The alarm goes off at 2:45 AM. Outside the refuge, the Patagonian wind is doing what it always does — testing every seam in the fabric, rattling the corrugated roof, making sleep impossible anyway. You dress in stages: base layer, fleece, softshell, hardshell. Tripod, camera bag, headlamp. You step outside into air that cuts.
By 4 AM you’re on the trail above Refugio Chileno. By 7 AM, having climbed the final forested switchbacks and the boulder moraine in darkness with 20 kilograms of camera gear, you’re sitting at the shore of the glacial tarn at the base of the Torres del Paine. The light is wrong. Clouds cover the peaks. Wind throws spray off the water. You wait.
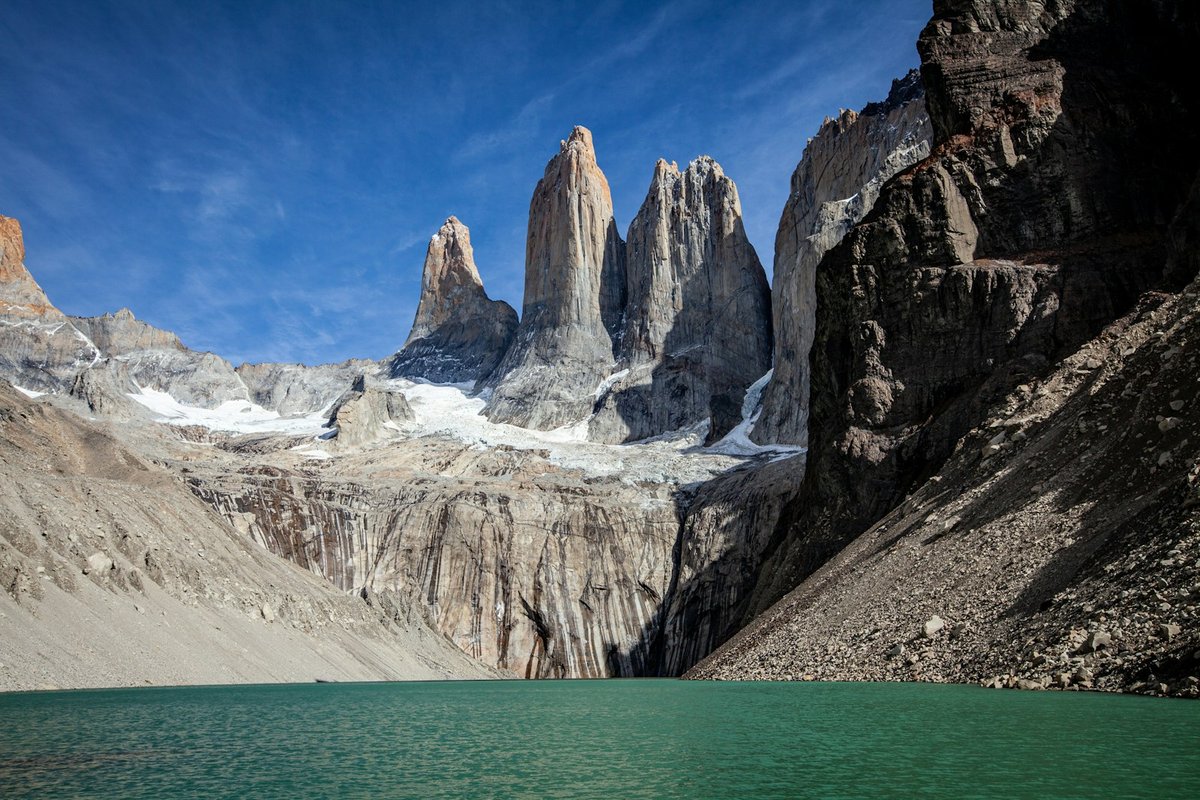
The three granite towers above the tarn at Mirador Base de las Torres — the reflection shot needs a rare calm-wind window, typically at first light. Photo: Mario La Pergola / Unsplash
At 8:14 AM, a 40-second gap in the cloud cover allows pale pink light to touch the uppermost meters of the three granite towers. You fire 60 frames. The cloud closes. You have something.
That is Torres del Paine. Not the postcard moment of perfect conditions and empty trails, but the negotiation between preparation and weather, between what you planned and what you got. The photographers who leave with extraordinary images are the ones who showed up on the bad days as reliably as the good ones.
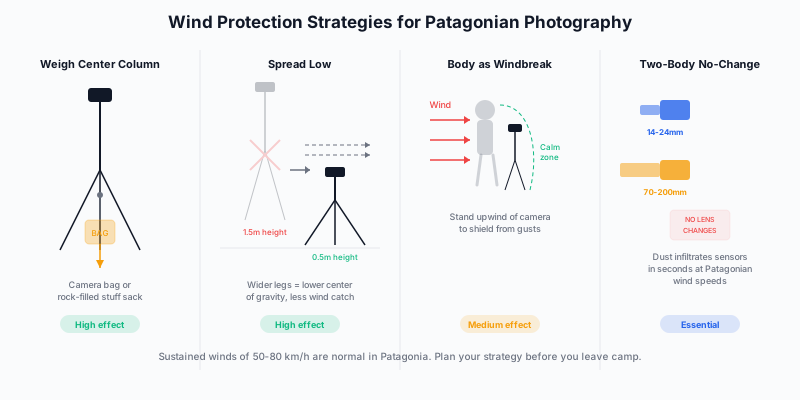
The wind in Torres del Paine doesn’t ask permission. It arrives without warning at 60, 70, 80 kilometers per hour, a physical force that doesn’t just shake your camera — it determines whether photography is possible at all. The first lesson every photographer learns in Patagonia is that the light, the location, and the conditions are all secondary to the wind. Manage the wind, and the rest follows.
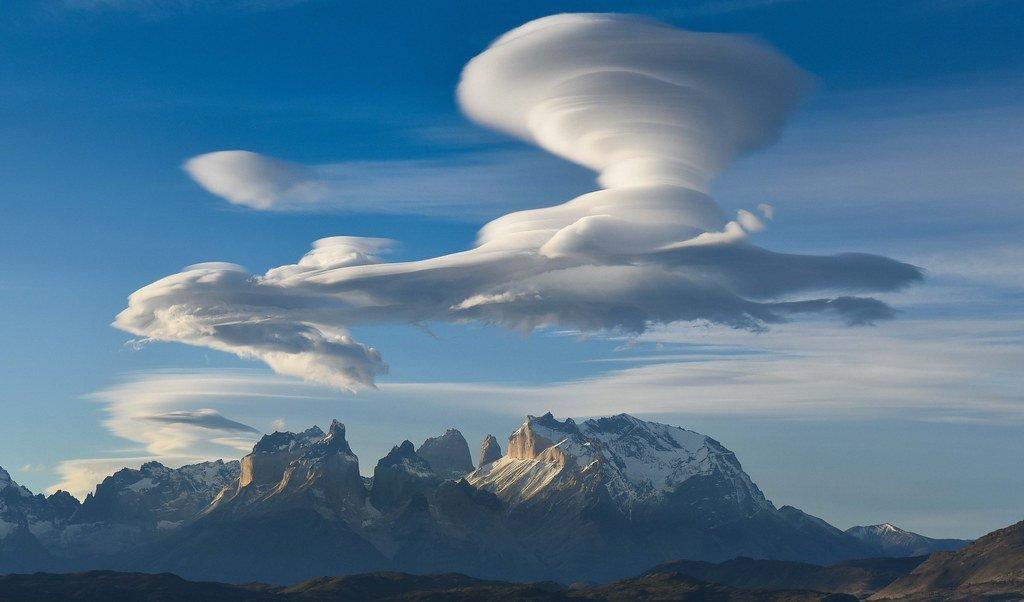
This is also what makes Patagonia extraordinary. The same force that challenges your technical preparation is what sculpts the landscape into the dramatic form you came to photograph. The clouds that streak across the sky at impossible speed, the waves that crash against the glacier’s face, the condors that ride the thermals with spread wings — all of this exists because of that wind. You don’t photograph Patagonia despite the weather. You photograph because of it.
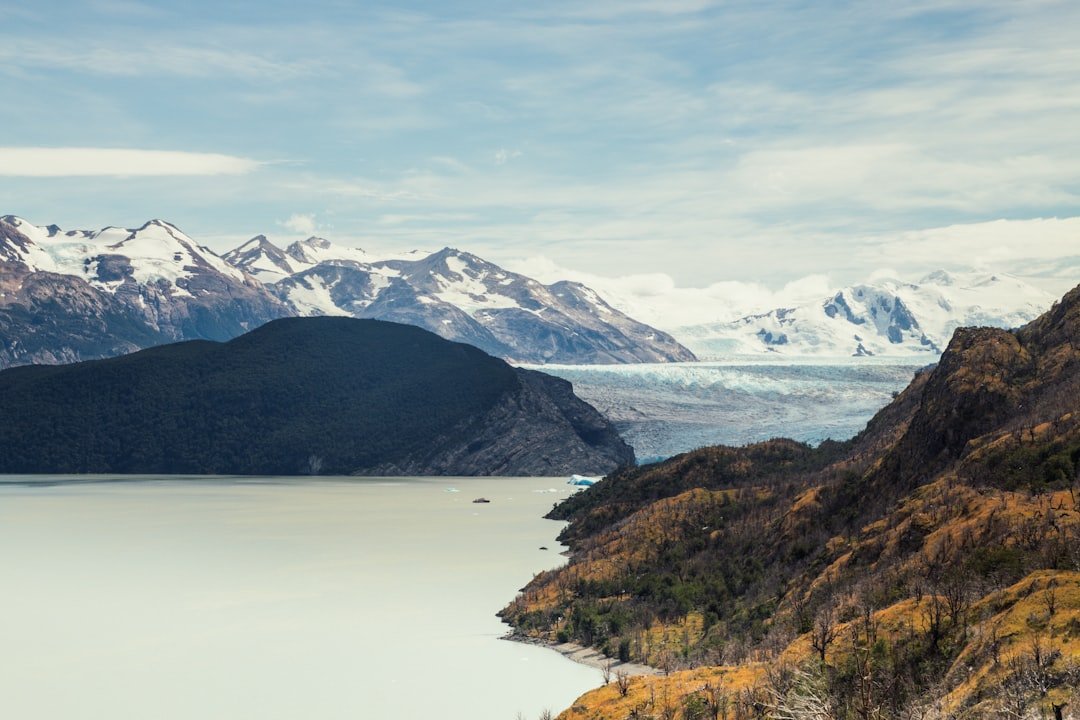
Grey Glacier — a polarizer reveals the ice’s blue tones; shoot from the lookout or kayak for different perspectives. Photo: Peter Conlan / Unsplash
Torres del Paine National Park in Chile’s Magallanes Region is the focal point of Patagonian landscape photography. The granite towers — carved by ice and weather into pillars whose summits reach 2,850 meters at Torre Sur — dominate the park’s northern skyline. The Cuernos del Paine (Horns of Paine), with their distinctive dark metamorphic caps on lighter granite, are visible from nearly every vantage point in the park. Glacial lakes — Lago Grey, Lago Pehoe, Nordenskjöld — frame the mountains with water that ranges from turquoise to deep cobalt depending on the light.
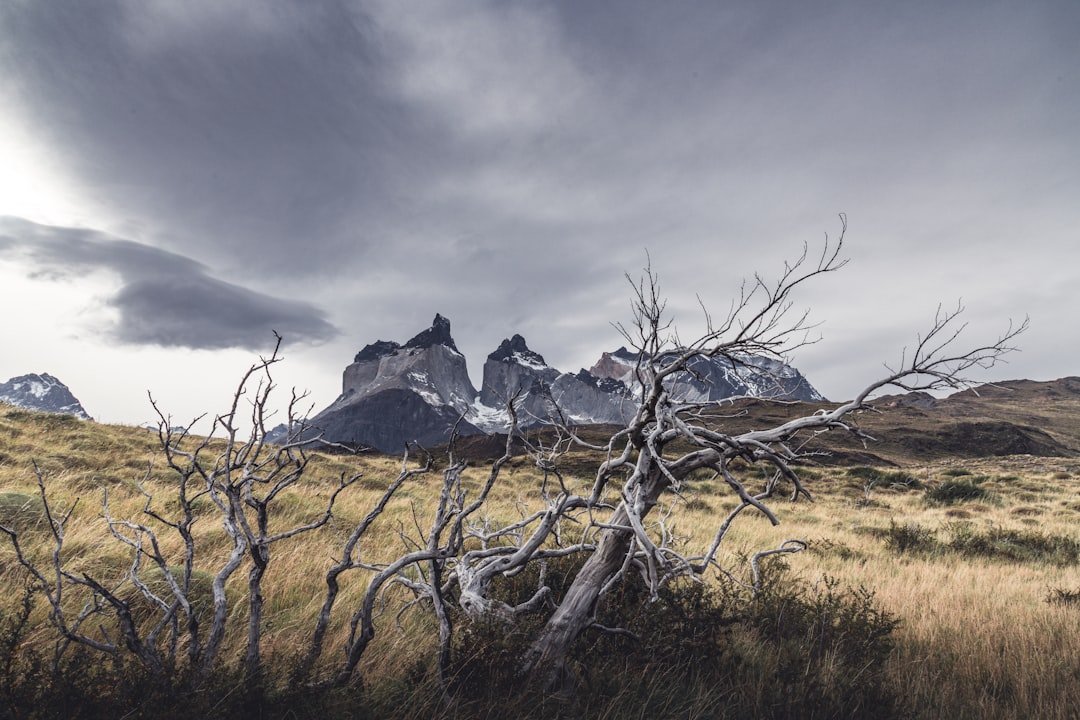
Cuernos del Paine over fire-killed lenga — Patagonian weather delivers dramatic cloud formations; embrace the storms rather than waiting for clear skies. Photo: Andrew Svk / Unsplash
This guide covers the park’s essential photographic locations, the seasonal strategy for maximizing your chances of success, and the practical logistics of a destination that demands more planning than most.
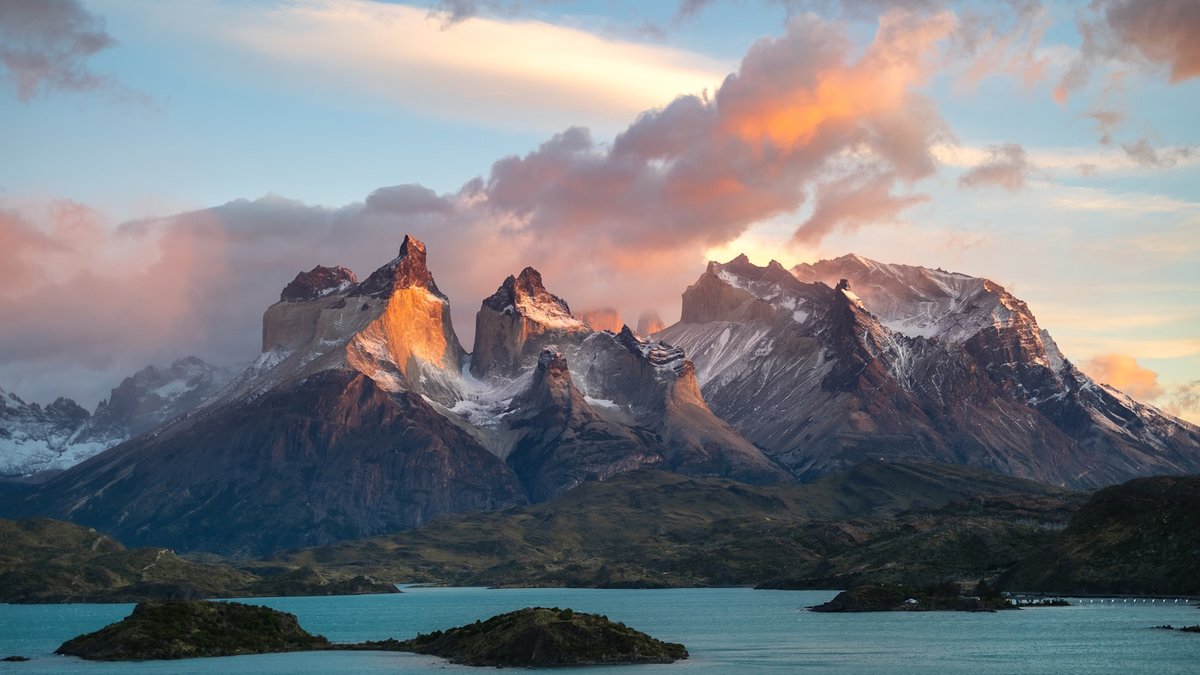
First light on the Cuernos above Lago Pehoé — color like this lasts minutes; have the composition ready before it arrives. Photo: Marek Piwnicki / Unsplash
Essential Photography Locations
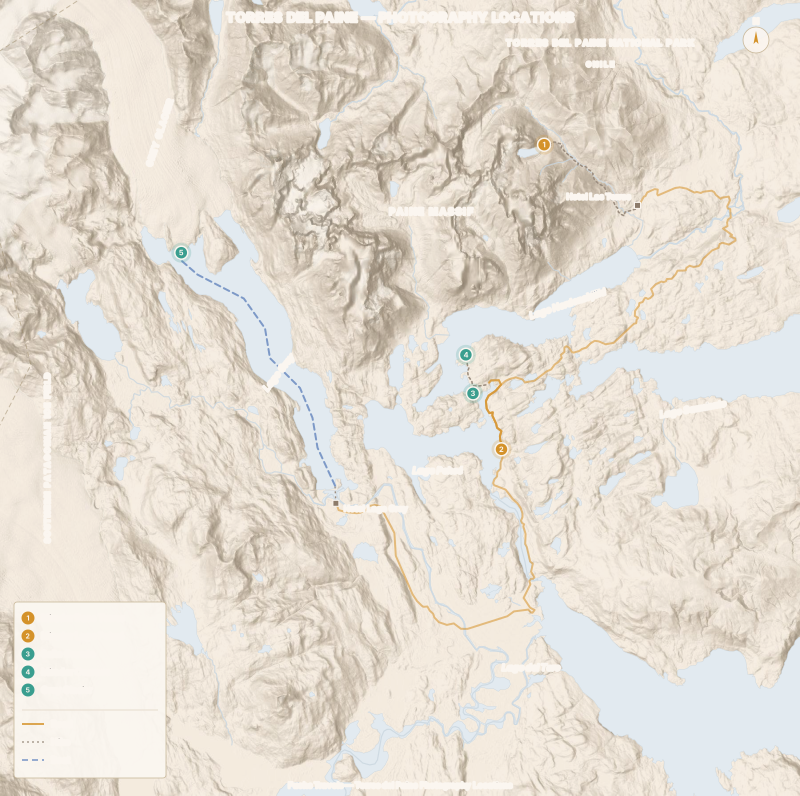
1. Mirador Base de Las Torres — The Pilgrimage
GPS: ●●.●●●●° S, ●●●.●●●●° W
Difficulty: Strenuous (8–10 hour round trip)
The three granite towers, reflected in the glacial tarn at their base, constitute one of the most powerful landscape compositions in photography. The tarn is formed by glacial runoff trapped in a rock basin, and it only holds still enough for clean reflections in the calm windows before sunrise.
The approach: The trail is officially closed at night and rangers enforce the hours — you can no longer start from the Hotel Las Torres trailhead at 3 AM. To photograph the towers at sunrise you must sleep at Refugio Chileno, the only point from which the pre-dawn climb to the mirador is permitted. Book it months in advance through Las Torres Patagonia; for serious photography it is non-negotiable — you’re in position at the tarn before any day hiker is allowed onto the trail.
Light: The towers face east. Direct light hits them at sunrise for approximately 45 minutes to an hour before the angle changes and the quality deteriorates. This is your window.
Wind at the tarn: Even on calm park days, the basin at the base of the towers can generate its own wind patterns. Arrive at the tarn 30 minutes before sunrise and assess conditions. If the water is choppy, position for foreground rocks rather than reflections.
Key settings for the towers:
| Condition | Shutter | ISO | Aperture | Notes |
|---|---|---|---|---|
| Pre-dawn blue | 10–30 sec | 400 | f/8 | Tripod, remote shutter |
| First light on towers | 1/30–1/60s | 200 | f/11 | GND filter for sky |
| Full sunrise | 1/125s | 100 | f/11 | Polarizer, reduce haze |
| Overcast (diffuse) | 1/30s | 400 | f/8 | Even detail, no drama |
2. Lago Pehoe — The Postcard View
GPS: ●●.●●●●° S, ●●●.●●●●° W
Difficulty: Easy (roadside access)
The view of Cuernos del Paine across Lago Pehoe is the park’s most accessible and most widely published composition. The turquoise glacial water in the foreground, the Cuernos’ dramatic silhouette, and the frequently dramatic sky above create a composition that works in almost any light.
Timing: Sunrise light hits the Cuernos from the east. The morning is the primary shooting window. By midday, the light flattens and the wind typically picks up. Late afternoon creates backlight that can work for silhouette compositions.
Foreground strategy: The eastern shore of Lago Pehoe has multiple positions. The most southerly position includes wind-bent lenga beech trees that serve as a framing device. The central position gives the cleanest reflection when the lake is calm. The northern position angles toward the Salto Grande waterfall connection.
When the lake isn’t calm: On windy days (most days), Lago Pehoe is too choppy for reflections. Shift to the compositional approach — strong sky, textured foreground water, the mountains as the subject rather than their reflection.
3. Salto Grande — The Waterfall Between Lakes
GPS: ●●.●●●●° S, ●●●.●●●●° W
Difficulty: Easy (short walk)
A powerful waterfall where Lago Nordenskjöld drains toward Lago Pehoe. The surrounding landscape of fire-scarred ghost forests (the result of a massive 2011 fire that burned 17,000 hectares of the park) creates an unusual compositional element — dead white trees against green hillsides.
Long exposure approach: The volume of water at Salto Grande makes it well-suited to long exposure treatment. 1–4 seconds at f/16 with a 6-stop ND creates the silk-water effect. Include the ghost forest trees in the composition for a uniquely Patagonian element.
Rainbow timing: Late morning on clear days creates rainbow potential in the spray. Angle depends on sun position — scout the approach path for the best alignment.
4. Mirador Cuernos
GPS: ●●.●●●●° S, ●●●.●●●●° W
Difficulty: Easy (short walk from the Salto Grande trailhead)
The Cuernos del Paine are visible from dozens of points around Lago Nordenskjöld — from the day-hike mirador beyond Salto Grande to the W Trek’s middle section. The most compositionally useful vantage points are:
- Mirador Cuernos (●●.●●●●° S, ●●●.●●●●° W): an easy 30–40 minute walk beyond Salto Grande, looking directly north at the horns across Lago Nordenskjöld. Best light: afternoon
- W Trek shoreline below Refugio Los Cuernos: lakeside boulders and wind-bent beech provide foreground structure
- W Trek viewpoint east of Refugio Los Cuernos (●●.●●●●° S, ●●●.●●●●° W): higher ground on the trail gives the full Cuernos silhouette against sky
What makes the Cuernos distinctive: The dark metamorphic cap on lighter granite towers was formed when ancient sedimentary rock was metamorphosed under heat and pressure and pushed upward by the granite intrusion below. The resulting layered geology photographs as a deliberate design — horizontal darkness atop vertical light.
5. Grey Glacier
GPS: ●●.●●●●° S, ●●●.●●●●° W
Difficulty: Moderate (boat access or 3-day trek from Paine Grande)
Lago Grey runs into the Grey Glacier, a 270 km² ice mass calving directly into the lake. Floating icebergs — some the size of small buildings — range from brilliant white to deep blue to almost black from embedded rock.
Boat access: Hotel Lago Grey operates the Grey III, a roughly three-hour navigation across Lago Grey to the glacier face (around CLP 110,000 / US$115 round trip; check in at the hotel, then walk across the Pingo river flats to the embarkation point). The boat approach allows photography from the water, showing the glacier face at eye level.
Ice photography: The same metering principles that apply to Iceland’s glacier lagoon apply here: overexpose by +1 to +1.3 EV to keep ice reading as white rather than gray. The Patagonian sky is frequently more dramatic than Iceland’s — high contrast between white ice and dark storm clouds is common.
Best timing: morning sun rakes across the calving front from the east, giving the ice its strongest texture and color — the day’s first navigation typically aligns with this window.
Patagonian Wind: Photography Strategy
Wind is the defining challenge of Torres del Paine photography. Sustained winds of 50–80 km/h are routine; gusts to 120 km/h occur regularly in spring and summer.
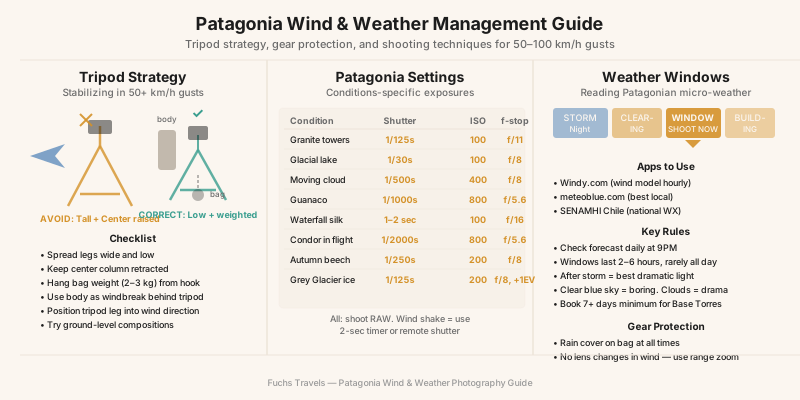
Tripod Strategy in High Wind
A standard tripod setup, at full extension, in 70 km/h wind, produces vibration that ruins long-exposure images. The solutions:
- Lower the tripod: Retract the center column completely. Drop the legs to the widest spread angle. This reduces leverage and significantly decreases wind-induced shake.
- Weight the tripod: Hang your camera bag from the center column hook. 3–5 kg of hanging weight dramatically reduces vibration.
- Use your body as a windbreak: Position your body between the wind and the camera. This is not elegance — it’s physics.
- Ground-level composition: When all else fails, place the camera directly on the ground, beanbag support, shooting upward. Not always the right composition, but always achievable in any wind.
Shutter Strategy for Wind
| Subject | Wind Condition | Shutter Strategy |
|---|---|---|
| Mountains, rocks | Any wind | Long exposure possible with stable tripod |
| Trees, grasses | Moderate wind | 1/250s+ to freeze motion |
| Clouds | High wind | 1/500s freezes streaks; 30s silks them |
| Condors | Any | 1/2000s minimum for wing detail |
| Guanacos | Calm | 1/500s; alert animals move fast |
| Wave spray | High wind | 1/1000s+ to freeze chaos |
The Shooting Schedule
Plan your day around wind patterns:
| Time | Typical Condition | Best Locations |
|---|---|---|
| Pre-dawn | Calm (often) | Base Torres tarn, Lago Pehoe |
| Sunrise (6–8 AM) | Light to moderate | All major viewpoints |
| Mid-morning (8–11 AM) | Wind building | Work quickly |
| Midday (11 AM–3 PM) | Peak wind | Shelter, rest, plan |
| Late afternoon (3–6 PM) | Often calming | Lago Pehoe, Cuernos |
| Sunset/dusk | Variable | Weather-dependent |
Seasonal Photography Calendar
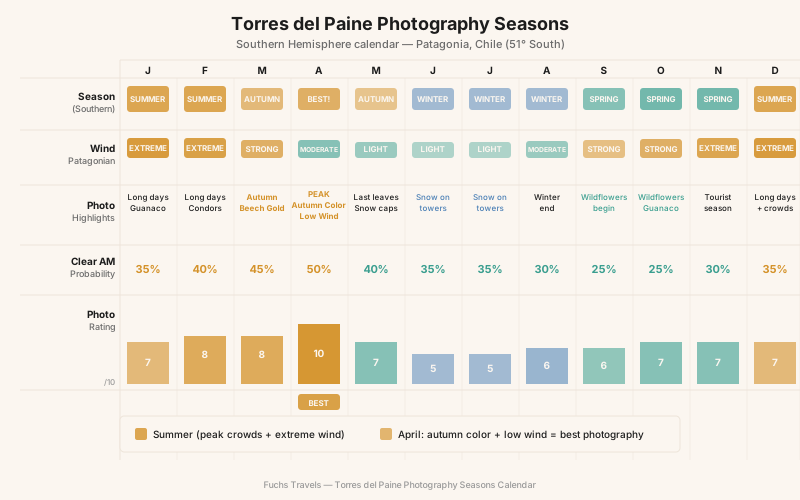
| Month | Season | Wind | Clear Sunrise % | Photo Rating |
|---|---|---|---|---|
| January | Peak summer | Extreme | 35% | 7/10 |
| February | Summer | Extreme | 40% | 8/10 |
| March | Early autumn | Strong | 45% | 8/10 |
| April | Autumn | Moderate | 50% | 10/10 |
| May | Autumn end | Light | 40% | 7/10 |
| June | Winter | Light | 35% | 5/10 |
| July | Winter | Light | 35% | 5/10 |
| August | Winter end | Moderate | 30% | 6/10 |
| September | Early spring | Strong | 25% | 6/10 |
| October | Spring | Strong | 25% | 7/10 |
| November | Late spring | Extreme | 30% | 7/10 |
| December | Early summer | Extreme | 35% | 7/10 |
April is the optimal month for Torres del Paine photography, for reasons that compound:
- The southern beech (lenga) forests turn gold and red — a color palette unique to Patagonia’s autumn
- Wind patterns are typically calmer than spring and summer
- The clear sunrise probability reaches its highest point (50%) of the year
- Tourist numbers drop significantly after summer crowds depart
- Snow begins to appear on the peaks, creating contrast against the autumn foliage
The combination of autumn color, lower wind, and better clear sky probability makes April the answer to the question “when should I go?”
Wildlife Photography Opportunities
Torres del Paine is not primarily a wildlife destination — but the wildlife here is both abundant and approachable.
Guanacos
The primary large mammal of Patagonian grasslands. Guanacos (relatives of the llama) are common throughout the park, particularly in the open pampa near the park entrance and around Lago Grey. They’re accustomed to vehicles and can be approached to 30–50 meters on foot with patience.
Settings: 200–400mm, 1/500–1/1000s (they move quickly when startled), f/5.6 for a clean background separation from the golden grassland.
Andean Condors
With a wingspan reaching 3 meters, condors are the park’s most spectacular aerial subject. They soar on thermals above the mountain faces, particularly around the Cuernos and near the Base Torres trail. Early morning and late afternoon are peak activity times.
Settings: 300–600mm, 1/2000s minimum, f/5.6–f/8. Track continuously — condors bank and shift direction constantly. Burst mode is essential.
Darwin’s Rheas
Large flightless birds (similar to ostriches) that occupy the pampa. They’re approachable, slow-moving, and provide an unusual wildlife/landscape subject.
Add-on option: Cerro Fitz Roy in Argentina’s Los Glaciares National Park is roughly a 6–7 hour drive from Puerto Natales including the border crossing — too far for a day trip, but worth adding 2–3 days on the El Calafate route.
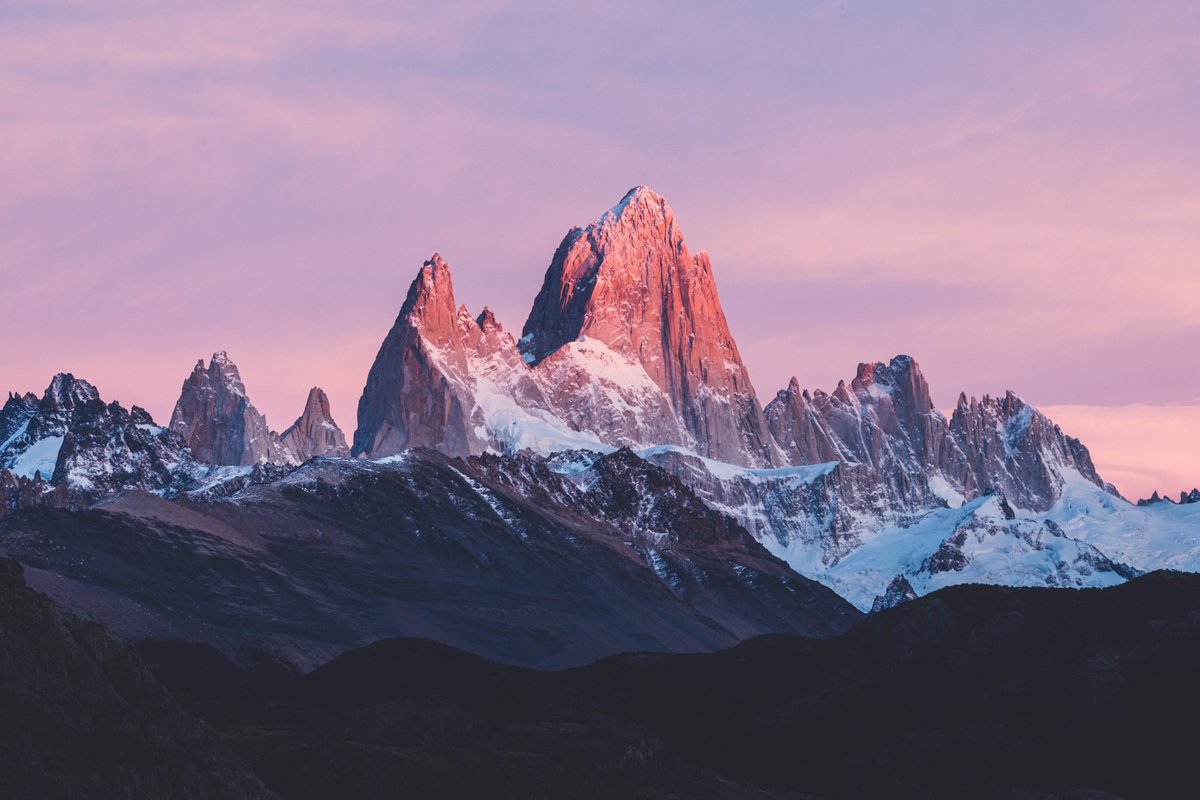
Dawn alpenglow on Fitz Roy in Argentina’s Los Glaciares — a full day’s travel from Torres del Paine, and worth the detour for the different mountain character. Photo: Andrew Svk / Unsplash
Drone Regulations
Drones are prohibited within Torres del Paine National Park. CONAF (Chile’s national parks authority) enforces this actively; fines are substantial and confiscation is possible. Any drone flight in Chile also requires registration with the DGAC (the civil aviation authority) — there is no casual, legal way to fly inside the park.
Drone alternatives:
- Areas outside park boundaries (estancia land near Puerto Natales, with the landowner’s permission and DGAC registration)
- Argentine Patagonia is not the workaround it’s often claimed to be: Argentine national parks law bans motorized overflight of protected areas, so Los Glaciares (Fitz Roy, Perito Moreno) is off-limits without an APN permit
- Commercial operations: CONAF issues permits for film productions and commercial work, but the process is lengthy and expensive
Logistics and Planning
Getting There
Flights: Puerto Natales has a small airport with limited connections. Most photographers fly to Punta Arenas (3-hour bus to Puerto Natales) or to El Calafate, Argentina (5-hour drive via Ruta 40 to Puerto Natales).
From El Calafate: This route passes Cerro Fitz Roy (Los Glaciares NP) — worth adding 2–3 days to photograph the Argentine side of the Andes.
Accommodation Strategy
| Option | Location | Best For | Notes |
|---|---|---|---|
| Hotel Lago Grey | Inside park | Grey Glacier access | 15 min drive to ice |
| Hotel Las Torres | Inside park | Base Torres trailhead access | Day hikes; sunrise needs Chileno |
| EcoCamp Patagonia | Inside park | Central access, eco focus | Geodesic domes |
| Refugio Chileno | On W Trek | Sunrise at Base Torres | The only permitted pre-dawn start; book months ahead |
| Puerto Natales hotels | Gateway town | Budget base | 2.5 hours to main viewpoints |
Refugios and campsites are run by two private concessionaires — Vertice Patagonia (Paine Grande, Grey, Dickson, Los Perros) and Las Torres Patagonia, formerly Fantástico Sur (Central, Chileno, Francés, Cuernos) — and confirmed reservations for every night inside the park are mandatory; rangers check them at trail checkpoints. High-season dates sell out months ahead, often within weeks of bookings opening.
Cost Estimate
| Expense | Daily Cost (USD) | Notes |
|---|---|---|
| Park entrance ticket | $35–50 | Foreigners: CLP 34,000 (up to 3 days) / CLP 48,500 (multi-day). Buy online in advance at pasesparques.cl — tickets are not sold at the gate |
| In-park accommodation | $80–250 | Refugios to lodges |
| External accommodation (Puerto Natales) | $40–120 | Budget to mid-range |
| Food (self-catering or refugio meals) | $30–60 | In-park meals are expensive |
| Transport to/from | $50–100 | Bus or shuttle |
| Grey Glacier boat (Grey III) | ~$115 | Round trip from Hotel Lago Grey |
| Daily total (inside park) | $200–400 | High-end travel |
The W Trek vs. Day Trips
Day trips (recommend for first-time photographers):
- Drive to optimal light each day
- Carry minimal weight
- Skip locations with poor weather
- Fresh clothes and charged batteries daily
Multi-day W Trek advantages:
- Access Base Torres for sunrise (essential)
- Multiple visits to the same locations in changing conditions
- Immersive, fewer day-trippers
The W Trek’s western half hinges on the Pehoé catamaran between Pudeto and Paine Grande (about 30 minutes) — the only non-hiking link to the Paine Grande sector. Book it ahead in high season and build the itinerary around its schedule.
Recommendation: 5–7 days minimum. Mix: 2–3 nights split between Hotel Las Torres and Refugio Chileno for Base Torres sunrise attempts, 2 days at Lago Grey / Pehoe area, 1–2 days of W Trek hiking.
Camera Settings for Patagonia Conditions
Patagonia presents technical challenges that demand deliberate settings strategy before you arrive at a location.
Extreme Contrast Management
The Patagonian landscape is frequently subject to extreme dynamic range — bright sky, dark mountains, reflective glacial water. Settings strategy:
| Scenario | Setting | Rationale |
|---|---|---|
| Towers against bright sky | Expose for highlights, recover shadows in post | Preserve detail in sky and ice |
| Glacial water reflection | Polarizer to reduce glare, f/8-f/11 | Maximize depth and control reflections |
| Overcast flat light | Expose to the right (ETTR) | Maximize shadow detail without noise |
| Sunset on Torres | Manual, bracket +/- 1 EV | Unpredictable light intensity |
Wind and Long Exposure
Long exposure photography in Patagonia requires understanding the wind’s effect on every element of the frame:
- Moving foreground: At 1/4 second, grasses and wildflowers will blur even slightly — decide if this is intentional
- Water: 1-3 second exposures on glacial lakes create silk when wind creates waves; too long and detail is lost
- Clouds: 30-second exposures in wind create dramatic motion streaks across peaks — pre-visualize the direction
High-Contrast Ice Metering
Grey Glacier and the floating icebergs on Lago Grey require careful exposure:
| Subject | Exposure Compensation | Notes |
|---|---|---|
| White/blue ice in overcast | +1.0 to +1.5 EV | Camera meters ice as grey |
| Ice against dark water | +0.5 to +1.0 EV | Balance histogram to right |
| Calving face in direct sun | -0.3 to 0 EV | Bright face needs no compensation |
Gear Recommendations
| Category | Item | Why It Matters in Patagonia |
|---|---|---|
| Camera | Sony a7R V, Nikon Z8 | Weather sealing, high DR for extreme contrast |
| Wide zoom | 16–35mm f/2.8 | Towers against sky, landscapes |
| Standard zoom | 24–70mm f/2.8 | Versatile, no lens changes in wind |
| Telephoto | 100–500mm | Condors, guanacos, glacier detail |
| Tripod | Gitzo GT3543 or RRS TVC-34 | Wind resistance is non-negotiable |
| Tripod hook | Always use | 3–5 kg of bag weight reduces shake |
| GND Filter | 3-stop soft | Sky 3–4 stops brighter than ground |
| ND Filter | 6-stop, 10-stop | Waterfall silk, cloud motion |
| Polarizer | Always carried | Glacier water color, sky saturation |
| Rain cover | F-stop ICU | Use it at ALL times |
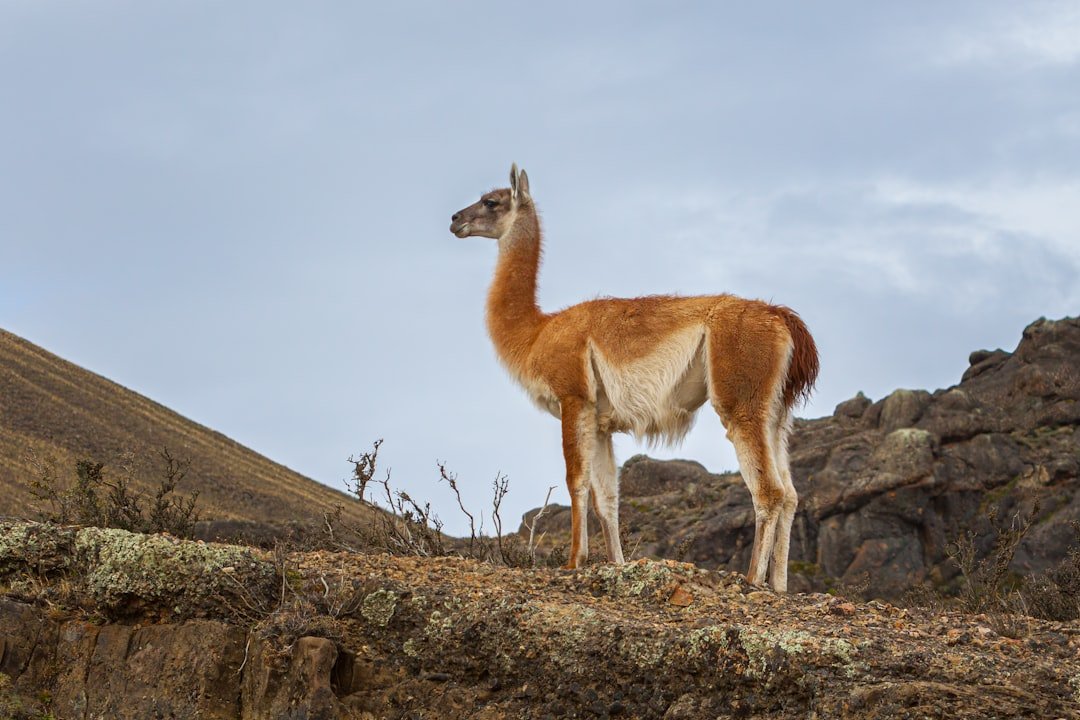
A guanaco on lookout duty in Torres del Paine — herds post sentinels on high ground; isolate the animal against sky or ridgeline at 200mm+. Photo: Chris Stenger / Unsplash
Field Exercises
Exercise 1: The Wind Exposure Test
Identify a location with a stable, fixed subject (rock face, mountain section). Shoot the same composition with: tripod at full height, tripod at half height, tripod at minimum height with bag weight, and camera on a beanbag on the ground. Compare sharpness in a 100% crop. This calibration tells you exactly how much height you can afford in any given wind condition.
Exercise 2: The Weather Window
Over 5 days in Torres del Paine, keep a log of conditions by hour: wind speed (estimate by observation), cloud cover, light quality, and what you were able to photograph. At the end of the trip, analyze the pattern. Most photographers will find a consistent 2–4 hour window each day where shooting is optimal. Identify it and build your schedule around it.
Exercise 3: The Same Mountain, Five Days
Commit to photographing the same peak (the towers, the Cuernos, or Lago Pehoe mountain) every single morning over a 5-day period. The accumulated series will contain one extraordinary image and four ordinary ones. Identifying which is extraordinary — and understanding why — is more valuable than exploring five different locations once each.
Exercise 4: The Autumn Color Isolation
If visiting in April, dedicate one half-day to photographing only the autumn beech colors — close-up detail, color patterns, leaves against sky — without any mountain peaks in the frame. The lenga beech transforms from green to gold to deep red in a compressed 3-week window, producing color that doesn’t appear anywhere else in the southern hemisphere.
Exercise 5: The Condor Wait
Choose a location with thermal activity (near the Cuernos or Base Torres approach) and wait. Don’t chase the condors — let them come to you. Set up a composition that includes the mountain context you want, and wait for the condor to enter it. This requires 30–90 minutes of patience and produces images that couldn’t be achieved any other way.
Conclusion
Patagonia is a destination where patience is not a virtue but a prerequisite. The mountain weather systems that produce the dramatic conditions you came to photograph will also thwart your plans repeatedly. The photographer who plans for 10 days and adapts daily will get the images. The one who plans for 3 days and expects reliable access to Base Torres at sunrise will come home disappointed.
Book more time than you think you need. Return to the same locations repeatedly. Photograph the conditions you have, not the conditions you planned for. The Patagonian light that breaks through after a two-day storm, raking golden across granite that’s still wet from the rain, cannot be planned. It can only be waited for.
That patience — the willingness to be present without expectation, to receive what the weather provides — is the actual subject of every photograph made here.
Plan the trip — Compare Patagonia month by month in the Seasons Planner, then read Packing Camera Gear for Expeditions for the wind and Wildlife & Bird Photography for condors and guanacos.