Introduction
Owning a 600mm lens makes you the person holding a 600mm lens. Making a photograph that stops a viewer cold—an eagle’s eye locked on yours, a leopard suspended in a fever tree, a puffin flaring its wings a heartbeat before touchdown—makes you a wildlife photographer. The gap between those two things is not money. It is craft: knowing how to hold the lens, how to command the autofocus, how to expose dark fur and white feathers, and above all how to get close enough that the animal behaves naturally.
This is the companion article to our wildlife destination guides—the Serengeti’s big cats, Svalbard’s polar bears, the mountain gorillas of Uganda and Rwanda, the grizzlies of coastal British Columbia, Bosque del Apache’s snow geese, the Galápagos, Borneo, the Pantanal. Those guides tell you where and when. This one tells you how. There are no shortcuts, but there is a clear path, and most of it has nothing to do with the price of your gear.
“The camera looks both ways. In picturing the subject, you are also picturing a part of yourself.” — Freeman Patterson
The Telephoto Reality: Reach, Support, and Shutter Speed
How much focal length you actually need
Wildlife photography lives between 400mm and 600mm on full-frame. Shorter than 400mm and you are cropping so aggressively that you throw away resolution; longer than 600mm and the lens becomes heavy, expensive, and unforgiving of technique. A 500mm or 600mm prime is the classic bird and safari tool, but the modern 100–400mm and 200–600mm zooms have quietly become the working professional’s default—one lens covering a herd-wide scene and a frame-filling head study without a lens change in the dust.
Reach is not only about the animal being small. It is about working distance—the room you leave between yourself and the subject. More focal length buys you more distance, and more distance means calmer, more natural behavior. The longest lens in the bag is often the most ethical one.
Teleconverters: the honest trade
A teleconverter multiplies focal length by sitting between lens and body, and the trade is real and non-negotiable. A 1.4x extender adds 40 percent reach and costs you one stop of light; a 2x doubles your reach and costs two stops. That f/4 lens becomes an f/5.6 with the 1.4x and an f/8 with the 2x. You also lose a measure of autofocus speed and a hair of sharpness.
The practical rule: a 1.4x on a high-quality prime, in good light, is almost free money and lives on the lens for whole trips. A 2x is a specialist tool—reach for it when the light is strong and the subject is static, and accept that flight shots will suffer. If you are shooting at f/8 in dim forest, no teleconverter will save the image; back it off and raise ISO instead.
Holding it steady: hand, monopod, beanbag, gimbal
| Support | Best for | Why |
|---|---|---|
| Handheld | Birds in flight, fast-changing action, stalking on foot | Total freedom of movement; modern stabilization makes it viable |
| Monopod | Long lenses on foot, hides, all-day carrying | Takes the weight, still allows quick panning |
| Beanbag | Vehicle windows and door frames on safari | Kills engine and body vibration; the safari secret weapon |
| Gimbal head | Heavy primes on a tripod, static wait-and-see | Lens floats weightless, tracks flight smoothly |
The single most useful piece of support kit in a game vehicle is not a tripod—it is a beanbag draped over the window ledge. On foot, a monopod carries a heavy prime all day and still lets you swing onto a bird. Reserve the tripod-and-gimbal setup for the hide, the perch you have pre-scouted, or the waterhole where you will sit for hours.
Learn your stabilization modes rather than leaving them on default. Image stabilization systems typically offer a general mode and a panning mode that disables correction along the direction of travel—essential for flight shots, where a full-correction mode fights your pan and smears the background unpredictably. And remember stabilization steadies your shake; it does nothing to freeze a moving animal. That job belongs to shutter speed.
Shutter speed: feather detail versus wing-blur intent
The old “one over focal length” rule (1/500s for a 500mm lens) is a floor for a static subject, not a target for a living one. Wildlife moves, and you are usually choosing between two goals: freeze every barb of a feather, or deliberately blur wings for motion.
| Situation | Shutter speed | Intent |
|---|---|---|
| Perched bird, resting mammal | 1/500 – 1/1000s | Sharp, but watch for head turns |
| Walking or grazing animal | 1/1000 – 1/1600s | Freeze the gait |
| Bird in flight, large and slow (heron, eagle) | 1/2000 – 1/2500s | Sharp wingtips |
| Bird in flight, small and fast (swallow, songbird) | 1/3200 – 1/4000s | Freeze rapid wingbeats |
| Running predator, breaching action | 1/2500 – 1/4000s | Freeze the moment |
| Intentional motion blur (panning) | 1/30 – 1/125s | Sharp eye, streaked wings and background |
Start faster than you think you need. A missed-focus frame at 1/4000s is recoverable next time; a motion-blurred once-in-a-trip moment is gone. The exception is the deliberate blur—a panned image at 1/60s with a pin-sharp eye and liquid wings is one of the hardest and most rewarding shots in the discipline, and worth practicing on common birds before you need it on rare ones.
Autofocus Mastery in the Subject-Detection Era
Modern mirrorless autofocus is the biggest leap wildlife photography has seen in a generation. Cameras now detect animal and bird bodies, faces, and eyes, and hold focus on them as they move across the frame. But the technology rewards photographers who understand it and punishes those who leave everything on automatic and hope.
Back-button focus: separate the two jobs
By default, your shutter button does two things at once—focus, then fire. Back-button focus moves focusing to a dedicated button on the rear of the camera (usually AF-ON) under your thumb, leaving the shutter to do nothing but release. This lets you hold focus on a subject, recompose freely, and fire without refocusing, then instantly re-acquire when the animal moves. It is the first thing most professionals change on a new body, and after a week it feels like the only sane way to work.
AF-area modes: spot, zone, or tracking
The most common autofocus mistake is using one AF-area mode for everything. The correct mode depends on how the subject is moving and—crucially—how busy the background is.
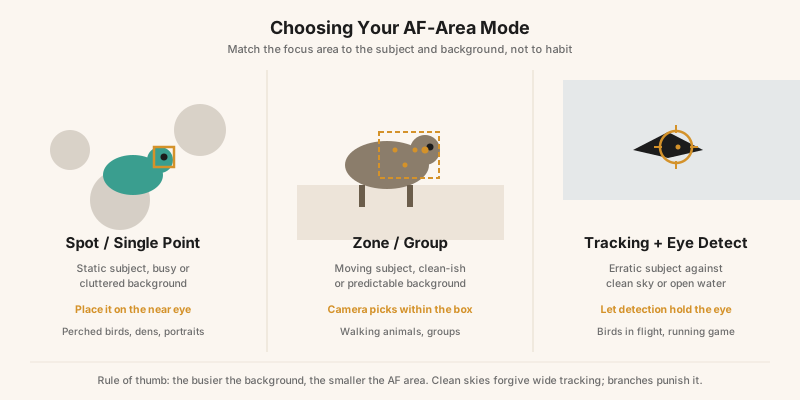
- Spot or single point for a static subject against a cluttered background—a bird perched among twigs, an animal at a den mouth. You place the point on the near eye yourself, because a wider area will grab the branch in front.
- Zone or group for a moving subject against a reasonably clean background. The camera chooses within the box, which keeps a walking animal sharp without you chasing it with a single point.
- Full tracking with subject detection for erratic movement against a clean sky or open water—birds in flight, running game. Let the eye-detection lock and follow; the clean background gives it nothing to grab by mistake.
The rule is simple: the busier the background, the smaller the AF area. Clean skies forgive wide tracking; a lattice of branches will punish it every time.
Pre-focusing perches, dens, and flight lines
Much of wildlife photography is not reaction but prediction. If a kingfisher returns to the same branch, or a bear works the same riffle, or gulls launch from the same ledge, focus there before the action. Set a single point on the spot, keep your thumb off the AF button, and fire the instant the subject arrives. Use your lens’s focus-limiting switch—the ring of settings that restricts the focus range (for example, 6m to infinity)—so the lens never hunts all the way to its closest setting when a bird flashes past. On a long lens against a distant subject, engaging the limiter can be the difference between nailing a flight sequence and watching the barrel rack helplessly.
Birds in flight: acquisition is everything
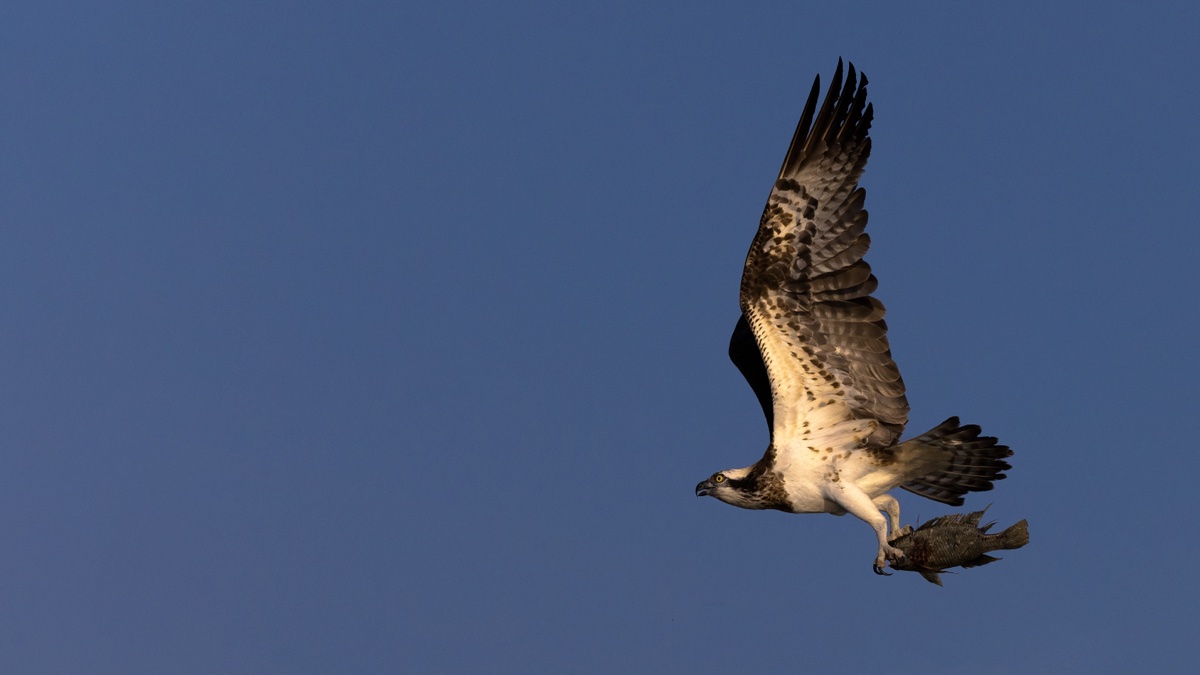
A clean sky is the friendliest background in bird photography — subject detection locks instantly with nothing to distract it. Photo: Sumeet Moghe / Wikimedia Commons (CC BY-SA 4.0)
Against a clean sky, flight photography has never been easier: continuous AF, subject detection, panning-mode stabilization, a shutter above 1/2000s, and a burst. The hard version is a bird flying against a busy background—a cliff, a treeline, a reedbed. There, detection can lose the bird to the clutter behind it. The technique is to acquire the subject while it is still against the open sky, lock tracking, and follow it down into the messy background so the camera never has to find it cold against the clutter. Practice the acquisition move on gulls at a harbor before you need it on eagles at a nest.
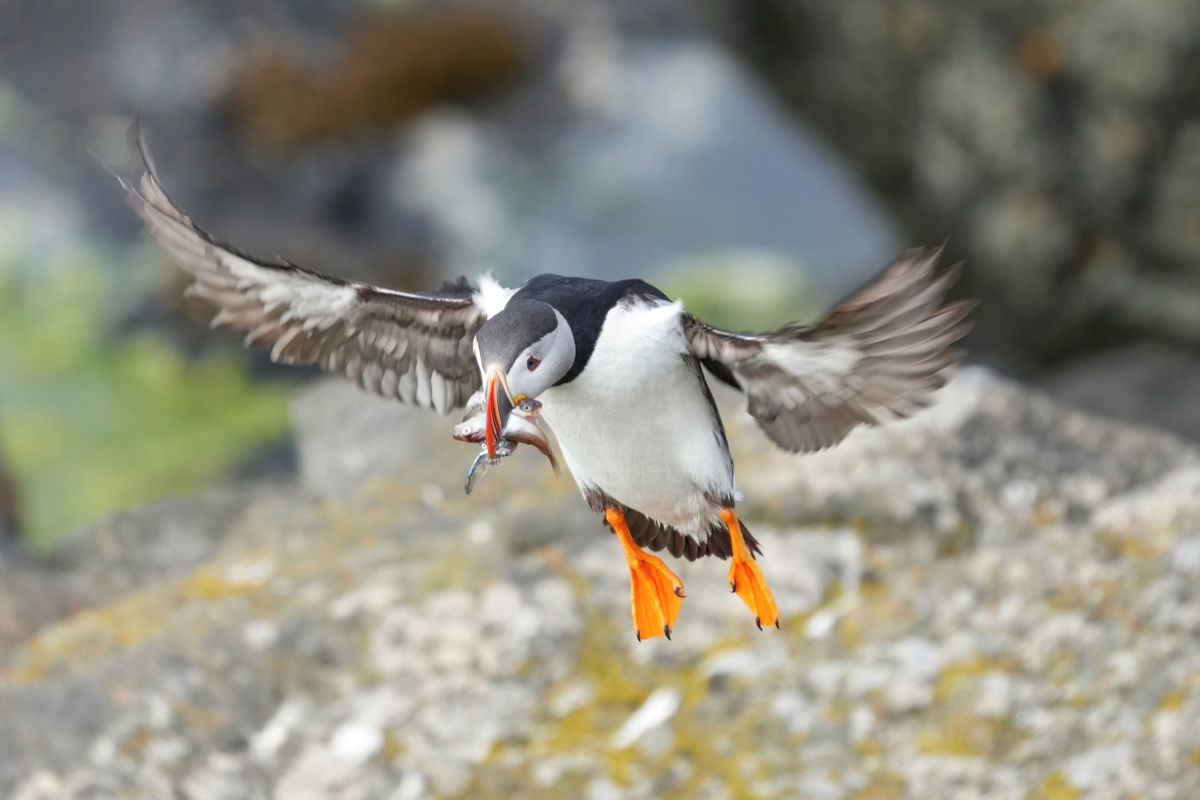
The landing moment against a busy cliff — acquired against the sky, tracked down, and timed to the flare. A shutter above 1/2000s freezes the wingtips. Photo: Giles Laurent / Wikimedia Commons (CC BY-SA 4.0)
The other flight skill is the pan itself—a smooth, continuous rotation from the hips that matches the bird’s speed, begun before you fire and carried through the burst like a golfer’s follow-through. Jerky panning is the most common cause of soft flight frames, more than autofocus ever is.
Exposure for Fur and Feather
Auto-ISO with manual shutter and aperture
Here is the working professional’s default exposure mode, and it surprises beginners: manual shutter and aperture, with Auto-ISO. You set the shutter speed you need to freeze the action and the aperture you need for depth of field, and let the camera float ISO to balance the exposure. Add exposure compensation and it shifts the ISO up or down while your creative settings stay locked. In changing light—a bird flying from shadowed forest into open sky—this keeps the shutter fast and the depth right while the camera handles the brightness. It is the mode that lets you think about the animal instead of the meter.
The compensation cheat sheet
Your camera’s meter is trying to render everything as mid-grey. That is fine for a lion but disastrous for a raven or an egret—the meter will brighten black feathers to grey and darken white ones to grey, and both are wrong. You override it with exposure compensation according to the tone of the subject.
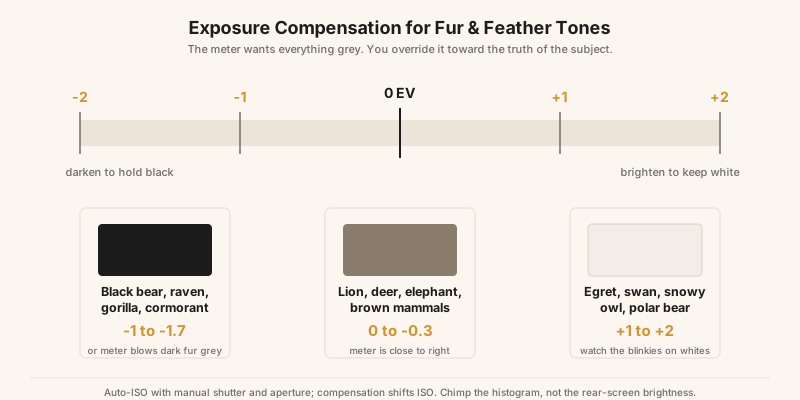
| Subject tone | Examples | Compensation |
|---|---|---|
| Very dark | Black bear, raven, gorilla, cormorant | −1 to −1.7 EV |
| Mid-tone | Lion, deer, elephant, most brown mammals | 0 to −0.3 EV |
| Bright / white | Egret, swan, snowy owl, polar bear | +1 to +2 EV |
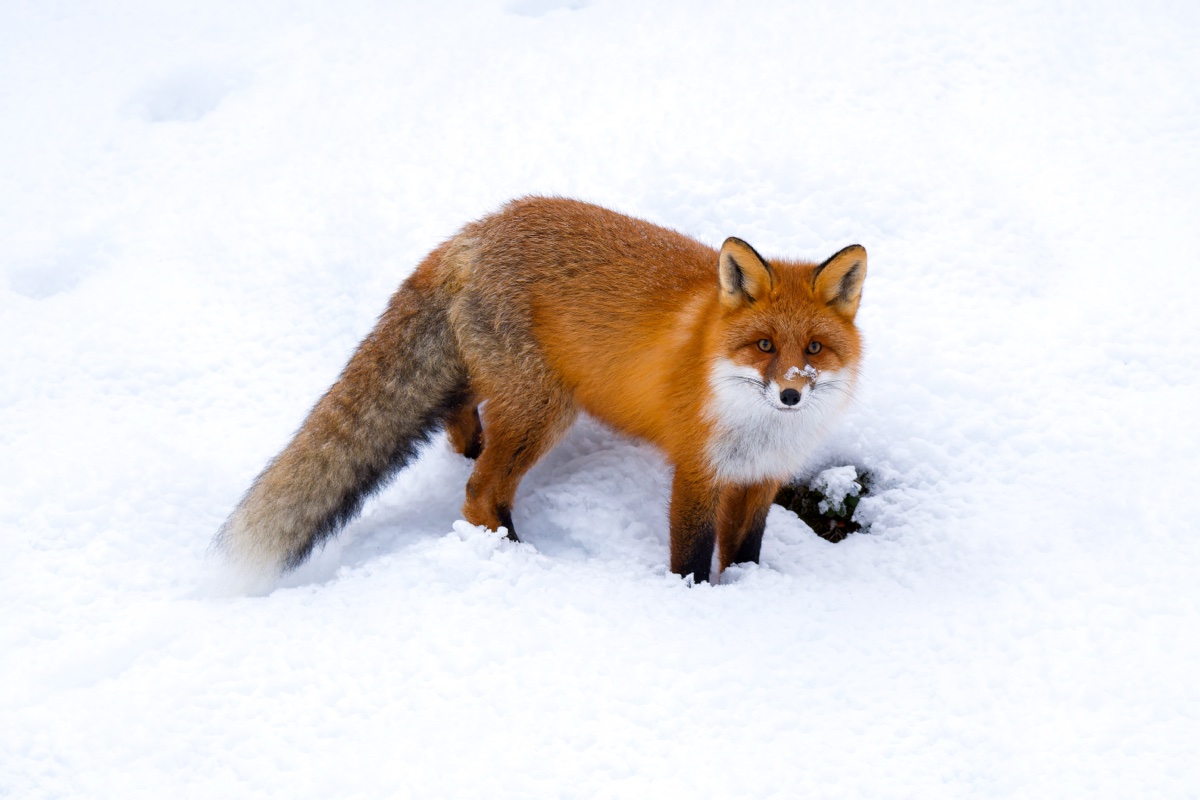
Snow fools the meter into underexposure — dial in +1 to +2 EV or the white goes muddy grey and the fox’s coat goes dark. Photo: ClaudiaTen / Wikimedia Commons (CC BY-SA 4.0)
Judge the result on the histogram, not the brightness of the rear screen, which lies to you in bright field conditions. For white birds, push the exposure as far right as you can without the highlight-warning “blinkies” flashing on the brightest feathers—that preserves the most tonal information while keeping the whites from clipping to featureless paper.
RAW headroom is your safety net
Shoot RAW, always, in wildlife. A RAW file holds far more recoverable detail in shadows and highlights than a JPEG, which means a frame that is half a stop off—because the animal moved into sun as you fired—is still fully rescuable. The discipline is to expose for the highlights you cannot recover (bright feathers, sky) and lift the shadows later. A blown white wingtip is gone forever; a dark belly is a slider move in processing.
Reading Light in the Wild
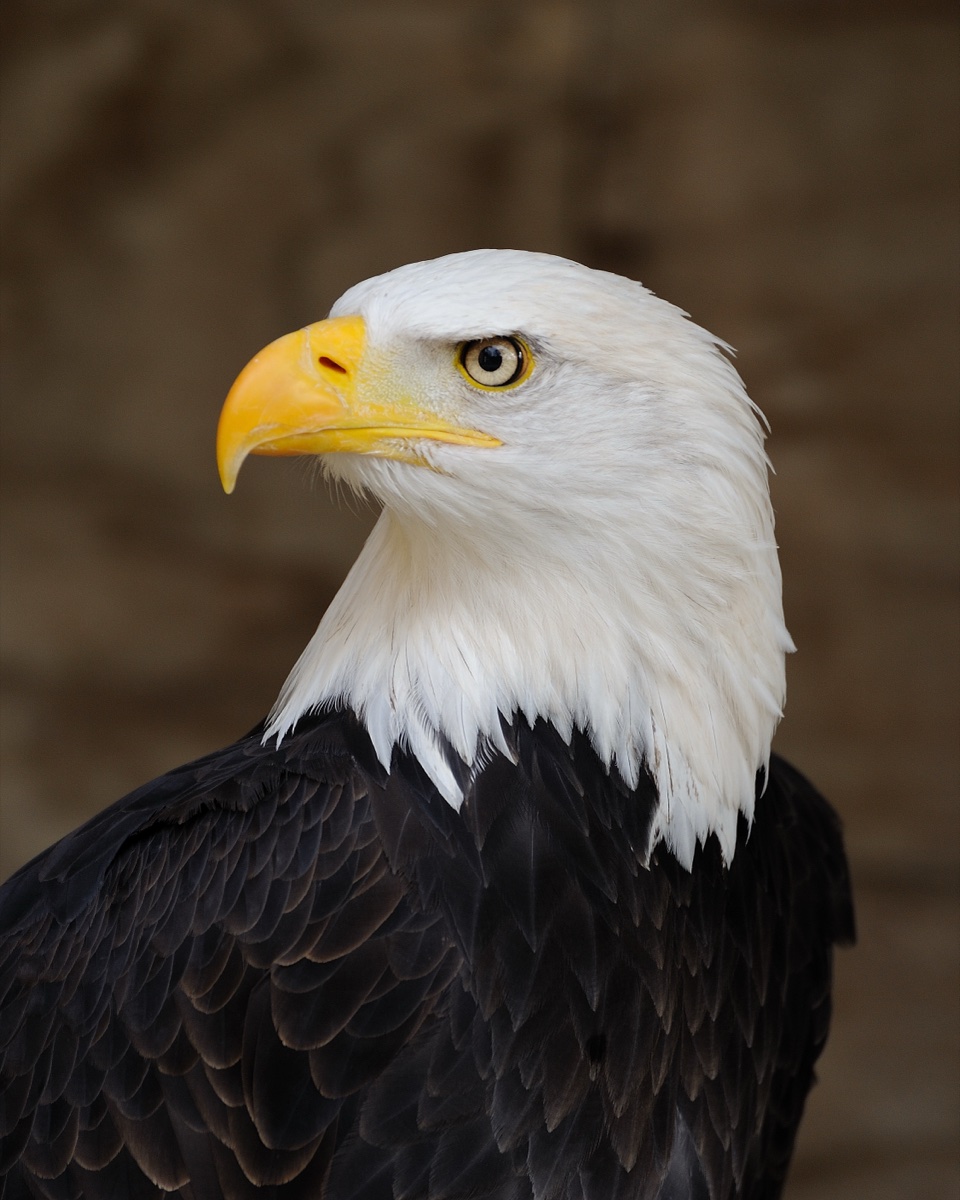
Front light and a clean catchlight bring a portrait to life; here it also reveals the fine structure of white head feathers without clipping them. Photo: Saffron Blaze / Wikimedia Commons (CC BY-SA 3.0)
Front light—the sun behind you, over your shoulder—is the safest wildlife light: it illuminates the eye, fills the catchlight, and renders feather and fur detail evenly. It is where you start.
Backlight—shooting into a low sun—is the advanced, atmospheric light: it rims an animal’s fur in gold, lights the breath of a bugling elk or a lion in cold air, and turns dust and spray into glowing halos. It demands more exposure care (spot-meter the subject, accept a darker background) but produces the images that win competitions.
Overcast is the fur-and-feather friend. A bright grey sky is a giant softbox that wraps the subject in even, shadowless light, holds detail in both black and white plumage at once, and saturates color. Many bird photographers prefer an overcast day to harsh sun. Do not pack up because the sun did not show.
Golden hour matters twice over in wildlife, because the best light overlaps with the most active behavior—dawn and dusk are when animals feed, hunt, and move. The photographer who is in position at first light gets both the light and the action. Finally, make peace with high ISO. A sharp, well-composed frame at ISO 6400 with some noise beats a clean, empty frame of the branch the animal just left. Noise is a minor, fixable problem; a missed moment is permanent. Modern sensors and noise reduction have made ISO 6400 and beyond entirely publishable.
Fieldcraft: Getting Close the Right Way
Gear gets you sharp; fieldcraft gets you close, and close-with-natural-behavior is the whole game. This is the part no one can sell you.
The oblique approach
Never walk straight at an animal. A direct line reads as a predator’s stalk and triggers flight. Instead move on a diagonal, low and slow, pausing often, never making eye contact, angling gradually nearer as though you are going somewhere else. Read the animal at every pause.
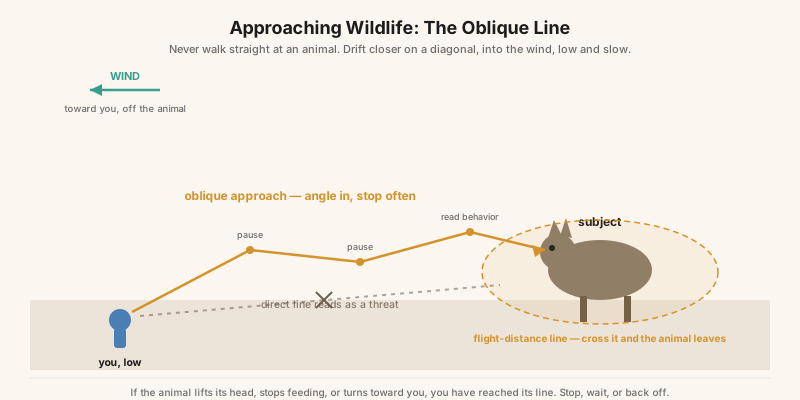
Mind the wind. Most mammals live in a world of scent, and if the wind carries your smell to the animal it will leave long before you are in range—keep the wind in your face so your scent blows away behind you. And respect the flight-distance line: every animal has a radius inside which it will not tolerate you. The art is to work right at the edge of that line, not to cross it. If the animal lifts its head, stops feeding, or turns toward you, you have found the line. Stop, wait, or back off.
The vehicle and the hide
On safari, the vehicle is your blind. Animals habituated to game vehicles treat them as neutral, non-threatening shapes—but that spell breaks the instant a human silhouette stands up and separates from the vehicle’s outline. Stay low, stay inside, shoot from the window on a beanbag, and cut the engine.
A hide or blind—a fixed structure at a waterhole, a floating hide on a lake, a portable pop-up at a lek—lets you disappear entirely and let the wildlife come to you. It is the opposite philosophy to stalking and often the more productive one.
Sit-and-wait versus stalk
There are two ways to make a close image: go to the animal (stalk) or let the animal come to you (sit-and-wait). Beginners almost always stalk, because sitting feels like doing nothing. But the sit-and-wait photographer, parked at a known perch or waterhole, gets relaxed subjects doing natural things, while the stalker mostly gets alert animals about to flee. When you have found a place animals reliably use, the hardest and most valuable thing you can do is stay put.
Reading behavior: predicting the moment
Great wildlife images are usually made a half-second before the peak, which means you have to predict the peak. Animals telegraph their intentions constantly if you learn the signals.
| You see… | It often precedes… |
|---|---|
| A bird preening, then stretching one wing and leg | Takeoff — get on it and pre-focus |
| A perched raptor defecating or leaning forward | Launch within seconds |
| A big cat yawning and stretching | The end of a rest — activity is coming |
| Ears pinned back, tail flicking (cats and elephants) | Agitation — respect it and back off |
| A predator’s fixed, lowered stare | A stalk or charge — be ready |
| Herd animals suddenly alert, all facing one way | A predator nearby — point your lens where they look |
Learning even a handful of these turns you from someone who photographs what already happened into someone who is ready when it does.
The patience economy
Be honest with yourself about the numbers. A serious wildlife session can be hours of watching for a few seconds of photography, and a strong trip might yield a handful of truly portfolio images from thousands of frames. The keeper rate is low for everyone, including the professionals whose work you admire—they simply put in more hours and cull more ruthlessly. Patience is not a personality trait here; it is the technique. The photographer who waits an extra forty minutes at the den gets the shot the one who left at golden hour never will.
Composition for Wildlife
Get low: the eye-level revolution
The fastest way to transform your wildlife photography costs nothing: get down to the animal’s eye level. Shooting down at a subject from standing height makes it look small and detached, with a compressed, cluttered background. Drop to the ground—kneel, lie prone, lower the vehicle window to the sill—and you enter the animal’s world, throwing the foreground and background into a soft wash and giving the subject presence and dignity. Eye level is why the fox on the snow above holds your gaze; a shot taken from standing would have been a snapshot.
Headroom, look room, and negative space
Give the subject somewhere to look. Leave more space in the direction the animal is facing or moving (look room) than behind it, so the frame feels balanced rather than crowded against an edge. Resist the urge to fill every frame; a small animal in a large, clean space—negative space—can be far more powerful than a frame-filling portrait, telling a story of scale and habitat. Alternate deliberately between the environmental wide that places the animal in its world and the frame-filling portrait that reveals its character.
Backgrounds are the real skill
Amateurs photograph the animal; professionals photograph the animal and the background. A distracting background—a bright branch, a hot spot of sky, a tangle of twigs behind the head—ruins an otherwise perfect subject. The fix is rarely in processing; it is in shooting angle. Move a metre left, drop lower, or wait for the animal to step forward, and a clean, distant, softly blurred background falls into place behind it. Training yourself to see the background before you press the shutter is what separates competent wildlife work from extraordinary wildlife work.
Catchlights
The small reflection of light in an animal’s eye—the catchlight—is what makes a subject look alive rather than taxidermied. Position yourself so the eye catches the light; without it, even a technically perfect portrait feels dead. On an overcast day the whole bright sky can serve as a catchlight; in a forest you may need to wait for the animal to turn its head into a shaft of light. It is a tiny detail that decides whether a portrait works.
Burst Discipline and the Cull
Modern cameras shoot 20 frames per second and beyond, which is a gift for peak action and a trap for everyone. Machine-gunning a static bird fills your card, drains your battery, overruns the buffer at the exact moment real action starts, and buries you in an unwinnable culling job. Fire in short, purposeful bursts timed to the moment—the wings coming up, the leap, the shake—not a continuous barrage from the second you raise the camera. Learn your buffer depth and let it clear before the action peaks.
Then cull ruthlessly, and cull in passes. On the first pass, move fast and reject only the obvious failures—eyes shut, out of focus, empty frames, clipped wings. On the second pass, among the technically sharp frames, choose the single best gesture: the peak wing position, the direct gaze, the one moment of connection. From a burst of thirty flight frames you keep one, occasionally two. The willingness to delete good-but-not-best frames is a professional habit, and it makes your portfolio—and your storage—immeasurably stronger.
Ethics as Craft
In wildlife photography, ethics and good technique are the same thing. A stressed animal makes a worse picture: it flees, it stares in alarm, it abandons natural behavior. A calm animal at a respectful distance gives you everything. Distance is not a limitation on the photograph; it is what makes the photograph possible.
The rules are not complicated. Do not bait predators or use call playback to lure them—it alters behavior and can put both animal and people at risk. Keep well back from nests and dens; a parent kept off eggs or a den entrance by your presence can lose a brood, and no image is worth that. Do not fly a drone at wildlife—the sound and shadow of a drone reads as an aerial predator and causes panic, stampedes, and nest abandonment, which is why drones are banned outright across most national parks and reserves. And respect the specific rules your destination sets, because they exist for reasons researchers have measured: Svalbard’s legally mandated polar-bear distances, the roughly 7-to-10-metre minimum-distance rule (and masks) at the gorilla parks, the marked approach limits in the Galápagos. Follow the local rules to the letter—they are not bureaucracy, they are field-tested welfare science, and they consistently produce better behavior and therefore better photographs.
Gear Reality Check
You do not need the newest flagship and a $13,000 prime to make strong wildlife images. A few honest observations:
- The used telephoto market is your friend. A previous-generation 500mm or 150–600mm zoom, bought used, delivers the vast majority of a new lens’s performance for a fraction of the price. Glass ages slowly; a well-kept lens from several years ago is still excellent.
- Crop-sensor bodies buy reach. An APS-C or Micro Four Thirds body multiplies your effective focal length (roughly 1.5x and 2x respectively), turning a 400mm lens into a 600mm-equivalent field of view. For subject size at distance, a crop body with a modest lens can out-reach a full-frame body with the same lens—a genuinely economical path to frame-filling birds.
- Rent for the trip. If you travel to serious wildlife once or twice a year, renting a 600mm prime for the week costs a small fraction of owning one and gets you the best glass exactly when you need it. Rent, shoot, return; own the versatile zoom you use year-round.
For a deeper breakdown of specific bodies, lenses, and teleconverters, see our forthcoming telephoto buyer’s guide. The short version: prioritize autofocus performance and reach over megapixels, buy the best glass you can (used counts), and spend the savings on being in the field more often. Time in the field beats gear every single time.
Field Exercises
- The pan drill. Find common birds in flight—gulls, pigeons, ducks. Set 1/2000s and practice smooth hip-rotation panning until you can hold a bird in the same part of the frame through a full burst. Then drop to 1/60s and attempt the motion-blur version: a sharp eye, streaked wings. Expect a 1-in-40 keeper rate at first.
- The background hunt. Photograph one accessible subject—a park duck, a backyard squirrel—from five different positions, changing only your angle and height to clean up the background. Compare the five frames and identify which shooting position gave the cleanest, most distant backdrop.
- The tone test. Photograph something very dark and something very white on the same outing. Nail each exposure using compensation and the histogram, holding detail in the black without a muddy grey, and in the white without clipped highlights.
- The sit. Choose one spot animals reliably use—a feeder, a shoreline, a den you already know—and stay there, still and quiet, for a full ninety minutes. Photograph only natural behavior that comes to you. Notice how much more relaxed the subjects are than anything you have stalked.
- The eye-level session. Spend an entire session shooting from the ground—prone, elbows down, camera at the subject’s eye height. Compare the results to your standing-height snapshots and let the difference retrain your instinct.
Conclusion
Wildlife photography is the discipline where technique and patience matter more than money, and where the camera is the smallest part of the equation. The photographers whose work stops you—on a gallery wall, in a magazine, in a competition—are not the ones with the most expensive gear. They are the ones who learned to command their autofocus, expose fur and feather correctly, read an animal’s next move, and above all get close the right way, on the animal’s terms, at its eye level, with the wind in their face.
That craft is portable. It works on a leopard in a fever tree, a puffin flaring to land, a fox on fresh snow, an eagle turning its head into the light. Master it near home on the common birds and mammals that surround you—the park geese, the backyard fox, the harbor gulls—and you will arrive in the Serengeti or Svalbard or the Pantanal already fluent, ready to spend your rare hours there making photographs instead of learning fundamentals. Get low, move slow, wait longer than feels reasonable, and respect the animal above the image. The extraordinary frames follow.
Put it to work — Use this fieldcraft for condors and guanacos in the Torres del Paine guide.