The Philosophy: Protection vs. Accessibility vs. Weight
Every packing decision involves trade-offs:
Protection: Fragile equipment must survive baggage handling, weather, and adventure
Accessibility: Gear you can’t reach quickly is gear you won’t use
Weight: Every kilogram matters on long hikes and airline restrictions
Choosing the Right Bag System
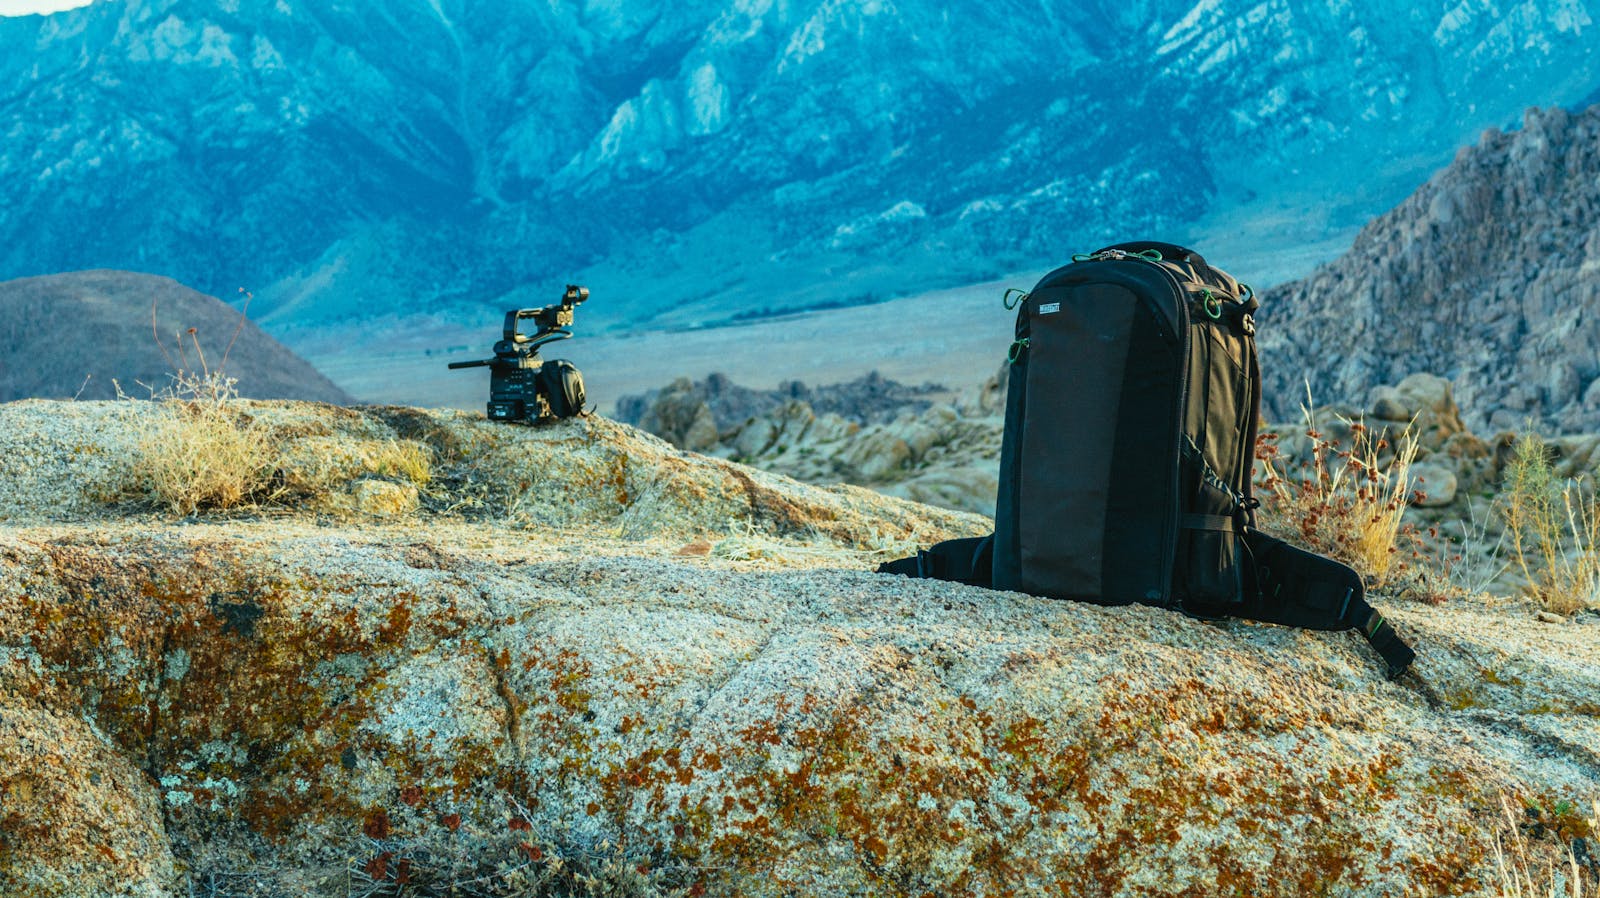
A bag system is the chassis of your kit — get it wrong and every other piece of gear pays the cost
Your bag system is the single most important investment after the camera itself. Cheap bags destroy expensive gear. These are the flagships that working expedition photographers actually use.
Rolling Airport Bags — For Getting There
When flying with expensive glass, a roller designed specifically for camera gear is the professional choice. It goes in the overhead bin, never in the hold, and is built to survive the reality of airport use.
Think Tank Photo Airport Security V3 is the gold standard. Built-in TSA-approved combination lock, ballistic nylon exterior, and a rolling design that fits in virtually every commercial overhead bin worldwide. It holds 2–3 camera bodies, 6–8 lenses, a 15” laptop, and enough accessories for a two-week expedition. The interior is fully customizable with dividers. If you are taking expensive prime glass on an international flight, this is what goes in the overhead.
Think Tank Airport International V3 is the larger sibling — slightly bigger, same build quality, better for kits with longer telephoto glass. Check regional overhead bin restrictions before flying on smaller aircraft.
Peak Design Pro Roller 45L is the newer challenger — 45 litres, weatherproof 400D nylon exterior, MagLatch closure system, and the same thoughtful design language as the rest of Peak Design’s line. It expands when checked, compresses for carry-on. Excellent organization for photographers who also need to carry personal clothing.
Camera Backpacks — For Moving in the Field
A rolling bag gets you to the location. A backpack gets you to the shot.
F-Stop Tilopa 50L is the expedition backpack for photographers who actually hike. The modular ICU (Internal Camera Unit) system means the camera gear lives in a removable padded insert inside a real hiking pack. Swap the ICU for overnight gear on multi-day treks; the bag carries either role competently. Fits camera gear equivalent to a 70-200 f/2.8 and two additional primes alongside overnight layers. The Tilopa is built to MOLLE spec and carries like a proper mountaineering pack.
F-Stop Ajna is the smaller sibling — day-hike capacity, same ICU system, better for lighter one-body-two-lens kits. Ideal for photographers who aren’t sleeping out but are covering serious vertical terrain.
Think Tank Photo BackLight 35L solves the airport security problem elegantly: the camera compartment opens from the back panel, meaning you can access all your gear without removing the bag from your back in a crowd. The 35L capacity fits a full mirrorless kit plus personal items. Built-in rain cover, TSA-compliant laptop compartment.
Shimoda Explore 60 — for expeditions where you are carrying more kit than you thought possible. 60 litres, modular Core Unit insert system similar to F-Stop, bombproof build quality. Favoured by photographers working in genuinely remote environments.
Internal Camera Units (ICUs) — The Modular Approach
The ICU system separates camera protection from bag ergonomics. You choose the best hiking pack for your terrain, then insert a purpose-built padded camera unit.
F-Stop ICU range: available in Small, Medium, Large, and X-Large. The X-Large fits a pro body with 70-200 attached, plus four additional lenses. Snap the ICU into any F-Stop bag, or adapt it to third-party packs with the ICU Adapter.
Shimoda Core Units: similarly excellent, with colour-coded size options. The Action X range integrates them particularly well.
Peak Design Camera Cubes: designed for the Peak Design Travel Backpack ecosystem. Smaller capacity than F-Stop, but the packaging system is genuinely clever for photographers who also travel with non-camera luggage.
The Hybrid System (Recommended for Expeditions)
For any expedition longer than three days:
- Airport roller (Think Tank Airport Security V3 or Peak Design Pro Roller) for the flight — everything valuable in the overhead
- F-Stop or Shimoda backpack with ICU for field days — hike-ready, camera-ready, weather-ready
- Small shoulder bag or sling (Peak Design Sling or Think Tank Retrospective) for vehicle transfers and city days when you want fast access without a full pack
Packing Strategies
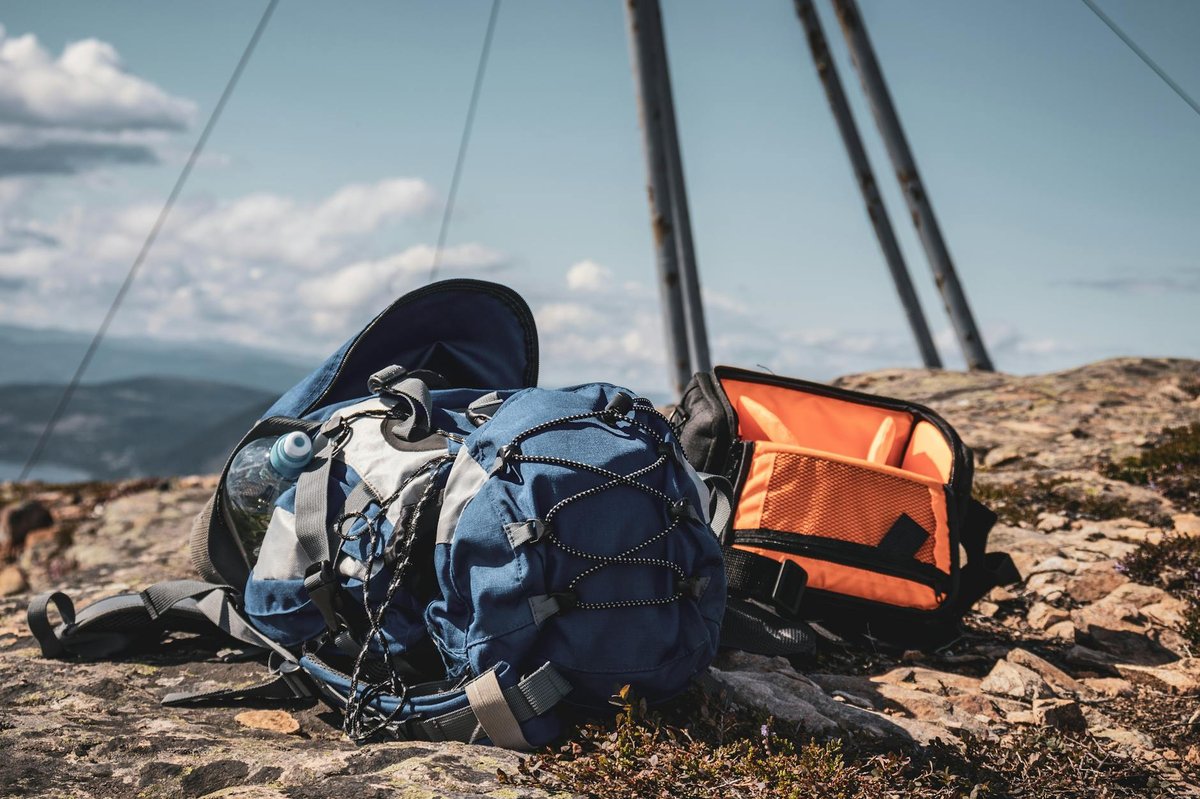
Pack for the worst-case access scenario — the moment you need a lens, you do not have time to unpack three layers to reach it
The Layer Approach
Bottom Layer (least accessible):
- Spare batteries
- Chargers and cables
- Filter cases
- Backup memory cards
The diagram below maps the full three-layer system — use it as a packing template, not a rigid rule. The logic is access frequency: you should be able to reach your primary body and a filter without opening more than one layer.
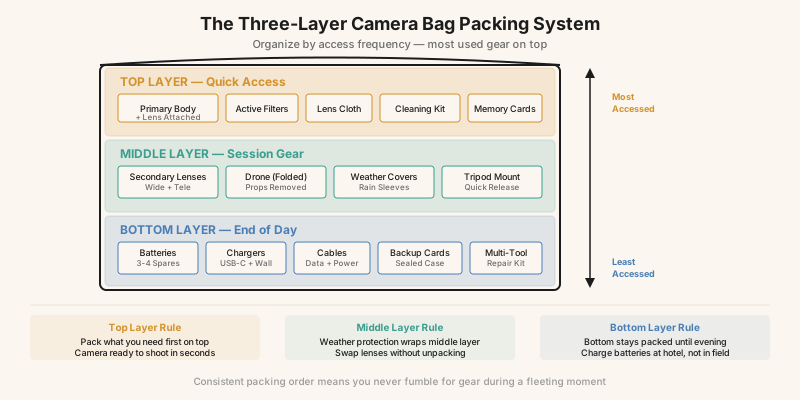
Middle Layer:
- Secondary lenses
- Drone (if carrying)
- Weather protection gear
Top Layer (most accessible):
- Primary camera body with lens attached
- Current shooting filters
- Cleaning supplies
Lens Organization
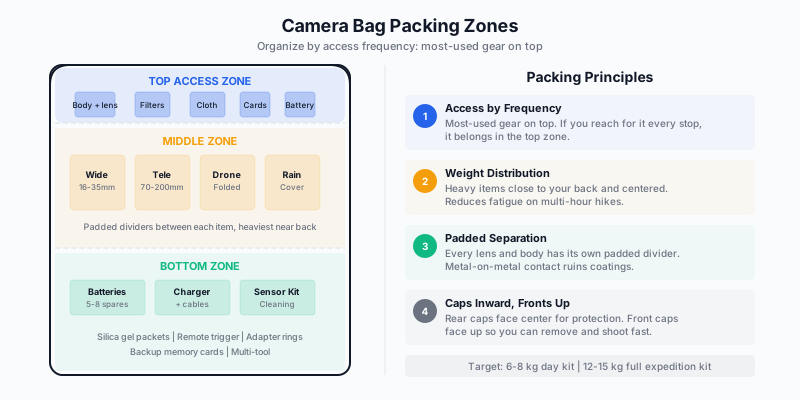
Strategy: Pack with rear caps toward center
- Dividers between each lens
- Heaviest glass against your back
- Front caps easily removable
Using Soft Wraps vs. Hard Cases
Soft Wraps (Domke, Peak Design):
- Lighter weight
- Conforms to spaces
- Adequate protection for padded bags
Hard Cases (Pelican, Nanuk):
- Checked luggage protection
- Extreme environment survival
- Heavier, bulkier
Air Travel Essentials
Carry-On Policies
Never check irreplaceable equipment. Know airline limits:
| Airline | Carry-On Size | Weight Limit |
|---|---|---|
| United | 22” x 14” x 9” | None |
| Delta | 22” x 14” x 9” | None |
| American | 22” x 14” x 9” | None |
| British Airways | 22” x 18” x 10” | 51 lbs |
| Emirates | 22” x 15” x 8” | 15 lbs |
| Ryanair | 15.7” x 9.8” x 7.9” | 10 kg |
Budget Carriers Warning: Strict enforcement. Weigh and measure before airport.
Lithium Battery Regulations
MUST be in carry-on:
- All lithium-ion batteries
- Camera batteries
- Drone batteries
- Power banks
Checked baggage prohibition: Spare lithium batteries are banned in checked luggage.
Quantity Limits:
- Under 100Wh: No limit (most camera batteries)
- 100-160Wh: 2 per passenger (large drone batteries)
- Over 160Wh: Prohibited
Security Checkpoint Procedures
TSA PreCheck/Global Entry: Equipment stays in bag
Standard Screening: May need to remove camera bodies
Pro Tip: Open bag for screeners before requested. Shows cooperation, speeds process.
Protection Against Elements
Humidity and Moisture
Silica Gel Packets:
- Include 2-3 in camera bag
- Replace when color indicates saturation
- Especially important in tropical destinations
Camera Rain Covers:
- Purpose-built covers (Peak Design Shell)
- Emergency: Plastic bag with hole for lens
- Dry bags for extreme water exposure
Cold Weather
Condensation Prevention:
- Place camera in plastic bag before entering warm space
- Seal bag completely
- Allow 30+ minutes to equalize temperature
- Open bag only when warm
Battery Warmth:
- Carry spares in inside pocket
- Rotate cold battery to body warmth
- Expect 50% capacity in extreme cold
Photography Gloves — a Critical Overlooked Item:
Cold hands make bad photographs. Standard winter gloves prevent you from operating controls; removing gloves in sub-zero conditions risks frostbite and drops. Photography-specific gloves solve this.
Vallerret — the Norwegian brand that built the category — makes gloves specifically for the realities of cold-weather photography:
- Vallerret Oslo Merino — the everyday cold-weather option. Merino wool lining, leather palm, individual finger flip-tops on thumb and index finger for full sensor/dial control without removing the glove. Rated to around -10°C. The right choice for most winter expeditions.
- Vallerret Markhof Pro — the flagship. Premium leather outer, merino lining, slip-on thumb and index finger covers on a magnetic attachment so you don’t lose them. Built for -20°C and professional use. If you shoot in serious arctic conditions, these are worth the price.
- Vallerret Alta — the warmest option, designed for extreme cold (-30°C+) and the least dexterous. Best for telephoto work where you need warmth more than fine motor control.
The flip-top finger covers on Vallerret gloves are what makes them worth the price — you operate the camera normally with gloves on, and expose only the two fingertips you need for the shutter and dial, then flip the covers back. No other glove system handles this as elegantly.
Liner gloves (Vallerret Skadi or generic thin wool liners) under the main gloves provide insurance: if conditions change or you need full dexterity briefly, you have a base layer that keeps hands functional while you work.
Dust and Sand
Desert Environment Protection:
- Change lenses inside tent/vehicle only
- Rear cap on lens immediately upon removal
- Lens cloth over camera when not shooting
- Sensor cleaning after sandy environments
Security Measures
AirTags and GPS Trackers
In Checked Bags (if any equipment checked):
- AirTag in each checked bag
- Know limits: AirTag battery is lithium but under threshold
Limitation: AirTags help locate stolen gear but rarely recover it
TSA-Approved Locks
For checked bags with non-essential equipment:
- TSA can open without destroying lock
- Limited deterrent value
- Better than nothing
Travel Insurance
Essential Coverage:
- Equipment theft and damage
- Trip interruption (if equipment stolen)
- Rental replacement coverage
Providers:
- TCP (Travel Camera Protection)
- Hill & Usher
- Lloyds of London policies
Documentation: Maintain serial numbers and photos of all gear.
Memory Cards and Backup
The 3-2-1 Rule
- 3 copies of every image
- 2 different media types
- 1 copy offsite/separate location
Field Backup Strategy
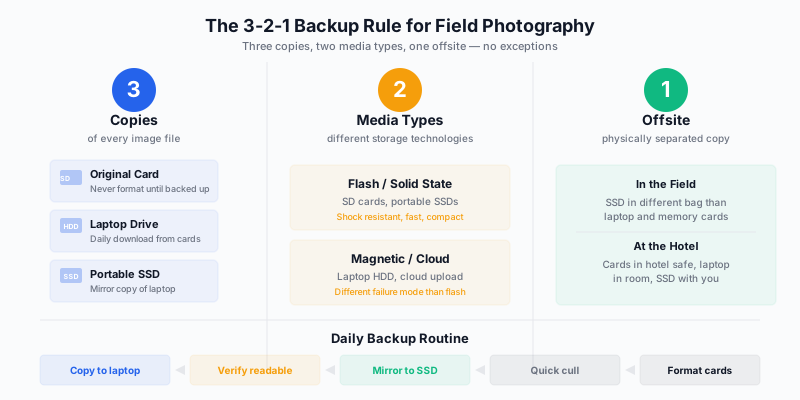
The 3-2-1 rule is not optional on serious expeditions — it is the minimum standard. Three copies of every image, on two different media types, with one copy stored away from the other two (a hotel safe, a cloud backup, anything physically separate).
Minimum:
- Dual card slots in camera (mirror mode)
- Daily backup to laptop or portable drive
- Never keep all cards together
Premium:
- Dual SD backup to separate drives
- Cloud upload when WiFi available
- Gnarbox or similar field backup device
The Minimal vs. Comprehensive Kit
Minimal Expedition Kit
- 1 camera body
- 24-105mm or 24-70mm zoom
- 5 batteries
- Tripod (travel size)
- Filter kit
- Cleaning supplies
Weight: ~4-5 kg
Best For: Multi-day treks, weight-critical travel
Comprehensive Expedition Kit
- 2 camera bodies
- 16-35mm, 24-70mm, 70-200mm lenses
- Specialty lens (macro or super-tele)
- 8-10 batteries
- Full-size tripod
- Drone with batteries
- Complete filter system
- Laptop and drives
Weight: ~15-18 kg
Best For: Vehicle-supported expeditions, professional assignments
The packing checklist below translates both kit sizes into a field-ready format — print it, work through it the night before travel, and check nothing gets left on the hotel bed.
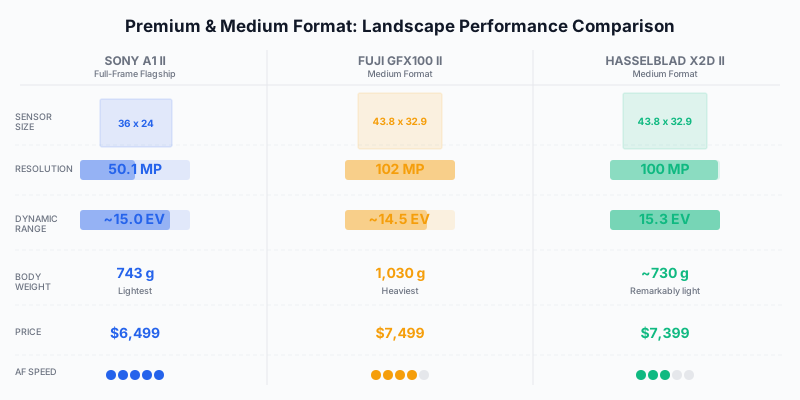
Kit weight is dominated by camera system choice. Mirrorless bodies, lens selection, and whether you’re carrying a drone determine whether your pack is 8 kg or 18 kg. If you’re deciding between systems or weighing an upgrade for expedition work, the comparison below maps the flagship options across the metrics that matter most in the field: weight, weather sealing, battery life, and native lens range.
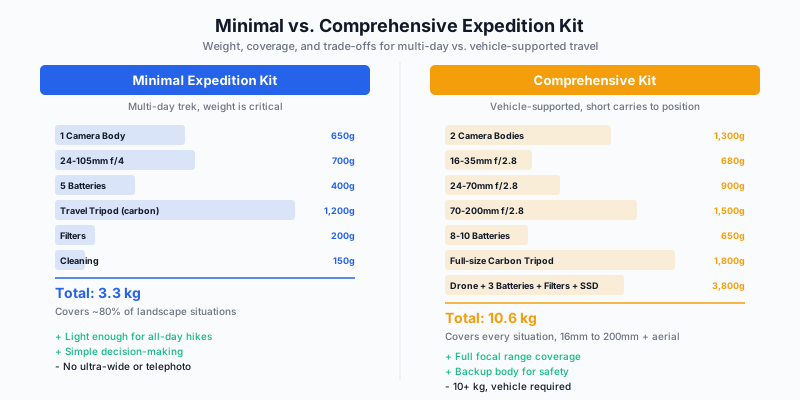
The question of how much gear to carry depends on what you’re trying to accomplish and how you’re getting there. On a helicopter-supported expedition you carry the full system; on a 20 km ridge walk you carry the minimum that lets you make the images you came for. The breakdown below puts both approaches side by side with the real numbers.
Printable Packing Checklist
Camera Gear
- Camera body (+ backup)
- Primary zoom lens
- Wide-angle lens
- Telephoto lens
- Lens caps (front and rear)
- Batteries (charged)
- Battery charger
- Memory cards (formatted)
- Card wallet
Support
- Tripod
- Tripod plate (verify attached!)
- Quick-release plates (spares)
- Remote release/intervalometer
- Bean bag (drone/vehicle work)
Filters
- Polarizer
- ND filters (3, 6, 10 stop)
- Graduated NDs
- Filter holder and rings
Protection
- Rain cover
- Microfiber cloths (3+)
- Sensor cleaning kit
- Silica gel packets
- Plastic bags (emergency protection)
Electronics
- Laptop
- Portable drive (2x)
- Card reader
- International adapters
- Power strip
- USB cables
Documentation
- Gear list with serial numbers
- Insurance documents
- Drone registration
- Permits (if required)
Conclusion
Effective packing is a learned skill. Start with comprehensive checklists, adapt to your shooting style, and develop systems through experience. The goal: arrive ready to shoot without equipment failures or security problems.
Put it to work — See what cold and wind demand of your kit in the Lofoten and Arctic Norway guide and the Torres del Paine guide.