The first time you stand on the Milford foreshore at first light, you learn what “the crown jewel of Fiordland” actually costs. It costs you a 4:30 alarm, a two-hour drive over the Homer Tunnel in the dark, and the very real chance that the rain that feeds this fjord — over six metres of it a year — will be falling on your lens instead of lighting up Mitre Peak. And then, some mornings, the cloud lifts off the water like a curtain, the peak doubles itself in a dead-still fjord, and you understand why photographers cross the planet for this one frame. Milford does not owe you that morning. You earn it by being there for the ones it doesn’t give you.
New Zealand’s South Island is the most concentrated landscape-photography country on Earth: glaciers, fjords, turquoise glacial lakes, and 3,000-metre peaks packed into an island smaller than Florida. What most guides miss is the thread that ties it together. Fiordland, Aoraki/Mount Cook, Mount Aspiring, and Westland are not four separate parks — they are one UNESCO World Heritage Area, Te Wāhipounamu (“the place of greenstone”), inscribed in 1990 for a landscape that has changed little since Gondwana broke apart. Plan your trip around that geography, not around a bucket list, and the South Island stops being a checklist and becomes a coherent body of work. This guide covers the three parks a visiting photographer can realistically shoot in one trip, plus Tongariro on the North Island for anyone routing through Auckland.
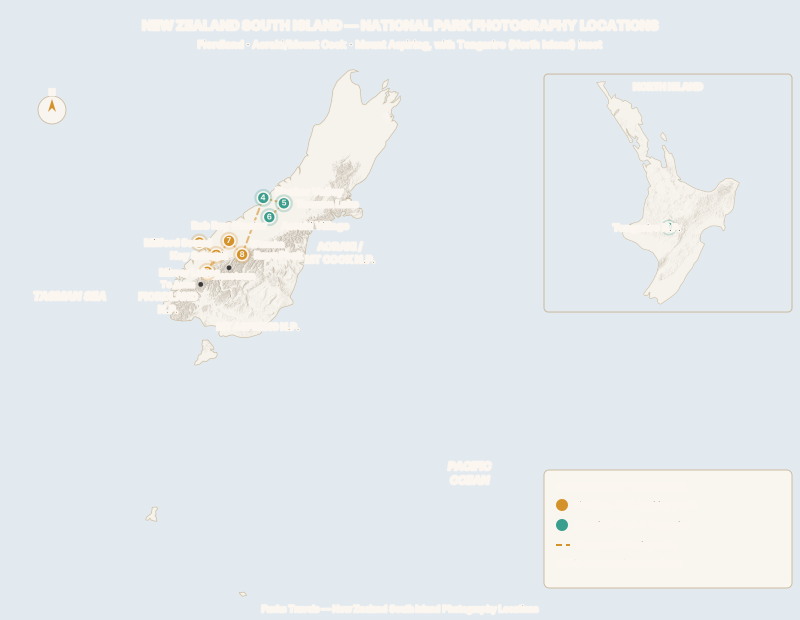
Fiordland National Park
Fiordland is New Zealand’s largest national park — 12,600 square kilometres of glacier-carved rock, temperate rainforest, and fjords that most people will only ever see from a boat. For a photographer it is defined by one hard truth: the weather makes the picture, and the weather is almost always doing something. Learn to shoot rain, mist, and the ten-minute clearing, and Fiordland will out-perform any blue-sky destination you own.
Milford Sound and Mitre Peak
GPS: ●●.●●●●° S, ●●●.●●●●° E
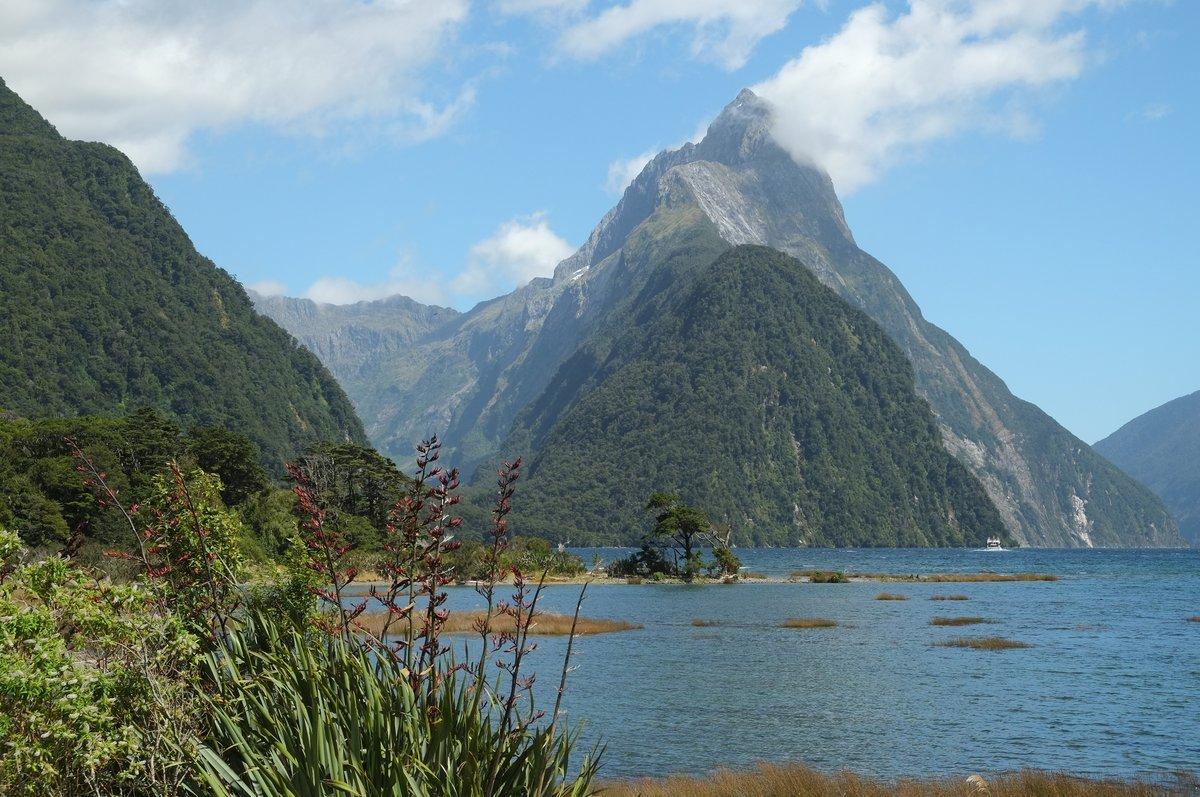
Milford Sound / Piopiotahi is the icon: Mitre Peak rising 1,690 metres straight out of the water, waterfalls threading the walls, and — after heavy rain — hundreds of temporary cascades that appear for a single day and vanish. Shoot the classic reflection from the foreshore walk at the end of the road, where a shallow, sheltered inlet holds a mirror on still mornings.
Best light: The fjord runs roughly east-west, so early morning gives you soft front-light on Mitre Peak and the best chance of a wind-free reflection. By late afternoon the peak falls into its own shadow. Overcast is not a problem here — it is the point; flat light saturates the moss-green walls and lets the waterfalls read.
Technique: A polariser cuts the sheen off wet rock and deepens the reflection, but rotate it carefully — over-polarising kills the reflection you came for. In rain, a lens hood and a microfibre cloth are worth more than any filter. For the reflection, expose for the sky and let the water go a touch darker; you can lift it in post without blowing the highlights on the peak.
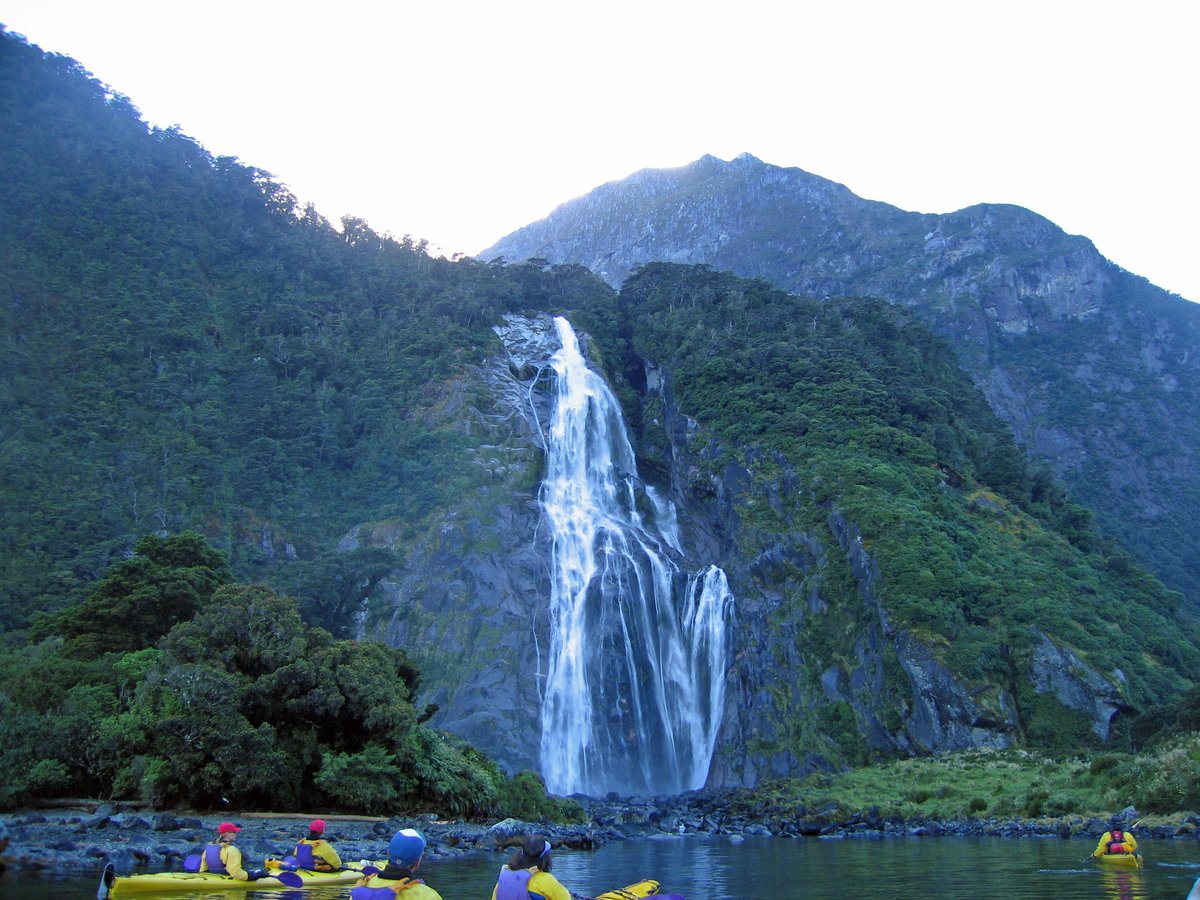
Milford Sound after rain — the fjord walls run with waterfalls. Photo: Greg Schechter / Wikimedia Commons (CC BY 2.0)
Key Summit, Routeburn Track
GPS: ●●.●●●●° S, ●●●.●●●●° E
Key Summit is the finest half-day view in Fiordland that doesn’t require a boat. A three-to-four-hour return climb off the Routeburn Track delivers you to an alpine tarn plateau with a 360-degree panorama over the Hollyford and Greenstone valleys and the Darran Mountains. The small tarns hold reflections of the surrounding peaks — a foreground gift most viewpoints don’t offer.
Technique: This is a foreground-driven composition. Get low over a tarn, use the reflected peaks as your top third, and let the wet alpine grasses and cushion plants anchor the frame. A 16-35mm equivalent is the workhorse here. Cloud moves fast on the summit; if it socks in, wait — the plateau clears and closes in cycles of ten to twenty minutes.
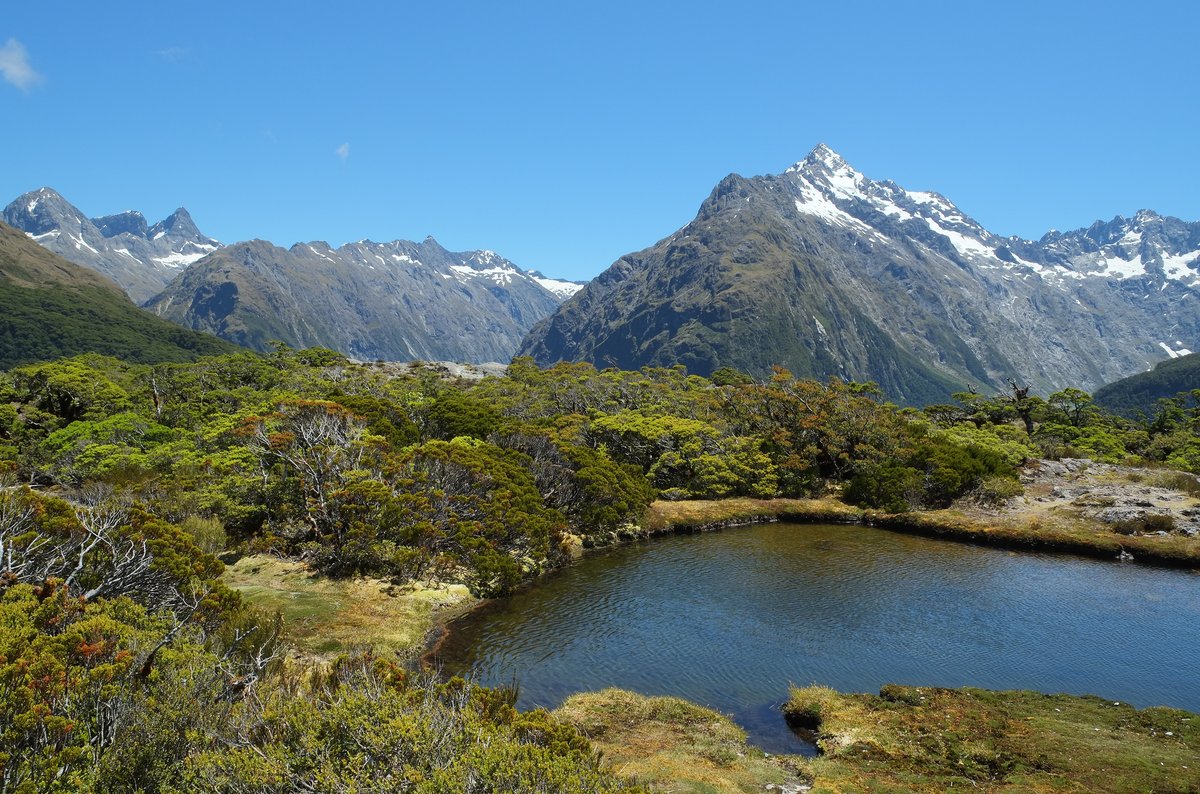
A tarn on Key Summit mirrors Mt Christina — a rare reflective foreground above the bushline. Photo: Pseudopanax / Wikimedia Commons (public domain)
Mirror Lakes and the Milford Road
GPS: ●●.●●●●° S, ●●●.●●●●° E
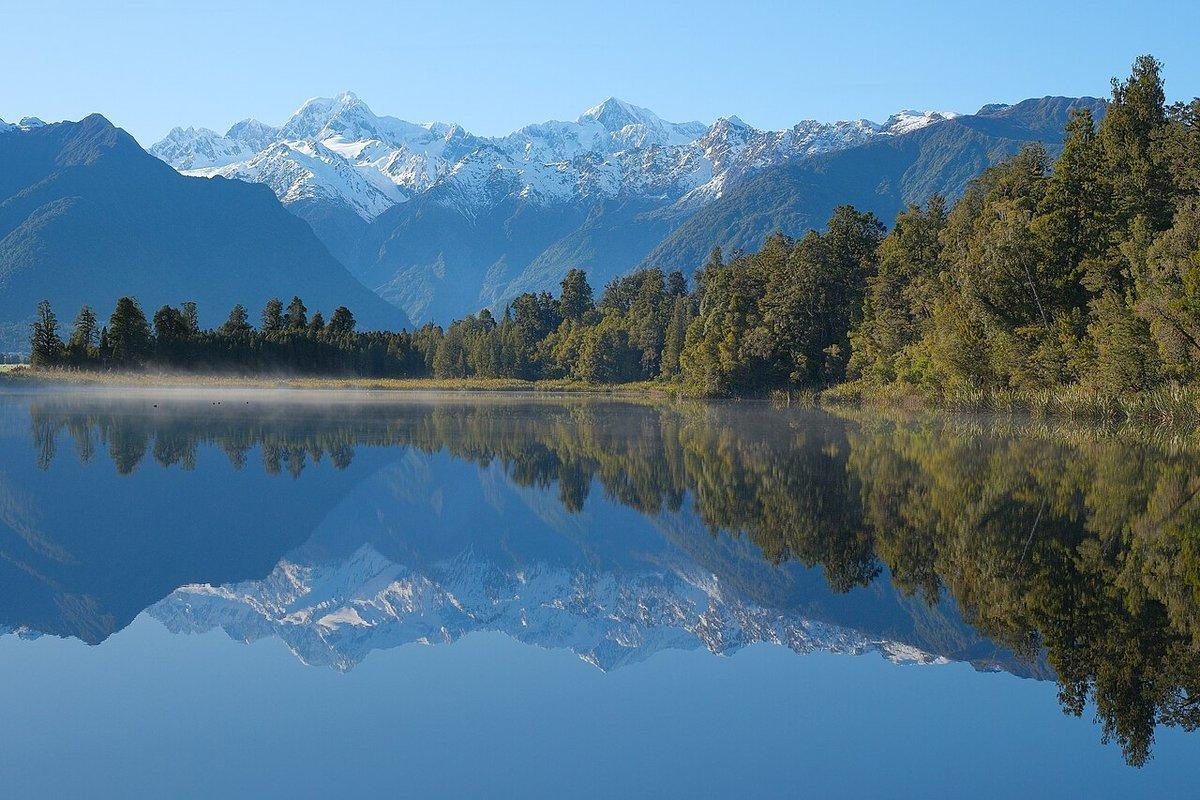
The drive from Te Anau to Milford is one of the great photographic roads, and Mirror Lakes — a chain of oxbow ponds in the Eglinton Valley — is its most reliable stop. On a still morning the Earl Mountains reflect perfectly, and a boardwalk puts you at water level without a hike. It is signposted and easy, which means it fills with tour buses by nine; be there before eight.
Technique: The reflection is the whole shot, so it lives and dies on wind. Check the water, not the sky. Shoot a symmetrical composition with the waterline dead-centre — one of the few times centring the horizon is correct — and clone out the submerged “MIRROR LAKES” sign later if it intrudes. This is also a strong location for intimate detail: reeds, reflected cloud, the reversed-text sign itself.
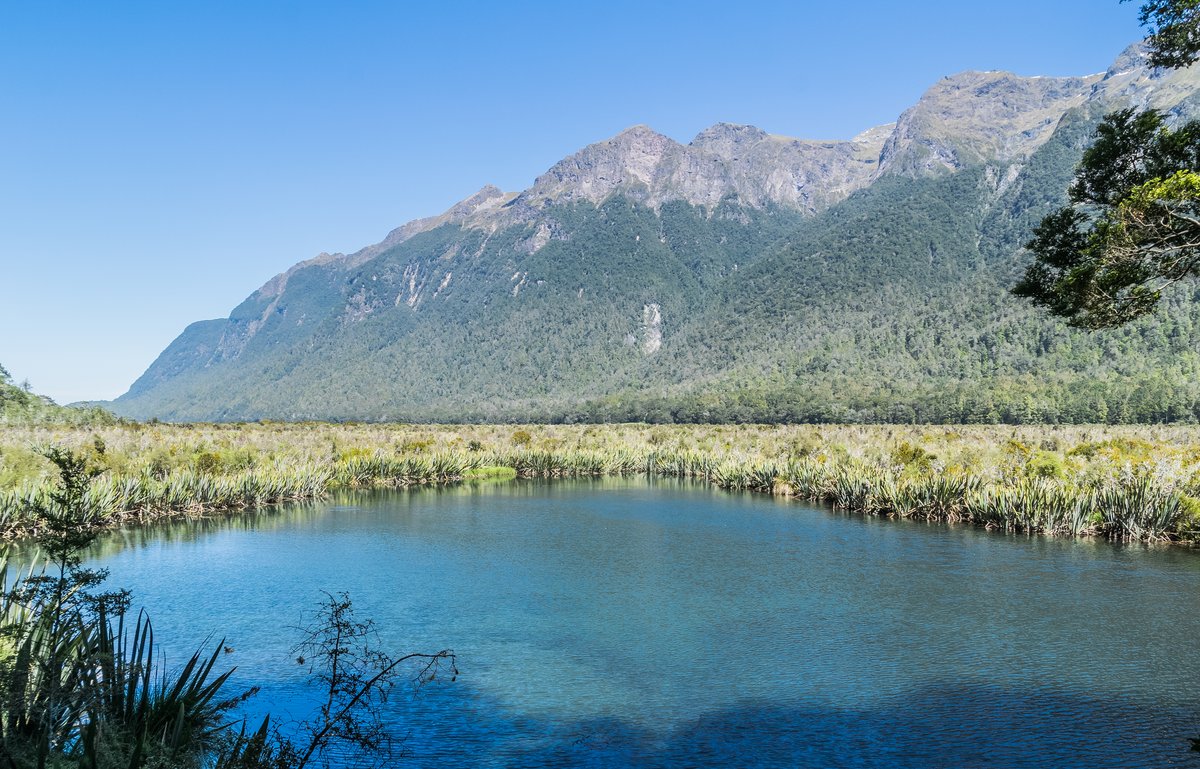
Mirror Lakes on a windless morning, the Earl Mountains doubled in the Eglinton Valley. Photo: Krzysztof Golik / Wikimedia Commons (CC BY-SA 4.0)
Aoraki / Mount Cook National Park
If Fiordland is about weather, Aoraki/Mount Cook is about scale and light. This is New Zealand’s alpine heart — Aoraki, the country’s highest mountain at 3,724 metres, ringed by glaciers and fed by rivers the colour of raw turquoise. It also sits inside the Aoraki Mackenzie International Dark Sky Reserve, the first gold-tier dark-sky reserve in the Southern Hemisphere, which makes this the one place on the South Island where you shoot the landscape by day and the Milky Way by night without moving your car.
The Hooker Valley Track
GPS: ●●.●●●●° S, ●●●.●●●●° E
The Hooker Valley Track is the most rewarding easy walk in the country: three hours return, nearly flat, over three swing bridges to a glacial terminal lake with Aoraki standing at its head. Icebergs calve off the Hooker Glacier and drift in the lake. It is the definitive Aoraki composition, and because the track is level it is shootable at dawn without a headtorch epic.
Best light: Aoraki faces roughly south down the valley toward you, so it catches alpenglow at both ends of the day — the summit lights up pink minutes before the valley floor does. Sunrise is the stronger session: still air for the lake reflection and warm light on the peak.
Technique: Use an iceberg or the lake’s outflow as foreground. Bracket for alpenglow — the dynamic range between a lit summit and a shadowed lake is brutal, and a two-to-three-stop bracket blended in post beats a single exposure. Keep a level horizon; the valley walls make tilt obvious.
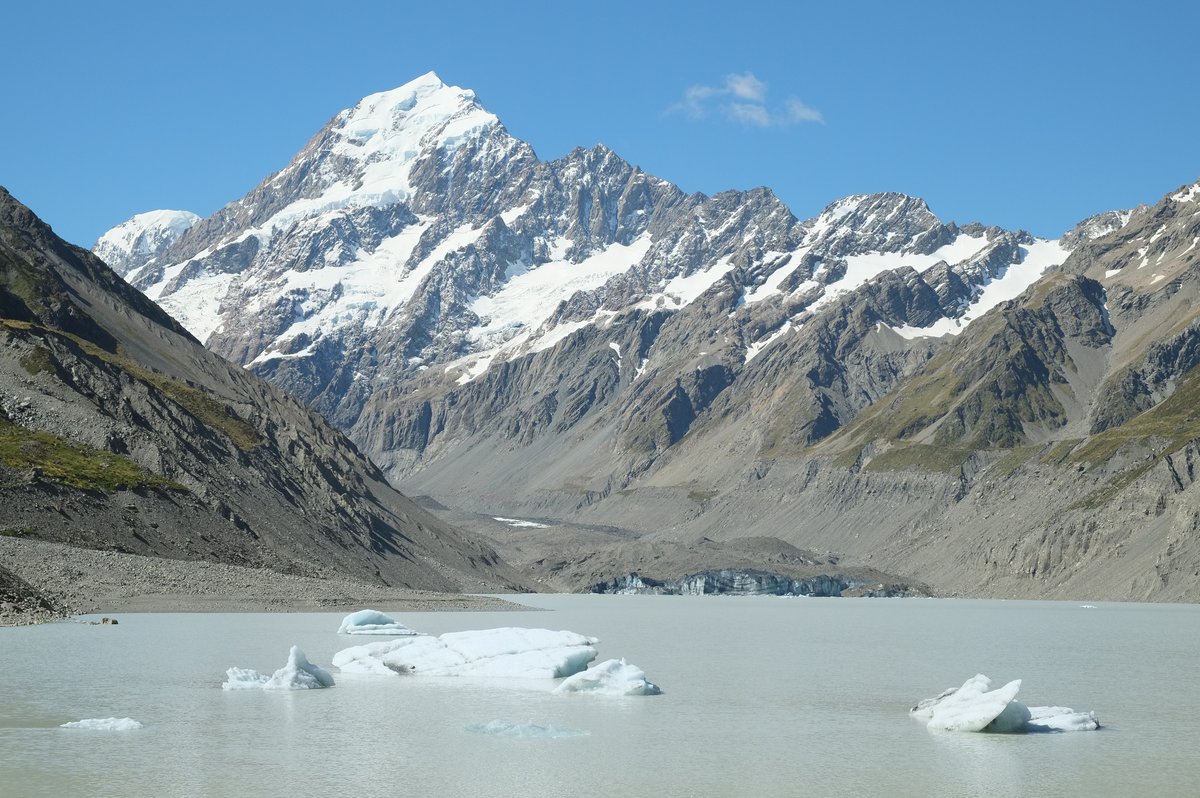
The payoff at the end of the Hooker Valley Track: Aoraki over the iceberg-strewn terminal lake. Photo: Pseudopanax / Wikimedia Commons (CC BY 3.0)
Tasman Lake and the Icebergs
GPS: ●●.●●●●° S, ●●●.●●●●° E
A short climb from the Blue Lakes car park brings you to a viewpoint over Tasman Lake, the meltwater lake at the foot of New Zealand’s longest glacier. The lake is grey with rock flour and studded with icebergs that flip and shatter without warning. It is a rawer, more geological scene than the Hooker — less postcard, more evidence of a landscape in retreat.
Technique: The grey water and white ice want a graphic, high-key treatment. Shoot the icebergs as shapes; a short telephoto (70-200mm equivalent) lets you isolate individual bergs against the moraine walls. Boat tours run onto the lake for those who want to shoot the ice at eye level — worth it for the texture in the old, layered glacier ice.
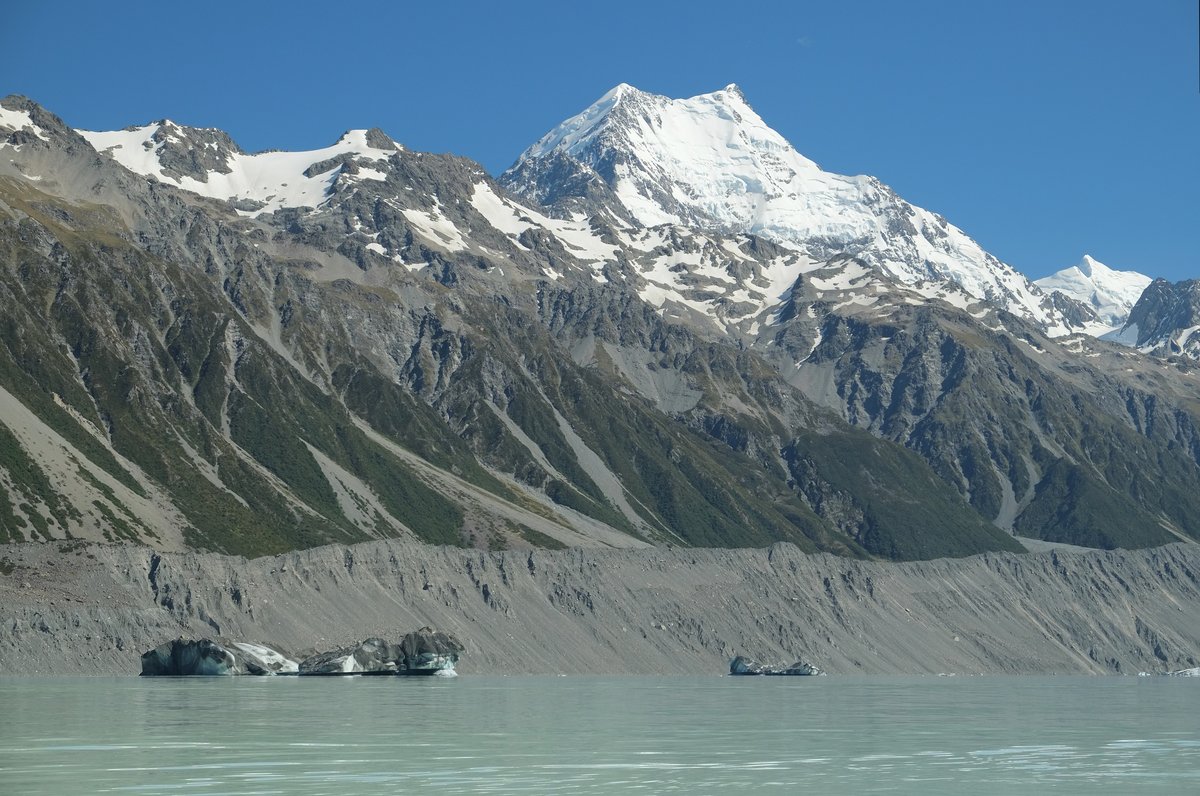
Icebergs on Tasman Lake — a rawer, more geological scene than the Hooker. Photo: Pseudopanax / Wikimedia Commons (public domain)
The Dark Sky Reserve
GPS: ●●.●●●●° S, ●●●.●●●●° E
From Aoraki/Mount Cook Village the night sky is a Bortle 2 — as dark as an accessible site gets. The Milky Way core arcs over the Southern Alps from roughly February through October, and the Southern Cross, the Magellanic Clouds, and — in strong geomagnetic conditions — the aurora australis all sit low in the southern sky. Lake Pukaki, thirty minutes south, gives you a foreground of still water and the silhouette of Aoraki under the stars.
Technique: Standard fast-wide astro kit: a 14-24mm at f/2.8 or faster, 15-20 second exposures, ISO 3200-6400, focus manually on a bright star via live-view magnification. Use the 500-rule (or NPF for the pedantic) to keep stars pin-sharp. For the sharpest possible core, shoot a tracked sequence with a star tracker and blend a static foreground — see the Fuchs Travels Milky Way field guide for the full workflow. New moon is non-negotiable; check the phase before you book.
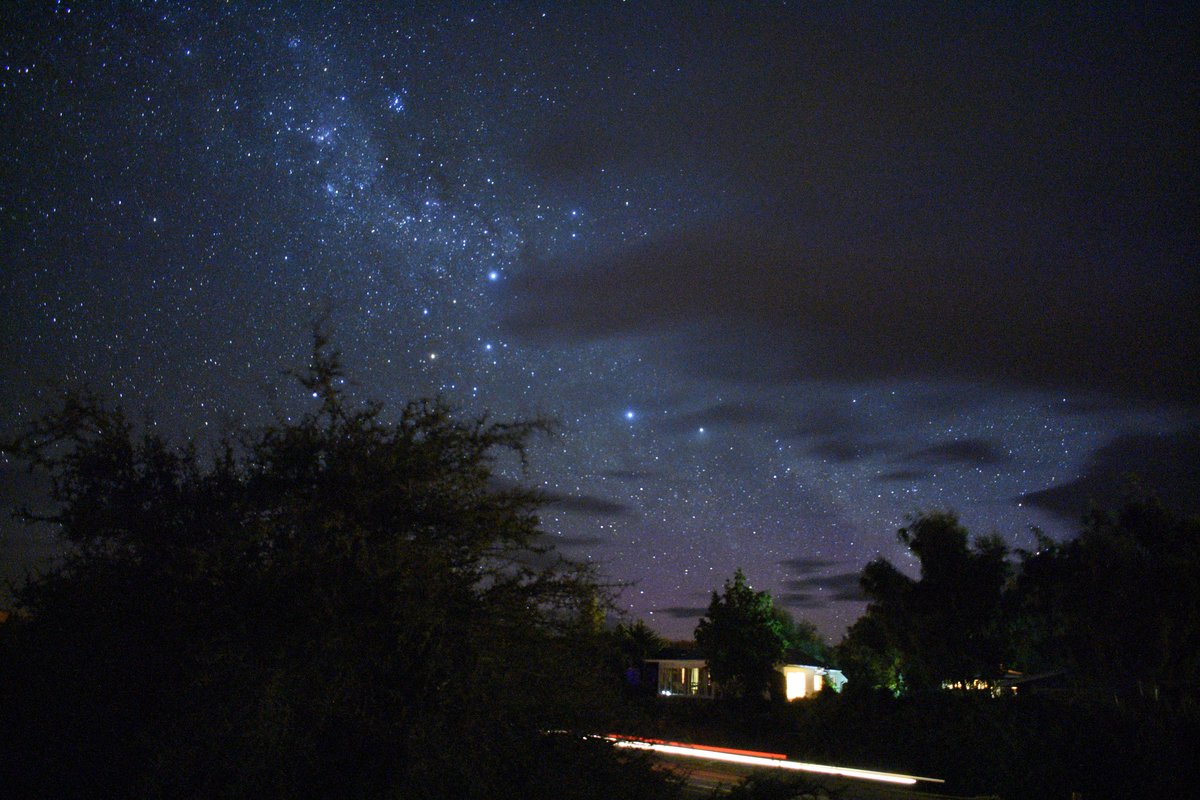
The southern sky from inside the Aoraki Mackenzie Dark Sky Reserve, near Lake Tekapo. Photo: Sky_xe / Wikimedia Commons (CC BY-SA 4.0)
Mount Aspiring National Park
Mount Aspiring is the connective tissue of the Southern Alps — 3,562 square kilometres of glaciers and hanging valleys between Fiordland and Aoraki, gateway’d by the lake town of Wanaka. It is less trafficked than its famous neighbours, which is exactly the point.
Rob Roy Glacier Track
GPS: ●●.●●●●° S, ●●●.●●●●° E
The Rob Roy Glacier Track is the best day-hike payoff in the park: a three-to-four-hour return walk up a valley that dead-ends in a natural amphitheatre of hanging glaciers, with waterfalls pouring off the ice and, if you are lucky, the crack-and-rumble of a small avalanche. The last stretch opens suddenly, which makes the reveal genuinely cinematic.
Technique: The scale here defeats wide lenses — a person on the track or a lone beech tree gives the glacier wall a sense of size. Overcast is your friend; direct midday sun on white ice is unrecoverable. The access road includes an unbridged ford at Raspberry Creek that ordinary rental cars are not insured for — plan the shuttle or a 4WD.
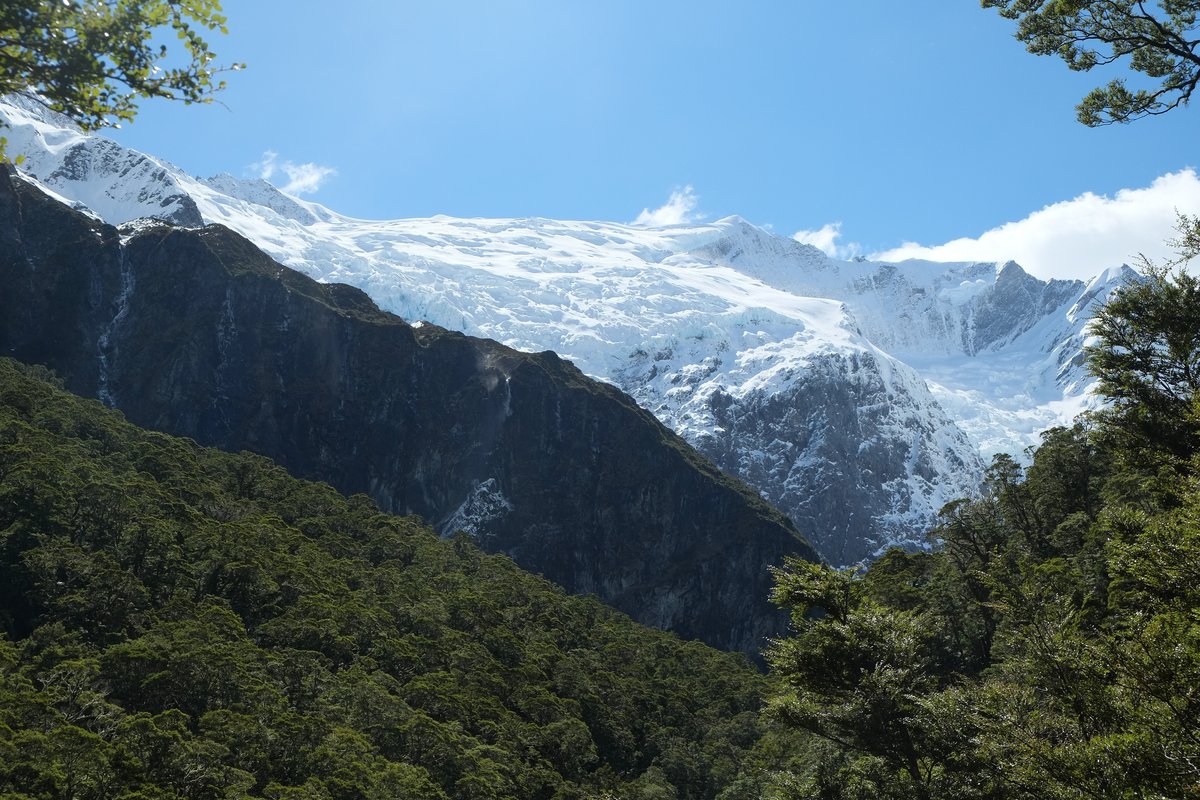
The Rob Roy Glacier amphitheatre — hanging ice and waterfalls above the beech forest. Photo: Pseudopanax / Wikimedia Commons (CC BY 3.0)
Wanaka: Roys Peak and the Tree
GPS: ●●.●●●●° S, ●●●.●●●●° E
Be honest about this one: neither Roys Peak nor “That Wanaka Tree” is inside the national park — Roys Peak is farmland conservation area, and the willow stands in Lake Wanaka in town. But they are the two most photographed spots in the region, and Wanaka is your base for Aspiring, so shoot them. Roys Peak is a brutal 16-kilometre, 1,200-metre climb to a ridgeline viewpoint over the lake and its islands; the famous spur is about two-thirds up, not at the summit.
Technique: Roys Peak is a sunrise hike — start at 3-4am with a headtorch to beat both the crowds and the light. The Wanaka tree is an any-conditions subject: dawn stillness, storm drama, or long-exposure minimalism with a 10-stop ND. Expect company at both.
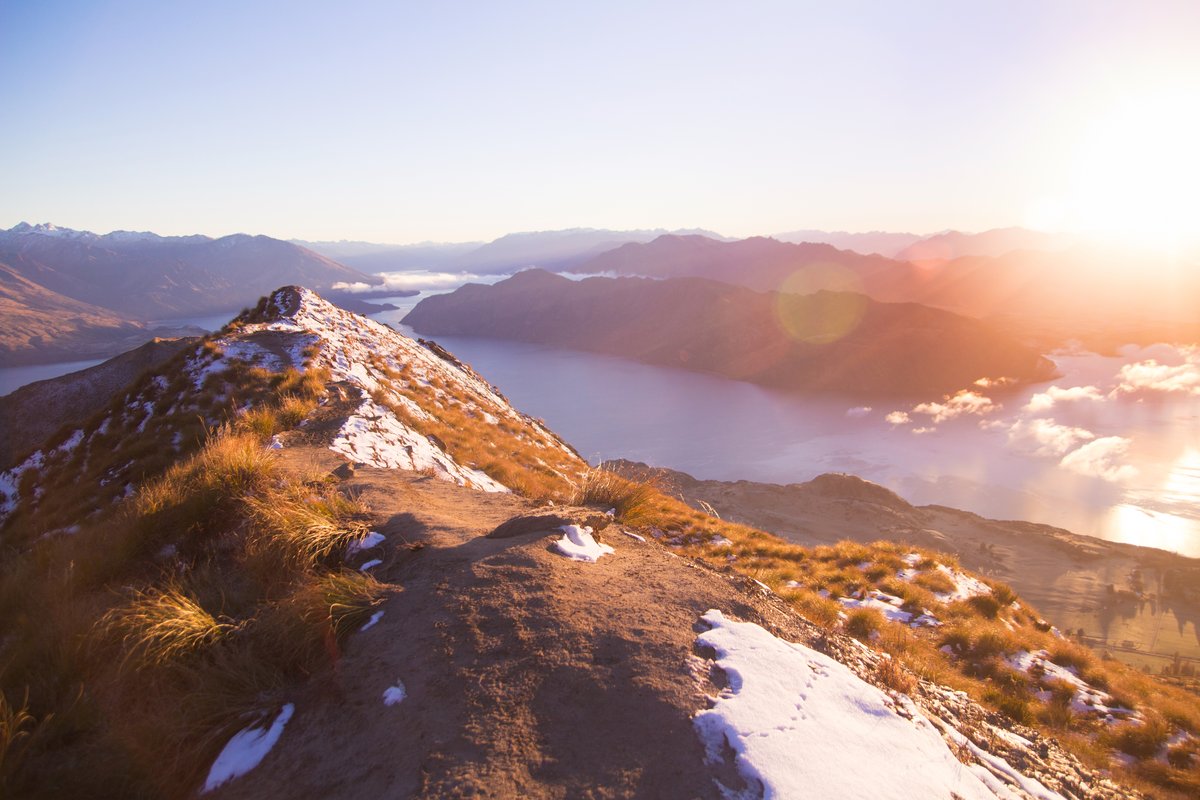
The Roys Peak ridge at sunrise, looking over Lake Wanaka and its islands. Photo: Jingwei Ke / Unsplash (CC0)
Tongariro National Park
GPS: ●●.●●●●° S, ●●●.●●●●° E
If your route runs through the North Island, Tongariro earns the detour. It is New Zealand’s oldest national park — established in 1887, the fourth in the world — and holds dual UNESCO World Heritage status, recognised for both its volcanic landscape and its profound cultural significance to Ngāti Tūwharetoa, who gifted the mountains’ summits to the nation. The Tongariro Alpine Crossing is the country’s most famous day walk, and the Emerald Lakes — acid-bright crater pools coloured by dissolved minerals, set against the red scoria of the Red Crater — are its signature frame.
Technique: The Crossing is a committing 19.4-kilometre one-way hike over exposed volcanic terrain; you shoot it as a through-hike, not a return, so pack light and fast. The Emerald Lakes sit just below Red Crater — reach them mid-morning after the dawn crowd has thinned but before the afternoon cloud builds. Weather turns violent and fast up here; a check of the mountain forecast is a safety decision, not a preference. Note that this is an active volcanic zone and the sacred summit of Ngāuruhoe should not be climbed.
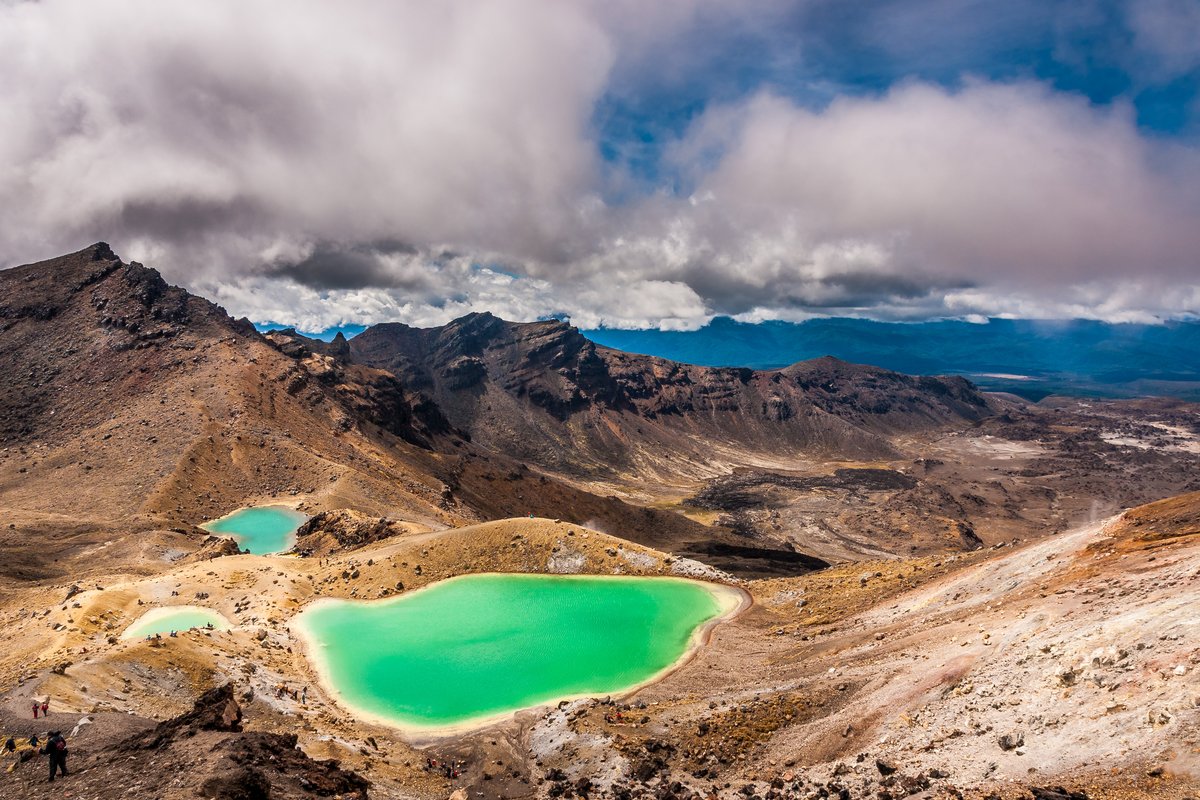
The Emerald Lakes on the Tongariro Alpine Crossing, coloured by dissolved volcanic minerals. Photo: Marcus Holland-Moritz / Wikimedia Commons (CC BY-SA 2.0)
Seasonal Photography Calendar
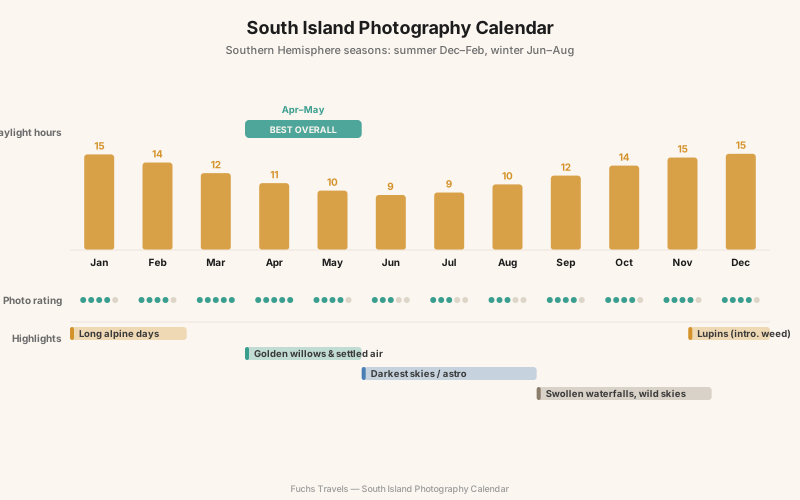
New Zealand’s seasons are inverted from the Northern Hemisphere: summer is December to February, winter June to August. Each has a distinct photographic personality.
| Season | Months | Character | Best for |
|---|---|---|---|
| Summer | Dec-Feb | Long days, warmest, busiest, lupins bloom late Nov-Dec | Alpine hikes, long shooting days, wildflowers |
| Autumn | Mar-May | Stable air, golden willows in Wanaka/Arrowtown, thinning crowds | Reflections, colour, the best all-round window |
| Winter | Jun-Aug | Snow to the valley floors, clearest night skies, short days | Snowy peaks, astro, moody Fiordland |
| Spring | Sep-Nov | Snowmelt swells waterfalls, unstable weather, new snow high up | Waterfalls, dramatic skies, fewer people |
Autumn (late April into May) is the connoisseur’s season: the willows around Wanaka and the Mackenzie turn gold, the air is more settled than spring, and the tourist peak has broken. Winter gives you the darkest skies for the Aoraki dark-sky reserve and snow low on the peaks, but the Milford Road can close for avalanche control and daylight is short. Summer is for long alpine days and the December lupins — beautiful, but an introduced weed, so photograph them, don’t celebrate them.
Technique: Reflections, Rain, and Alpine Light
Three conditions define South Island landscape work, and each rewards a specific discipline.
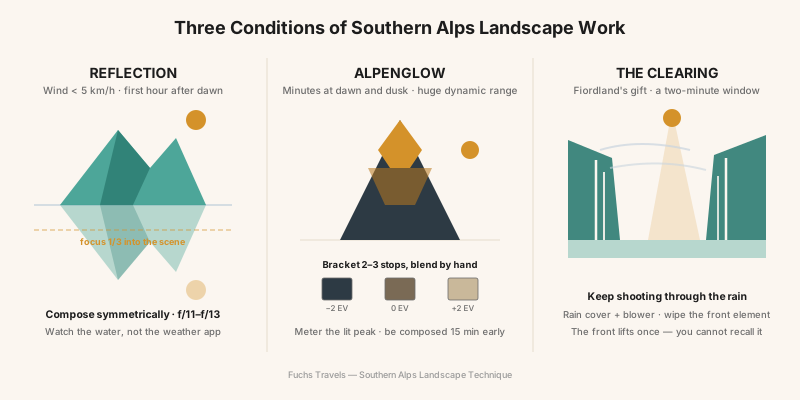
Reflections need wind under about 5 km/h, which in practice means the first hour after dawn before thermal wind builds. Check the water surface, not the weather app. Compose symmetrically, focus a third of the way into the scene, and stop down to f/11-f/13 for front-to-back sharpness. A polariser will deepen or destroy the reflection depending on angle — dial it while watching the water.
Alpenglow on Aoraki and the Darrans lasts minutes and carries enormous dynamic range. Meter for the lit summit, then bracket down two or three stops to hold the shadowed foreground, and blend by hand in post — auto-HDR flattens the very colour you are chasing. Be set up and composed fifteen minutes before the light, because it does not wait.
Rain and the clearing are Fiordland’s gift. Storms scour the fjord walls into hundreds of waterfalls, and the moment the front lifts — mist tearing off the peaks, sun breaking through — is the most dramatic light in the country. Keep the camera out in the weather (a rain cover and a rocket blower for the front element), and treat every clearing as a two-minute window you cannot recall.
Drones, Permits, and Ethics
Be blunt with yourself before you pack a drone: flying in New Zealand’s national parks is effectively off the table for visitors. The Department of Conservation requires a permit for any drone flight over national park land, and at the time of writing it is not accepting recreational applications for Fiordland, Aoraki/Mount Cook, Mount Aspiring, or Tongariro — applications for these parks are declined. Fines are real; a tourist who flew over the Tongariro Alpine Crossing had the aircraft seized and was fined NZ$1,500. Rules change, so confirm the current position on the DOC website before you travel, but plan your trip as a ground-based photographer.
Beyond the law, there is the ground truth of these places. The tarns at Key Summit and the alpine cushion plants take decades to recover from a bootprint — stay on the boardwalks and rock. Milford and Aoraki are of deep significance to Ngāi Tahu and Ngāti Tūwharetoa; Aoraki itself is an ancestor, not scenery. Photograph with that in mind.
Logistics and Planning
Getting there: Queenstown is the natural hub — international flights, rental cars, and roughly equidistant from Fiordland, Aoraki, and Wanaka. From Queenstown it is about 3.5 hours to Te Anau (the Milford base), 3 hours to Aoraki/Mount Cook Village, and an hour to Wanaka. Distances look short on the map and drive long on winding alpine roads; budget accordingly. Christchurch is the alternative gateway, closer to Aoraki.
Where to stay: Base out of towns, not the icons. Te Anau for Fiordland (Milford has almost no accommodation, and the road in is a long dark drive), Aoraki/Mount Cook Village or Twizel for the mountains and dark sky, and Wanaka for Aspiring.
| Tier | Per night (NZD) | Example |
|---|---|---|
| Budget | $40-90 | DOC campsites, hostels (Te Anau, Twizel) |
| Mid-range | $150-280 | Motels and lodges in Wanaka, Te Anau |
| Premium | $400+ | The Hermitage (Aoraki), lakefront lodges |
| Daily cost (two photographers) | Estimate (NZD) |
|---|---|
| Accommodation (mid-range) | $180-260 |
| Rental car + fuel | $70-110 |
| Food | $80-120 |
| Activities (boat/shuttle, occasional) | $0-200 |
| Daily total | ~$330-690 |
Allow ten days minimum to shoot all three South Island parks without racing the light; two weeks is comfortable and leaves room for the weather to cooperate.
Gear Recommendations
The South Island is a wide-to-medium-telephoto landscape with serious weather. Prioritise sealing and a sturdy tripod over exotic glass.
| Category | Recommendation | Why |
|---|---|---|
| Body | Weather-sealed mirrorless (full-frame ideal) | Rain in Fiordland, cold at altitude |
| Wide zoom | 16-35mm f/2.8-4 | Fjords, valleys, astro |
| Standard/tele | 24-70mm + 70-200mm | Isolating peaks and icebergs |
| Filters | Circular polariser + 6/10-stop ND | Reflections, waterfalls, long exposures |
| Tripod | Carbon, load-rated for wind | Dawn reflections, astro, alpenglow brackets |
| Astro extra | Fast prime (14-24mm f/1.8-2.8), star tracker optional | Dark-sky reserve nights |
| Protection | Rain cover, microfibre cloths, blower, dry bags | Milford will soak you |
Pack layers rated for alpine cold even in summer — Aoraki and the Crossing can drop below freezing with wind in any season.
Field Exercises
- The wind window: At Mirror Lakes or Hooker Lake, arrive 45 minutes before sunrise and shoot the same symmetrical reflection every five minutes until the thermal wind kills it. Study the sequence to learn how short the still window really is.
- Alpenglow bracket: On the Hooker Valley Track, shoot a three-frame exposure bracket of Aoraki at first light and blend it by hand. Compare it to your best single-exposure attempt.
- Shoot the rain: Spend a full wet morning at Milford without waiting for it to clear. Come home with five keepers made in the rain — waterfalls, misted walls, reflected grey.
- Iceberg abstracts: At Tasman Lake, fill the frame with a single iceberg using a telephoto. Make three images that read as pure shape and texture, not scenery.
- One dark-sky frame: From Aoraki/Mount Cook Village or Lake Pukaki, make a single Milky Way image with a real, identifiable foreground — not just stars, but stars over this place.
Conclusion
The South Island tempts you to treat it as a scavenger hunt — nine icons, ten days, a memory card full of the same photographs a million visitors have already made. Resist that. The reason Te Wāhipounamu is one World Heritage Area and not four parks is that the ice, the rock, and the water are a single continuous story, and the photographers who come home with work rather than snapshots are the ones who slow down enough to hear it.
Give the weather permission to change your plans. The clearing after the storm at Milford, the ten-minute alpenglow on Aoraki, the one still hour at a tarn on Key Summit — these are not on a schedule, and they are the whole reason to come. Be there, awake, with a level horizon and a clean front element, and the oldest landscape on Earth will occasionally decide to show you something extraordinary.