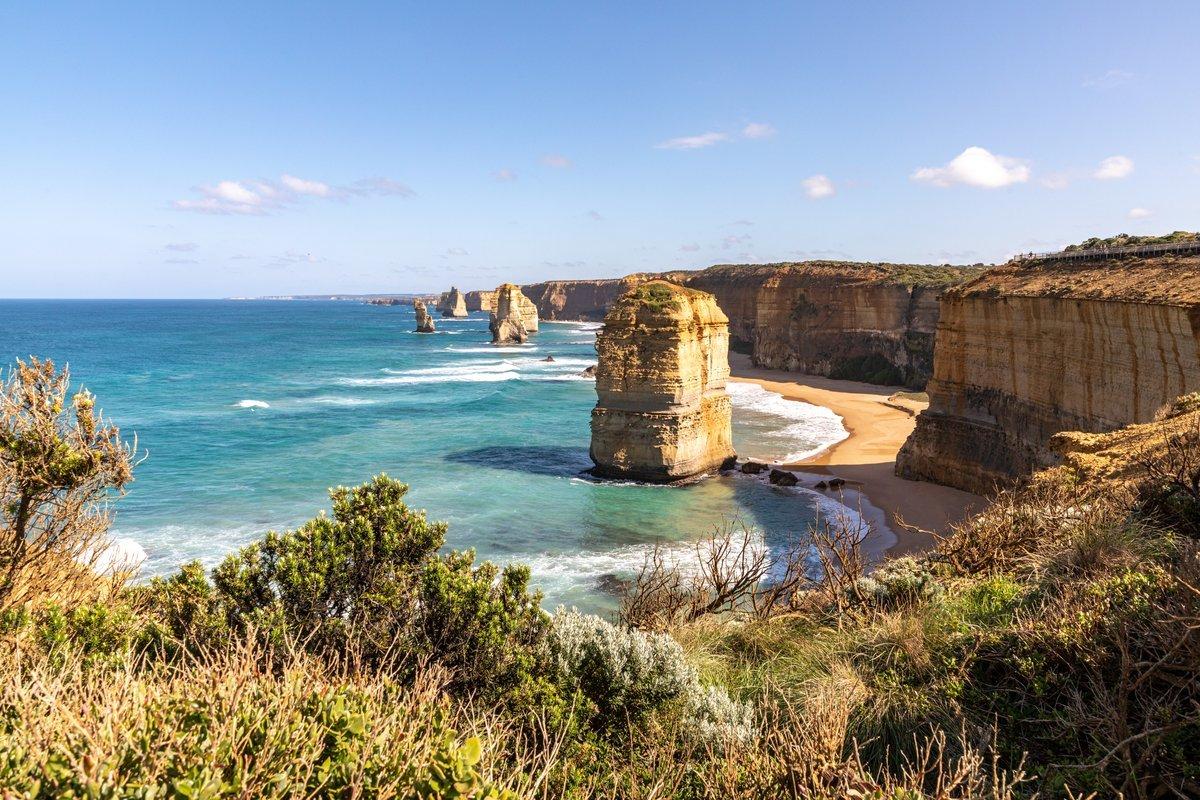
There is a moment at the Twelve Apostles, maybe forty minutes before sunrise, when the tour buses have not arrived and the boardwalk is yours. The Southern Ocean is a sheet of pewter, the stacks are black cut-outs against a sky the color of a bruise healing, and the wind comes straight off Antarctica with nothing in between. You set your tripod, you level the horizon, and you wait for the first light to reach across the water and set fire to the limestone. This is the shot every visitor drives four hours from Melbourne to make, and the frustrating, wonderful truth is that it is entirely out of your control. The rock did the composing eons ago. Your job is to be there, awake, prepared, when the ocean decides to perform.
The Great Ocean Road is a 240-kilometre ribbon of bitumen between Torquay and Allansford, built by hand by roughly 3,000 returned servicemen between 1919 and 1932 and dedicated to the Australians killed in the First World War — the largest war memorial on earth. For a photographer it is really three destinations stitched together: the collapsing limestone theatre of the Shipwreck Coast at Port Campbell, the dripping cool-temperate rainforest of the Otway Ranges, and the muscular surf breaks of the eastern Surf Coast. Each demands a different lens, a different alarm setting, and a different attitude to weather. This guide is built for a real trip down the whole corridor: where the icons are, which way they face, when the light works, and the access and drone rules you must understand in 2026 before you fly a single frame.
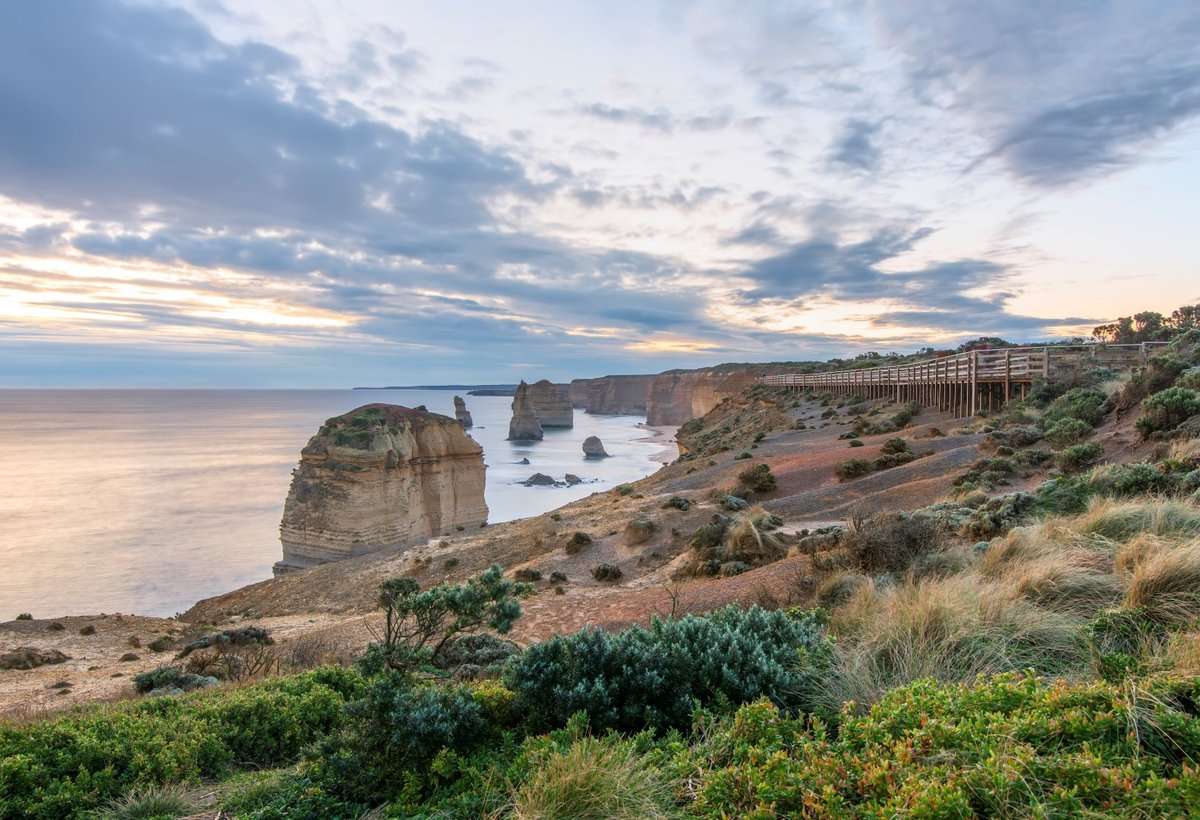
The main viewing platform at last light — the western cluster of stacks with the boardwalk that fills with tripods by sunset. A 15-second exposure irons the swell flat. Photo: Leonard Koh / Wikimedia Commons (CC BY-SA 4.0)
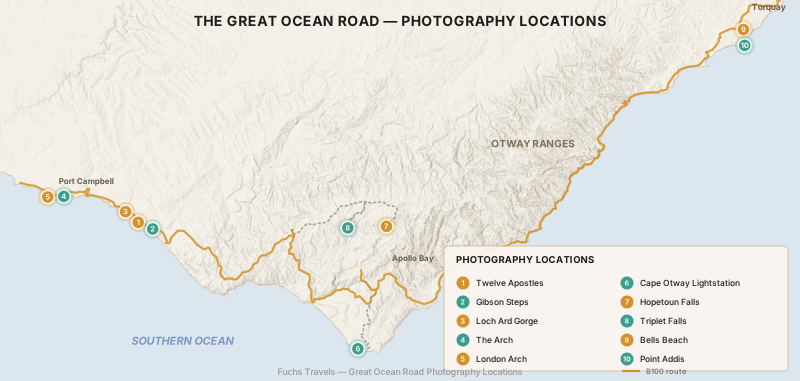
Getting the Coast Straight in Your Head
Before you plan a single sunrise, fix the geography, because the light guidance flows entirely from it. The Great Ocean Road runs broadly east–west. The whole coast faces south, into the Southern Ocean. That single fact governs everything: the sun rises out of the sea to your left as you look at the water and sets into the sea to your right, and at the height of summer it does both well to the south of due east and west. Sea stacks that sit to the west of a lookout are lit warmly and frontally at sunrise; the same stacks are backlit, thrown into silhouette against the sun, at sunset. Getting this backwards is the single most common way visitors waste a morning.
The corridor divides cleanly into three photographic regions, and this guide follows them from the marquee west end back toward Melbourne:
| Region | What it is | Signature light |
|---|---|---|
| Port Campbell coast | Limestone stacks, gorges and arches on open cliffs | Sunrise and sunset both work; wind and swell are the variables |
| Great Otway National Park | Cool-temperate rainforest, waterfalls, a historic lighthouse | Overcast days; deep shade at midday is a gift here |
| Surf Coast (Torquay end) | Powerful reef breaks and coastal heath | Sunrise over the water; afternoon offshore winds |
The Port Campbell Coast: Limestone Theatre
Everything at the western end is made of the same soft Port Campbell limestone, and it is all, slowly, falling into the sea. That is not a metaphor — the stacks and arches you photograph are geologically temporary, and several have collapsed within living memory. Photograph them as the ephemeral things they are.
The Twelve Apostles
GPS: ●●.●●●●° S, ●●●.●●●●° E
Start with the honest truth the brochures skate over: there were never twelve. Nine stacks stood off this stretch of cliff when the site took its current name (it was called the Sow and Piglets before a 1920s rebrand). A fifty-metre stack collapsed in July 2005, leaving eight. Another fell in 2009. Seven remain today, and depending on where you stand on the main platform you can usually pick out six or seven of them. Do not go hunting for a twelfth; go for the light.
The main viewing area sits on the cliff top, reached by a pedestrian underpass from the visitor centre car park on the inland side of the road. Best light: sunrise is the connoisseur’s choice — the rising sun to the east rakes warm light across the faces of the western stacks, the crowds are a fraction of the evening mob, and the sky over the ocean holds soft pastels. Sunset is the postcard: the sun drops into the sea beside the main cluster, rimming the stacks with fire, but you are shooting straight into the light and sharing a narrow boardwalk with three hundred people and a forest of selfie sticks. Shoot both if you can; they are different photographs.
Key compositions: the classic frame gathers the western group with the cliff and its little pocket beach on the right. Use the coastal heath and eroded foreground rock as a base for the wideangle. For something less photographed, isolate a single stack with a 70–200mm and let it sit small in a big minimalist sea. Technique: a polariser cuts the glare off the wet limestone and deepens the turquoise shallows, but wind it back — full polarisation at this angle kills the sheen that makes the rock glow. A 6-stop ND at either end of the day drags the shutter to a second or two and turns the messy swell into moving texture.
Gibson Steps
GPS: ●●.●●●●° S, ●●●.●●●●° E
A short walk east of the Apostles, a steep staircase cut into the cliff (originally hewn by a nineteenth-century landholder, Hugh Gibson) drops you onto the beach at the foot of the walls. This is the only place on this stretch where you can stand at sea level beneath the cliffs and shoot the stacks — locally called Gog and Magog — towering above you. The change in scale is the whole point: from the clifftop the Apostles are scenery; from the beach they are cathedral.
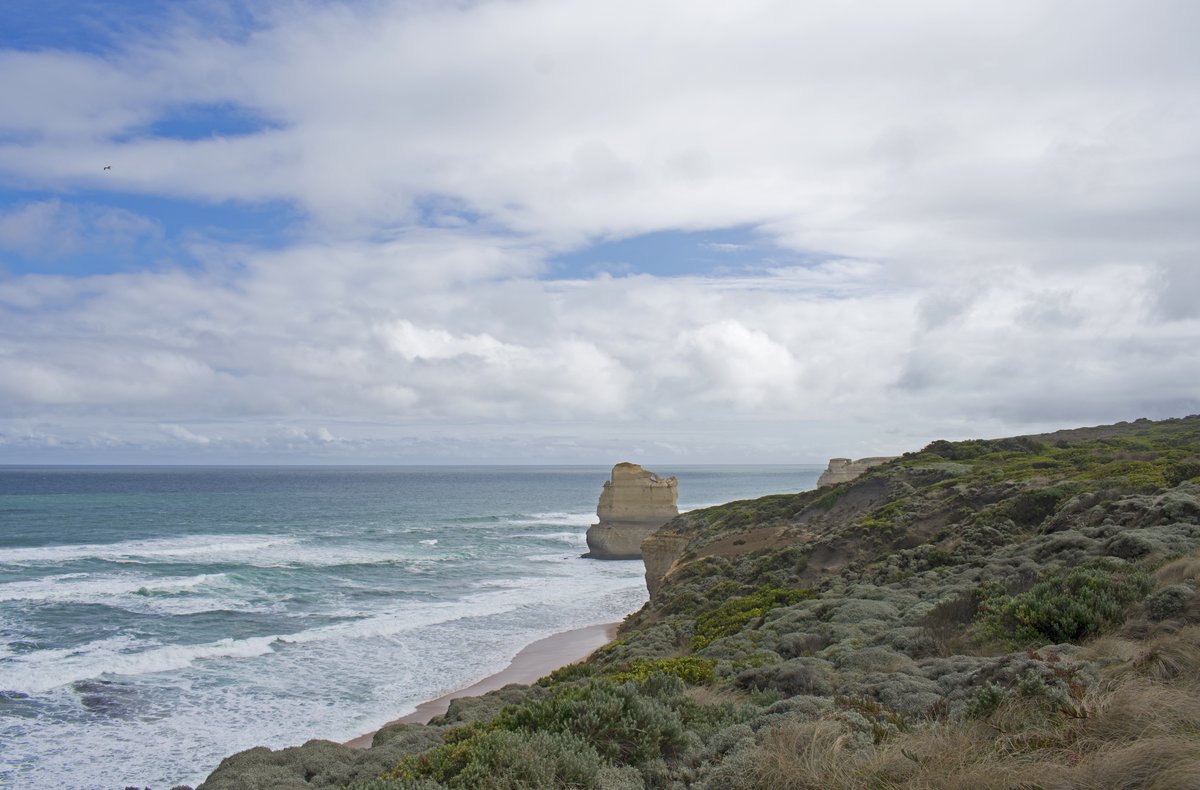
Beach level at Gibson Steps — the only vantage where the stacks loom over you rather than sit below you. Photo: Ymblanter / Wikimedia Commons (CC BY-SA 4.0)
This beach is dangerous and you must respect it. At high tide, or in any significant swell, the sand disappears entirely and the sea reaches the base of the cliff — people have been trapped and swept off here. Check the tide chart before you descend and shoot the low-tide window. Best light: low sun from the east at sunrise skims along the beach and lights the stack faces; the wet sand at low tide becomes a mirror for the sky. Key compositions: use the receding wave wash as a leading line straight to the base of the stack, and time your shutter (around 1/2 to 1 second) so the backwash draws silver streaks toward the camera. Keep your tripod feet out of the salt water and clean your front element obsessively — the spray here coats everything in minutes.
Loch Ard Gorge
GPS: ●●.●●●●° S, ●●●.●●●●° E
A few minutes further west, Loch Ard Gorge is the emotional heart of the Shipwreck Coast. It is named for the iron clipper Loch Ard, which struck a reef off Mutton Bird Island in fog on 1 June 1878, at the end of a three-month voyage from England. Of the fifty-four people aboard, two survived: apprentice Tom Pearce, who clung to an upturned lifeboat, and passenger Eva Carmichael, who held to floating wreckage for hours before Pearce swam back out and dragged her into the narrow gorge. Both were nineteen. They never married, whatever the Victorian newspapers hoped; Eva returned to Ireland. You are photographing a graveyard as much as a landform, and it shows in the light.
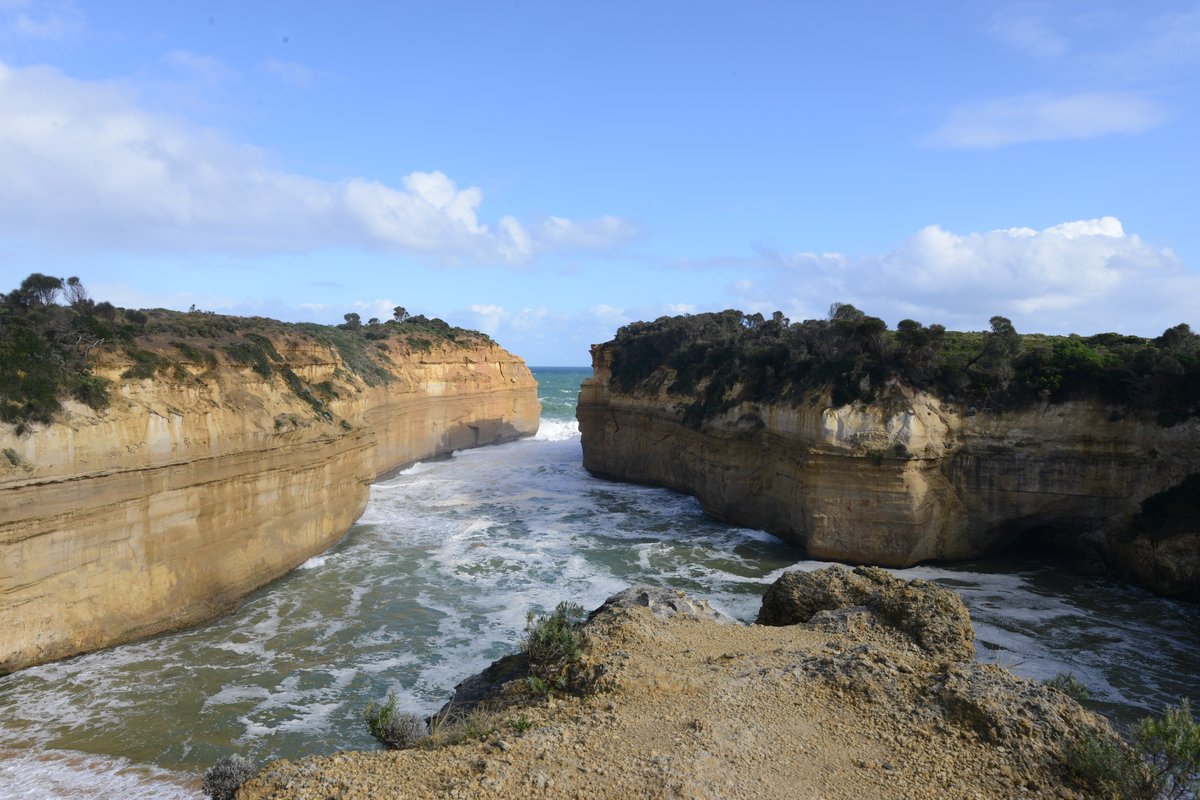
Loch Ard Gorge — sheer walls funnel the swell into a slot of turquoise. The enclosed beach where the two survivors came ashore sits at the head of the inlet. Photo: Jorge Láscar / Wikimedia Commons (CC BY 2.0)
Best light: the gorge is a deep, sheltered slot, so it holds shade for much of the day; early and late light reaches down the walls and warms the limestone. Overcast days are genuinely better here — flat light lets the turquoise water and cream rock carry the frame without blown highlights. Key compositions: shoot from the clifftop lookout down the length of the gorge to the beach, using the converging walls as natural leading lines; then take the staircase down and work from beach level with a wideangle, letting an incoming wave fill the foreground. The nearby Razorback and the collapsed Island Archway (its span fell in 2009) reward a wander along the clifftop circuit. Technique: a graduated ND helps balance the bright sea-mouth against the shaded walls; bracket three frames if the dynamic range beats your sensor.
The Arch and London Arch
GPS: ●●.●●●●° S, ●●●.●●●●° E
Continue west toward Peterborough for two of the coast’s best arches. The Arch is a clean limestone span jutting off a headland, easily seen from a short clifftop path.
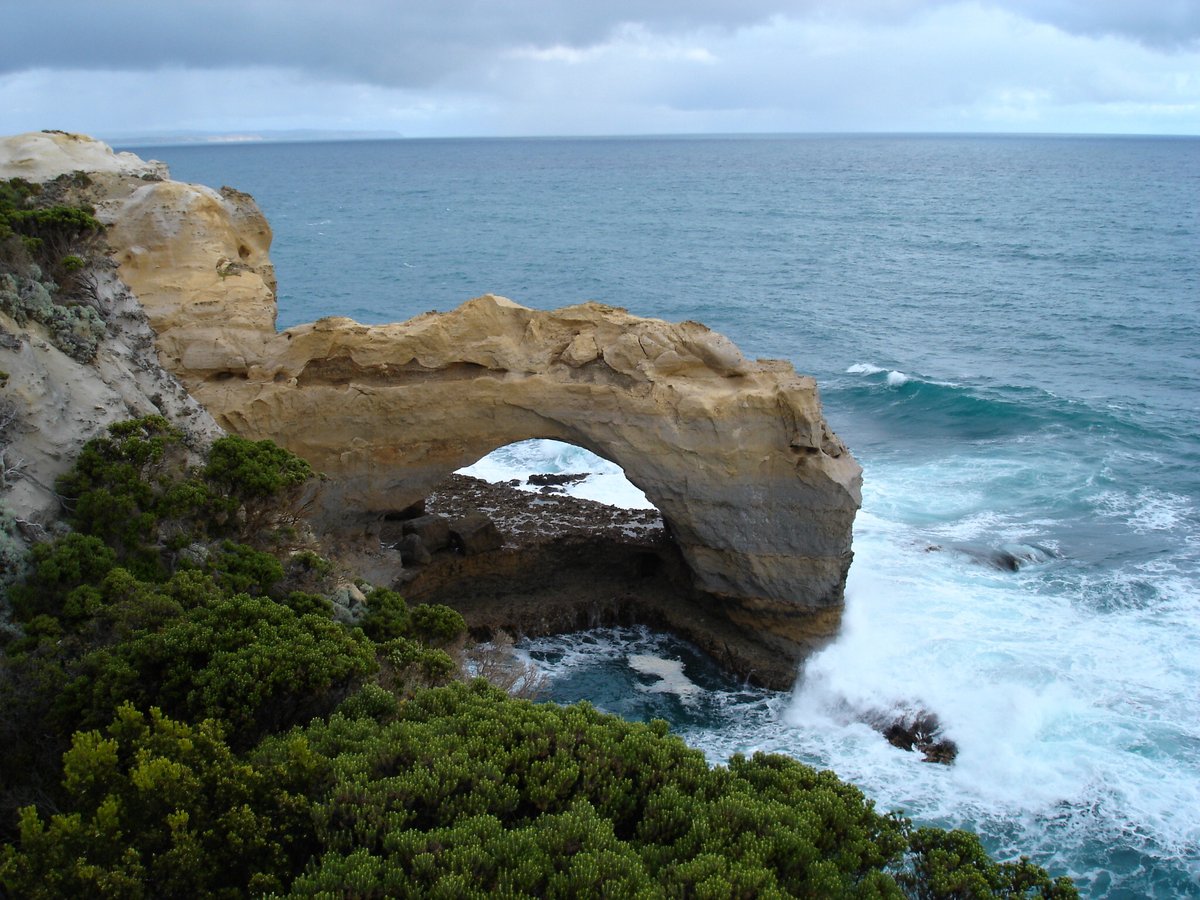
The Arch near Peterborough — a compact, graphic subject that suits a longer lens and a moody sky. Photo: Pavel Špindler / Wikimedia Commons (CC BY 3.0)
A little further sits London Arch, and its story is a lesson in why you photograph these formations now rather than later.
London Arch
GPS: ●●.●●●●° S, ●●●.●●●●° E
Until 1990 this was a double-span formation joined to the mainland, and everyone called it London Bridge. On the evening of Monday 15 January 1990 the shoreward span collapsed without warning, stranding two visitors on the newly created island — they were lifted off by police helicopter, unharmed, and the landmark was quietly renamed London Arch. What remains is a handsome offshore double arch marooned in turquoise water.
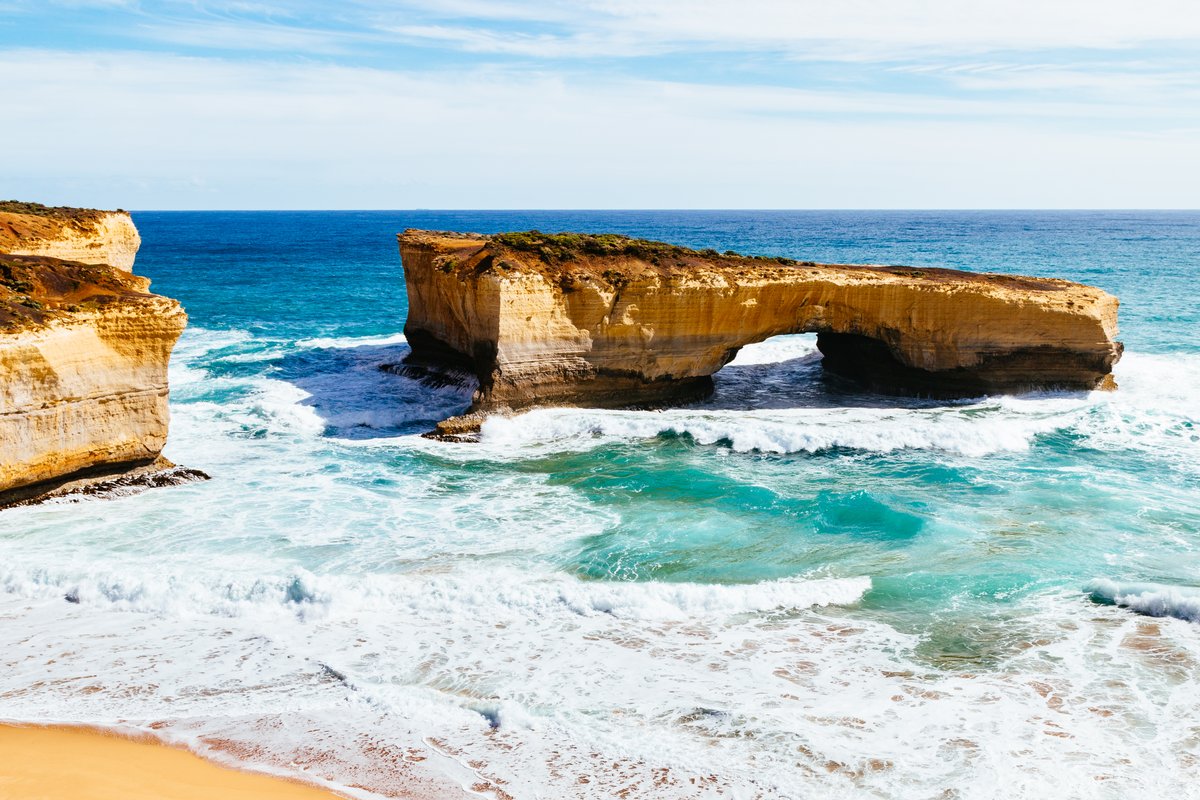
London Arch — the shoreward span collapsed in 1990, cutting the “bridge” off from the mainland. Bright side light and a polariser make the water glow. Photo: Stefan Schäfer, Lich / Wikimedia Commons (CC BY-SA 4.0)
Best light: this stretch faces south with a slight western aspect, so late-afternoon side light models the arch beautifully and warms the water. Key compositions: place the arch against the clean horizon with the surf line as your only other element — it is a subject that rewards restraint. A telephoto compresses the two spans; a wideangle from the western end of the lookout brings the pocket beach into the frame. Technique: mid-morning to early afternoon actually suits the turquoise water here, when the high sun lets you see into the shallows.
Great Otway National Park: The Green Interior
Turn inland and the coast’s hard geometry gives way to something completely different: Victoria’s wettest country, a cool-temperate rainforest of mountain ash, myrtle beech and tree ferns, threaded with waterfalls. If the Apostles demand a clear dawn, the Otways reward exactly the days that ruin coastal shooting — grey, drizzling, and windless.
Cape Otway Lightstation
GPS: ●●.●●●●° S, ●●●.●●●●° E
At the southern tip of the ranges, where Bass Strait meets the Southern Ocean over some of the most dangerous water in Australia, stands the Cape Otway Light — first lit in 1848 and the oldest surviving lighthouse on mainland Australia. It guided ships through the “eye of the needle” between the cape and King Island for nearly a century and a half before it was decommissioned in 1994; its light once sat 73 metres above the sea.
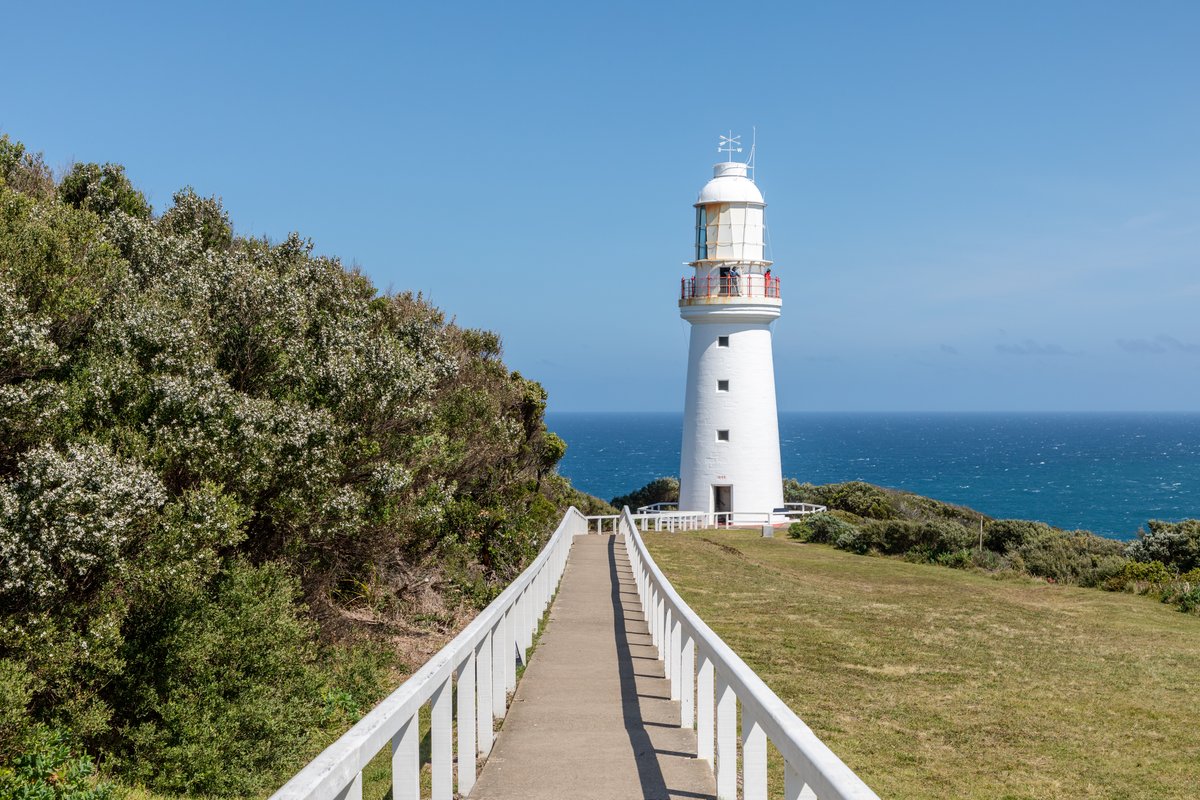
Cape Otway Light, first lit in 1848 — the oldest surviving lighthouse on the Australian mainland. The walkway makes an obvious leading line to the tower. Photo: Dietmar Rabich / Wikimedia Commons (CC BY-SA 4.0)
Best light: the white tower reads cleanly against blue sky in the afternoon, but overcast light suits the weathered stone quarters and the bleak, wind-bent heath. Key compositions: use the walkway and low stone walls as leading lines to the tower; climb to the balcony for the cliff-edge outlook west. The lightstation is a private reserve with an entry fee — check current hours and pricing before you drive the long spur road out. The drive itself is the bonus: Lighthouse Road is one of the most reliable places in Australia to find wild koalas in the roadside manna gums. Pull over safely, use a 100–400mm, and never bait or crowd them.
Hopetoun Falls and Triplet Falls
GPS: ●●.●●●●° S, ●●●.●●●●° E
Near Beech Forest, a cluster of waterfalls sits within a short drive of one another. Hopetoun Falls drops around thirty metres into a fern-choked amphitheatre, reached by a steep staircase to a viewing platform near the base — the classic Otways rainforest waterfall.
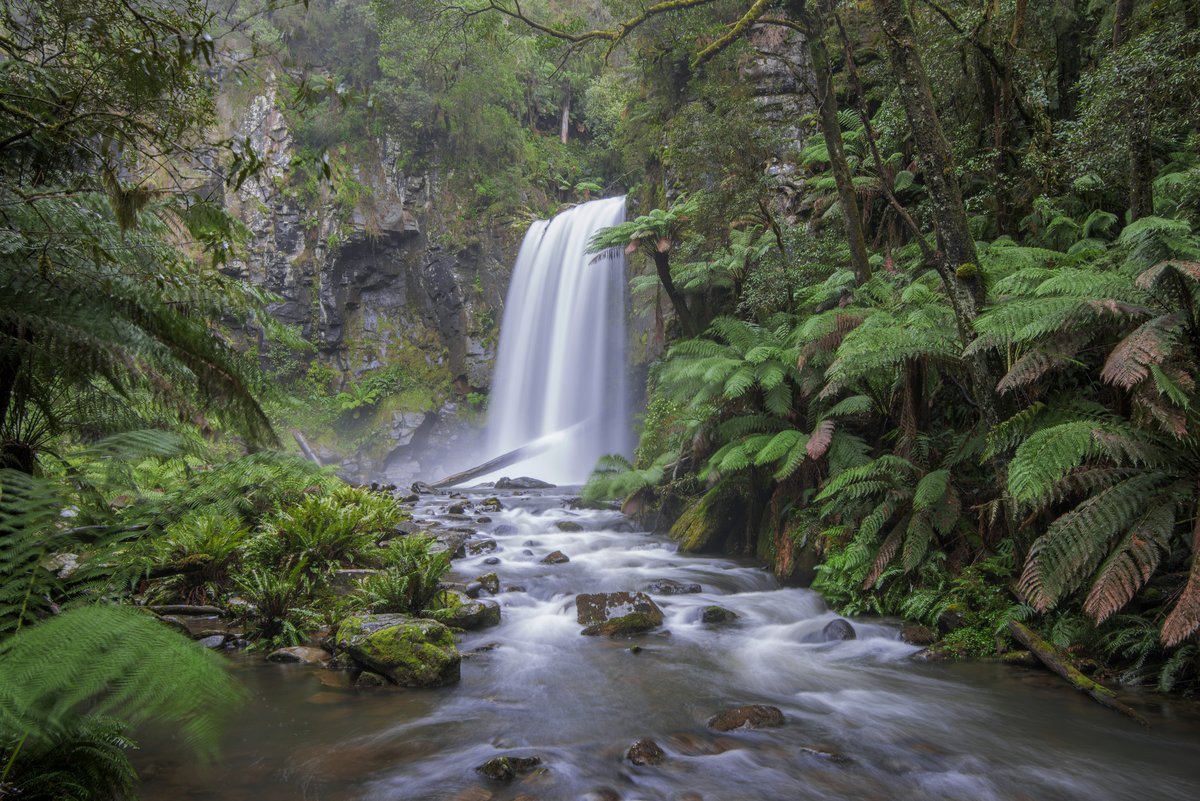
Hopetoun Falls on an overcast, windless morning — the only conditions that let a multi-second exposure work in a rainforest. Photo: Lenny K Photography / Wikimedia Commons (CC BY 2.0)
Triplet Falls, a little to the west, is a three-tiered cascade on a well-built loop walk through some of the mossiest forest on the coast.
Triplet Falls
GPS: ●●.●●●●° S, ●●●.●●●●° E
Best light: never shoot these in sunshine. A bright day throws dappled hotspots through the canopy that no amount of editing will rescue. Wait for overcast, or shoot early and late when the gully is in full shade. Drizzle is ideal — it saturates the greens and keeps the ferns glistening. Technique: this is long-exposure country. Screw on a polariser (it kills the glare on wet leaves and rock, which is worth more here than the shutter drag) and let the shutter run one to four seconds to silk the water while keeping the ferns crisp — so pick a windless moment. A 6-stop ND buys you those seconds even in daylight. Bring a microfibre cloth and check your front element between every frame; rainforest spray is relentless. Key compositions: use the stream and mossy boulders in the foreground as a leading line into the fall, and resist the urge to zoom in — the setting is the subject.
Fifteen minutes away, in the Aire Valley near Beech Forest, a plantation of Californian redwoods planted in the 1930s has grown into a cathedral of dead-straight trunks over a fern understorey — an eerie, quiet grove that photographs like nowhere else on the coast.
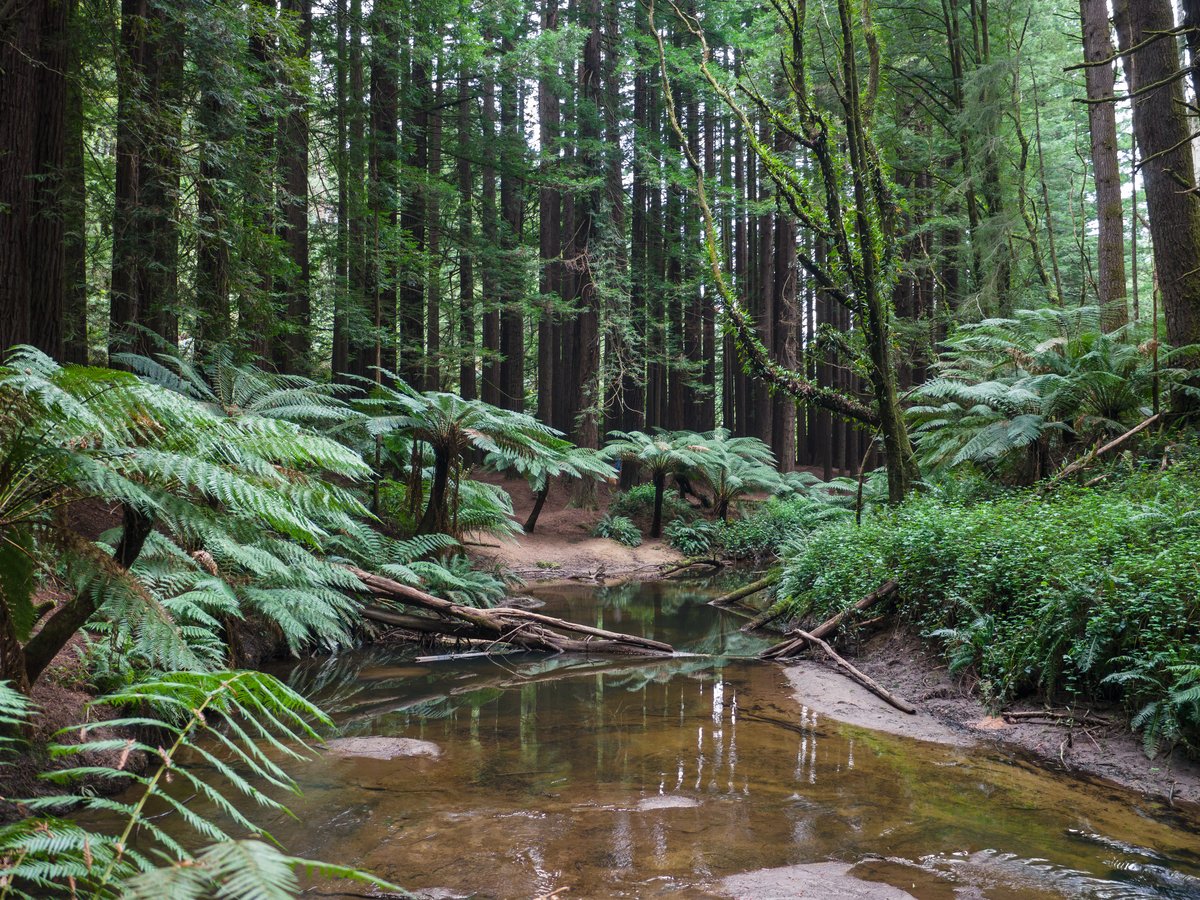
The Aire Valley redwoods near Beech Forest — planted in the 1930s, now a silent grove of vertical lines. Overcast light and a creek foreground hold the frame together. Photo: Faj2323 / Wikimedia Commons (CC BY-SA 4.0)
The Surf Coast: Where the Road Begins
At the eastern, Melbourne end, the road opens with the Surf Coast — lower cliffs, coastal heath, and the reef breaks that made this stretch famous.
Bells Beach
GPS: ●●.●●●●° S, ●●●.●●●●° E
Bells is a Surfing Recreation Reserve and the spiritual home of Australian surfing: the powerful right-hand reef break has hosted the Rip Curl Pro at Easter every year since 1962, the longest continuously running professional surfing contest in the world. For a photographer it is less about the beach and more about the water — a long lens trained on the lineup during a solid swell will out-earn any landscape frame here.
Best light: the amphitheatre of eroded cliffs faces roughly south-southwest, so morning light comes across the break cleanly and afternoon light backlights the spray. Key compositions: shoot from the clifftop viewing terraces with a 100–400mm (or longer) to fill the frame with a surfer on a wave face; for the wider story, a slow shutter at dawn blurs the sets rolling onto the reef. Technique: for surf action, prioritise shutter speed — 1/1000s and up to freeze spray, continuous autofocus, and a fast burst. If the Rip Curl Pro is on (check the exact Easter dates), expect crowds and shoot the trials earlier in the week.
Point Addis
GPS: ●●.●●●●° S, ●●●.●●●●° E
Just west, Point Addis is a broad headland dropping to a wide surf beach within a marine national park, with a Koorie cultural walk (the Ironbark Basin trail) threading the heath behind it.
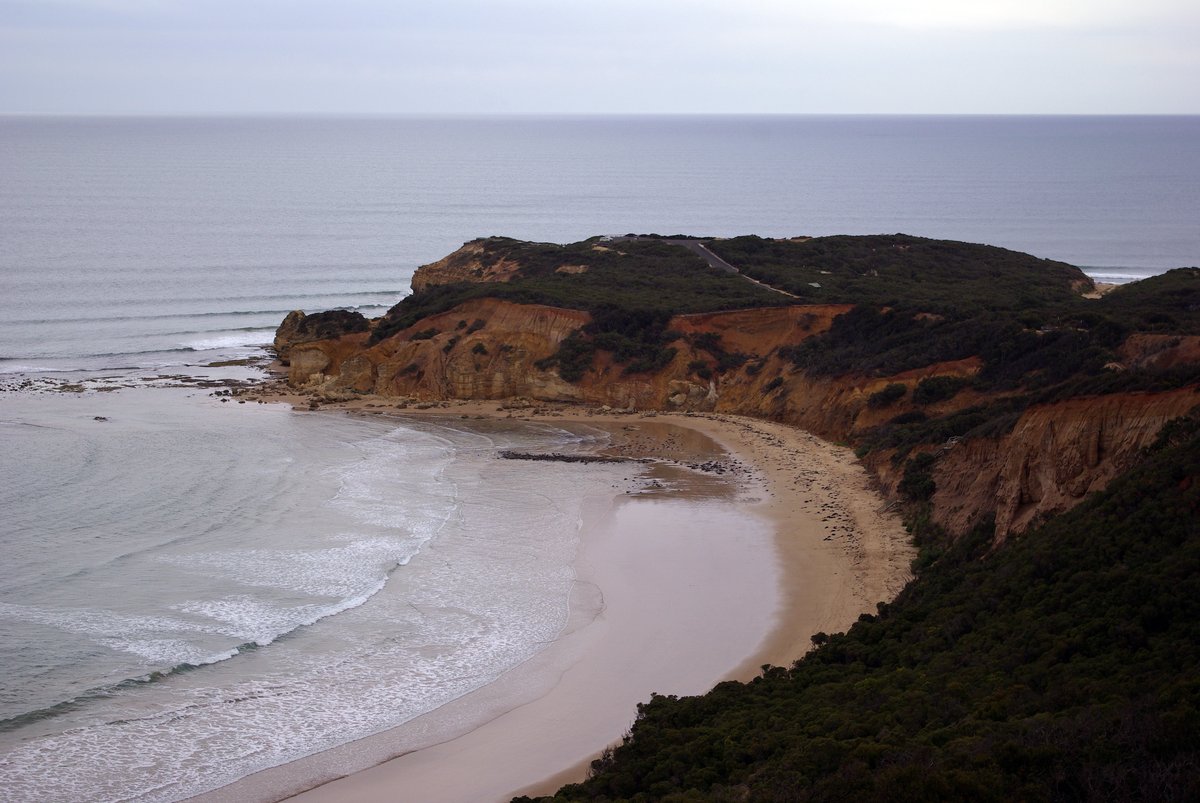
Point Addis — layered ochre cliffs and a sweeping beach mark the eastern gateway to the coast. Soft overcast light suits the muted palette. Photo: Stephen Bain / Wikimedia Commons (CC BY-SA 3.0)
Best light: the lookout faces broadly south over the beach, so sunrise throws warm light along the cliffs and low sun rakes texture across the ochre strata. Key compositions: use the curving beach and the layered cliff bands as leading lines; a longer lens isolates the geometry of the eroded headland. This is the quiet alternative to Bells — you will often have the lookout to yourself.
When to Go: The Seasonal Calendar
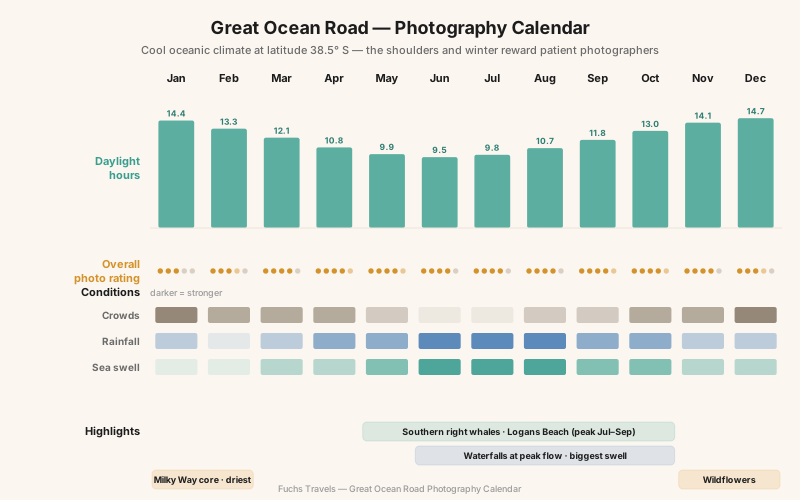
Southern Victoria has a cool oceanic climate, and the coast’s mood swings hard with the seasons. The counter-intuitive lesson is that the “best” months for weather are not the best months for photography. Summer brings reliable blue skies, long days and warm nights — and harsh midday light, peak crowds, and school holidays that clog every car park. The shoulders and winter, when most visitors stay home, hand the patient photographer dramatic seas, full waterfalls, whales, and empty boardwalks.
| Season | Months | Character | Photographer’s verdict |
|---|---|---|---|
| Summer | Dec–Feb | Warm, driest, up to ~14h50m daylight; peak crowds, harsh light | Best for astro and long days; shoot dawn only |
| Autumn | Mar–May | Mild, settling weather, thinning crowds | The sweet spot — calm mornings, good light |
| Winter | Jun–Aug | Cool, wettest, big swell, ~9h35m daylight; storms, whales | Most dramatic seas and fullest waterfalls; dress for it |
| Spring | Sep–Nov | Waterfalls full, wildflowers, whales tailing off | Excellent all-rounder, variable weather |
Two seasonal events are worth planning a trip around. From late May to early October — with the peak from July to September — southern right whales return to calve at Logans Beach near Warrnambool, at the western end of the coast, often within a hundred metres of the shore in water only five to ten metres deep. And in winter, the Southern Ocean throws its biggest swells against the Port Campbell cliffs, producing the exploding-surf drama that a calm summer sea can never give you. If you want the coast at its most cinematic, go in July and accept that you will get wet.
The Technical Deep-Dive: Photographing the Sea
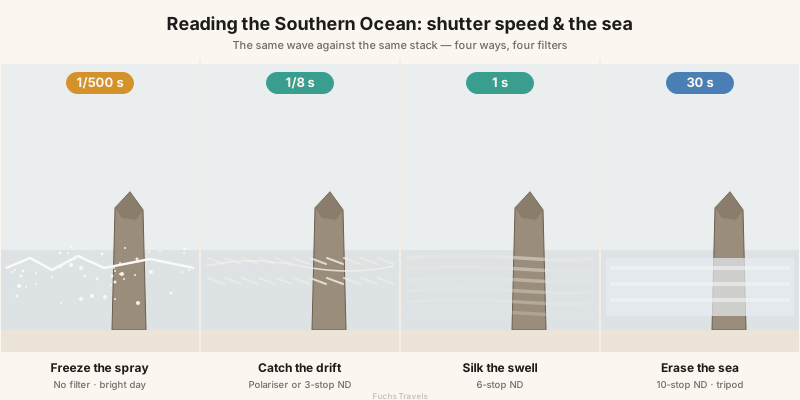
The one skill that separates a snapshot of the Apostles from a photograph of them is understanding how shutter speed renders moving water. There is no single “correct” setting — the sea gives you a different picture at every shutter speed, and choosing deliberately is the whole game.
| Shutter speed | Water becomes | Use it for | Filter |
|---|---|---|---|
| 1/500s and faster | Frozen spray, crisp droplets | Storm surf, exploding waves on the stacks | None |
| 1/8 – 1/2s | Directional streaks in the wash | Wave backwash as leading lines on a beach | Polariser or 3-stop ND |
| 1 – 4s | Silky drift, soft foam trails | The classic Apostles clifftop swell | 6-stop ND |
| 20 – 60s | Misty, near-flat, ethereal | Minimalist stack studies, moody dusk | 10-stop ND, tripod essential |
Commit to a look before you set up, not after. For a dramatic winter frame of surf detonating on a stack, go fast and freeze the violence. For the serene dawn postcard, load a 6-stop ND and let the swell smear to silk. The mistake is to shoot everything at 1/60s, which renders the sea as neither frozen nor smooth — just messy.
Two more coast-specific disciplines matter. Meter for the highlights: the wet limestone and backlit spray are the brightest things in the frame, and if you blow them there is no recovery. Expose to protect the whites and lift the shadows in post. Guard against salt and wind: the onshore wind that makes these seascapes dramatic also coats your front element in salt haze within minutes and shakes a lightweight tripod into blur. Bring a solid tripod, hang your bag from the centre column, shoot between gusts, and carry twice the lens cloths you think you need.
“Light makes photography. Embrace light. Admire it. Love it. But above all, know light. Know it for all you are worth, and you will know the key to photography.” — George Eastman
Drones: Know the Law Before You Fly
This section will disappoint many readers, so read it carefully. Recreational drone flight is banned outright on all Parks Victoria managed land, and that includes Port Campbell National Park and Great Otway National Park — which is to say the Twelve Apostles, Gibson Steps, Loch Ard Gorge, The Arch, London Arch, Cape Otway and every Otway waterfall in this guide. There is no recreational permit and no exception; visitors caught flying can be fined.
Commercial or professional filming is possible but demanding: you must be, or engage, a fully licensed and CASA-certified operator (even for sub-2kg drones), and Parks Victoria requires a filming-and-photography permit that takes a minimum of 20 business days to process. This is not something you arrange on the morning of your shoot.
If you are set on aerial frames, fly only outside park boundaries — some beaches and reserves along the corridor fall under local council rather than Parks Victoria control — and even then you remain bound by CASA’s national rules: stay below 120 metres, keep the aircraft in visual line of sight, stay 30 metres clear of people, and never fly over crowds. Regulations change, so confirm the current park boundaries and CASA rules before you travel; the safe assumption at the iconic sites is that the answer is no. Honestly, the coast’s clifftop lookouts already give you an aerial-like perspective — most of the “drone” shots you have admired from the Apostles were made from a helicopter under a commercial arrangement, not a hobby quadcopter.
Wildlife on the Coast
Beyond the whales at Logans Beach, the corridor is unusually rich for a landscape trip. Koalas doze in the manna gums along Cape Otway’s Lighthouse Road and at Kennett River. Kangaroos graze the fairways at Anglesea golf course at dawn and dusk. The Otway forests hide superb lyrebirds — you will hear them long before you see them — and the clifftop heath is alive with crimson rosellas and New Holland honeyeaters.
Photograph all of it ethically. Keep your distance, use a long lens rather than approaching, never feed or bait an animal for a frame (roadside koalas are wild, not props), and give nesting seabirds on the stacks a wide berth. The short-tailed shearwaters — mutton-birds — that nest on the islands off Loch Ard Gorge are a protected spectacle at dusk in the warmer months; watch, do not disturb.
Logistics and Planning
Getting there: the coast starts at Torquay, about a 90-minute drive southwest of Melbourne. The full run to Port Campbell is around four hours without stops, but nobody drives it that way — plan two or three days minimum. A car is essential; there is no practical public transport for photography. Drive the road west in the morning so the sea is on your left and you can pull into the clifftop lookouts (which are all on the ocean side) without crossing traffic.
Where to base yourself:
| Base | Best for | Notes |
|---|---|---|
| Apollo Bay | The Otways and central coast | Good midpoint; rainforest and Cape Otway within reach |
| Port Campbell | The Twelve Apostles at dawn | The only town at the icons — book early, stay here for sunrise |
| Lorne | The Surf Coast and eastern falls | Lively, closer to Melbourne |
| Torquay | Bells Beach and a short Melbourne hop | Surf-town base for the eastern end |
Rough daily costs (per person, 2026 indicative):
| Item | Budget | Mid-range |
|---|---|---|
| Accommodation | AUD 40–60 (hostel/campsite) | AUD 150–250 (motel/B&B) |
| Car hire + fuel | AUD 45–70/day shared | AUD 70–100/day |
| Food | AUD 30–45 | AUD 60–90 |
| Cape Otway Lightstation entry | — | AUD ~20 |
Australia’s national park entry is free at the coastal icons (there is no gate fee at the Twelve Apostles), so the main costs are the car, a bed, and fuel. Sunrise access is unrestricted — the lookouts are open around the clock — which is exactly why staying in Port Campbell the night before pays off. Check whether you need an Australian visa (an ETA or eVisitor for most nationalities) well ahead of travel.
Gear for the Coast
| Category | Recommendation | Why |
|---|---|---|
| Body | Weather-sealed mirrorless or DSLR | Salt spray and drizzle are constant |
| Wide lens | 16–35mm f/4 (or f/2.8) | Clifftop seascapes, foreground rock |
| Standard/tele zoom | 24–105mm and 100–400mm | Isolating stacks, surf action, koalas |
| Filters | Circular polariser, 6-stop and 10-stop ND, graduated ND | The core seascape toolkit |
| Support | Solid tripod with a hook for ballast | Onshore wind will shake anything light |
| Protection | Rain cover, a dozen lens cloths, blower | Salt haze coats the front element in minutes |
| Extras | Headlamp, tide app, gloves for winter | Pre-dawn scrambles and cold cliff-tops |
Michael Freeman’s The Photographer’s Eye is the book to reread before this trip — the coast is a masterclass in using the natural leading lines (wave wash, cliff bands, boardwalks) that his framework makes conscious. For the seascape long exposures, plan your shutter with an app like PhotoPills, and check swell and wind on a marine forecast the night before every coastal shoot.
Field Exercises
- The tide-and-wash study at Gibson Steps. On a falling tide, set up at beach level and shoot the same stack at 1/500s, 1/2s, and 2s. Compare how the wave backwash reads — frozen, streaked, silked — and decide which serves the mood. (Check the tide chart first; never do this on a rising tide.)
- Sunrise versus sunset at the Apostles. Photograph the western cluster at both ends of one day from the main platform. Study how the light direction flips the stacks from warmly frontlit to backlit silhouette, and note which you prefer and why.
- The rainforest windless minute at Hopetoun Falls. On an overcast day, wait for a genuinely still moment, then make a 2-second exposure with a polariser. The water should silk while every fern stays razor-crisp — if the ferns blur, the air moved, and you try again.
- A single-stack minimalist frame. Using a 70–200mm or longer and a 10-stop ND, make one 30-second exposure that reduces the sea to mist and leaves a lone Apostle floating in near-empty space. Restraint is the exercise.
- The clifftop leading line. At Loch Ard Gorge, compose a frame where the converging gorge walls carry the eye all the way to the enclosed beach, with nothing in the picture that does not serve that line.
The Long View
The Great Ocean Road is not a single photograph; it is a negotiation with a coast that is quite literally coming apart. The stacks you frame at dawn are shorter than they were a century ago, an arch that stood in 1989 was an island by 1990, and the sea that gives you your silky long exposures is the same sea methodically dismantling the subject. That impermanence is the coast’s great gift to a photographer — it turns a tourist checklist into something urgent. You are not documenting a monument; you are catching a moment in a slow collapse.
So plan around the calendar rather than fighting it. Take the grey days into the Otways and the clear dawns to the cliffs. Learn which way the coast faces and let that decide your alarm. And when you are standing alone on the Gibson Steps beach before sunrise, salt on your lens and the whole Southern Ocean turning gold in front of you, remember that the extraordinary part was never guaranteed — you earned it by being there, awake, ready, when the light arrived.
Plan the trip — Compare Australia month by month in the Seasons Planner, and read the Complete Guide to Long Exposure before you shoot the seascapes.